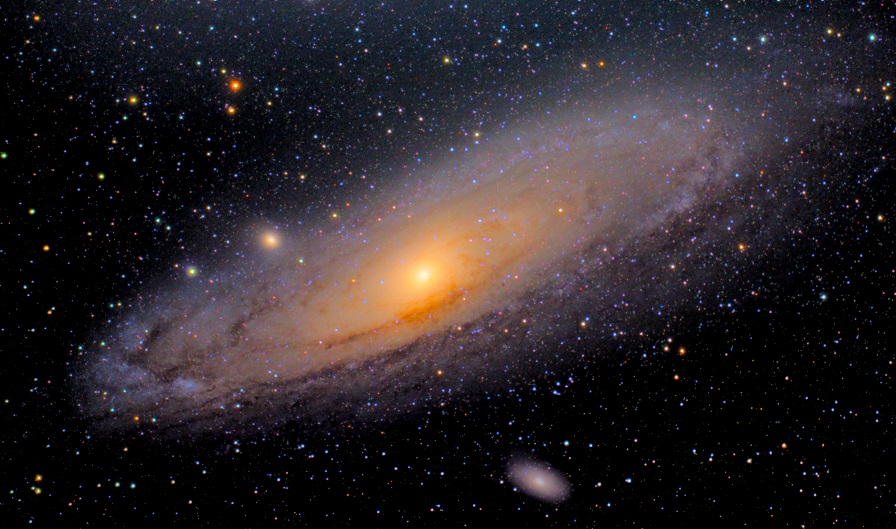
Image Processing M31 with Star Tools involves enhancing the Andromeda Galaxy’s images using specialized software. Star Tools offers advanced features for astrophotography enthusiasts.
Astrophotography is a captivating hobby that allows enthusiasts to capture stunning images of celestial objects. The Andromeda Galaxy, also known as M31, is one of the most popular targets for amateur astronomers. Using Star Tools, a powerful image processing software, you can significantly enhance your photos of M31.
This software provides advanced features like noise reduction, color calibration, and detail enhancement. These tools help bring out intricate details and vivid colors in your astrophotography. Whether you are a beginner or an experienced photographer, Star Tools can elevate your images of the Andromeda Galaxy.
Capturing The Andromeda Galaxy
The Andromeda Galaxy, also known as M31, is a stunning sight. Capturing its beauty requires the right equipment and settings. This guide will help you photograph this distant wonder.
Choosing The Right Equipment
To capture the Andromeda Galaxy, you need a good telescope. A telescope with a focal length of 600-800mm works well. You will also need a camera. DSLR or mirrorless cameras are excellent choices. They offer high resolution and sensitivity.
A sturdy tripod is necessary. It keeps the camera stable. Stability is vital for clear images. You should also use a star tracker. It helps follow the galaxy as Earth rotates. This ensures long exposures without blurring.
Optimal Settings For Deep Sky Imaging
Setting up your camera correctly is crucial. Use a low ISO setting, like 100 or 200. This reduces noise in the images. Set the aperture to f/4 or f/5.6. This allows enough light to enter without overexposing.
Long exposure times are essential. Start with 30-second exposures. Use the star tracker to keep the galaxy in view. If the images are still too dark, increase the exposure time. A good starting point is between 1 to 2 minutes.
Here is a quick reference table for your settings:
| Setting | Recommended Value |
|---|---|
| ISO | 100-200 |
| Aperture | f/4 – f/5.6 |
| Exposure Time | 30 seconds – 2 minutes |
Lastly, use a remote shutter release. This prevents camera shake during long exposures. With these settings, you can capture the Andromeda Galaxy in all its glory.
Preprocessing Astrophotography Data
Astrophotography is a challenging yet rewarding hobby. Capturing stunning images of celestial objects like the M31 galaxy requires proper preprocessing. Preprocessing astrophotography data helps in reducing noise and enhancing the quality of the final image. This process involves several steps, including calibration frames and stacking images.
Calibration Frames Essentials
Calibration frames are critical in astrophotography. They help remove unwanted artifacts from images. There are three types of calibration frames:
- Bias Frames: These capture sensor noise without any exposure.
- Dark Frames: These capture thermal noise by taking images with the same exposure time as the light frames but with the lens cap on.
- Flat Frames: These correct for vignetting and dust by capturing a uniformly illuminated field.
Taking proper calibration frames ensures the accuracy of your data. It improves the final image quality significantly. Always take multiple calibration frames for better results.
Stacking Images For Noise Reduction
Stacking images is essential for reducing noise in astrophotography. It involves combining multiple images to improve the signal-to-noise ratio. Here are the steps for stacking images:
- Take multiple exposures of the same object.
- Use software like Star Tools to align the images.
- Combine the aligned images to create a single, noise-reduced image.
Stacking images enhances the details and clarity of your astrophotographs. It allows you to capture faint objects more clearly. Always use a stable mount to avoid blurring during exposures.
Preprocessing astrophotography data is crucial for obtaining high-quality images. By using calibration frames and stacking images, you can significantly improve your astrophotography results.
Introduction To Star Tools
Star Tools is a powerful image processing software designed for astrophotography. It offers advanced tools for enhancing astronomical images. This software simplifies complex tasks, making it accessible for beginners.
Software Capabilities
Star Tools boasts a range of impressive features. These include:
- Noise reduction: Minimize noise in your images for a clearer view.
- Detail enhancement: Sharpen and reveal finer details.
- Color correction: Adjust colors for a more accurate representation.
- Deconvolution: Improve image resolution by reversing optical distortions.
- Tracking: Maintain the integrity of your data throughout the editing process.
Navigating The User Interface
The user interface of Star Tools is intuitive and user-friendly. Here’s a simple guide:
- Main Toolbar: Access essential tools and settings.
- Image Workspace: View and edit your images here.
- Modules: Use specific modules for various tasks like noise reduction and color correction.
- History: Track and undo changes with ease.
| Section | Function |
|---|---|
| Main Toolbar | Access essential tools and settings |
| Image Workspace | View and edit your images |
| Modules | Use specific tools for different tasks |
| History | Track and undo changes |
With these features, Star Tools makes image processing simple and effective. It allows both beginners and experts to enhance their astrophotography.
Credit: www.cloudynights.com
Initial Steps In Star Tools
Embarking on the journey of image processing M31 with Star Tools is exciting. Star Tools offers powerful features to enhance your astrophotography. Here, we guide you through the initial steps.
Importing Data
To begin, you must import your data into Star Tools. Follow these steps:
- Open Star Tools software.
- Click on the Open button in the main menu.
- Select your image file. Supported formats include FITS, TIFF, and JPEG.
- Click OK to load your image.
Ensure your image is calibrated. Calibrated images yield the best results. This includes dark frames, bias frames, and flat frames.
Setting Up For M31
Once your data is imported, you need to set up for processing M31.
Follow these steps for an optimal setup:
- Navigate to the Bin module. This helps reduce noise and speed up processing.
- Set the binning factor to 50%. This is a good starting point.
- Next, go to the Crop module. Crop unnecessary borders from your image.
- Ensure your image is centered on M31.
After cropping, head to the Wipe module. This removes gradients and light pollution:
- Select Gradient in the Wipe module.
- Click Do to apply the gradient removal.
- Inspect your image. Ensure all gradients are removed.
Now, your image is ready for further enhancements. Continue exploring Star Tools for more advanced features.
Noise Reduction Techniques
Noise reduction is crucial in image processing. It helps improve the quality of your images. In astrophotography, noise can obscure details and reduce clarity. Using effective techniques can make a big difference. Two popular methods include wavelet denoising and managing background noise.
Using Wavelet Denoise
Wavelet denoise is a powerful technique. It helps reduce noise while preserving details. Star Tools offers a user-friendly way to apply this method. Follow these steps to use wavelet denoise:
- Open your image in Star Tools.
- Navigate to the ‘Noise Reduction’ module.
- Select ‘Wavelet Denoise’.
- Adjust the settings as needed.
- Apply the changes and save your image.
Wavelet denoise works by breaking down the image into different frequency layers. It then reduces noise in those layers without affecting important details. This technique is great for astrophotography because it keeps stars and other celestial objects clear.
Dealing With Background Noise
Background noise can be a big problem in astrophotography. It can make your images look grainy or blurry. Star Tools provides tools to manage background noise effectively. Here’s how to deal with background noise:
- Open your image in Star Tools.
- Go to the ‘Background’ module.
- Select ‘Background Noise Reduction’.
- Use the sliders to adjust the noise levels.
- Apply the changes and save your image.
Reducing background noise helps bring out the main subjects in your image. It makes the stars and galaxies stand out more. This technique is essential for clean and sharp astrophotography images.
| Technique | Benefits |
|---|---|
| Wavelet Denoise | Reduces noise while keeping details |
| Background Noise Reduction | Reduces graininess and blurriness |

Credit: m.youtube.com
Color Calibration For Accurate Representation
Accurate color calibration is essential in image processing of M31 with Star Tools. Proper color calibration ensures the celestial images look realistic. This step helps in achieving true-to-life colors, making astronomical observations more meaningful.
Understanding Color Profiles
Color profiles define how colors appear on different devices. These profiles help in maintaining consistent colors across various platforms. In image processing, it’s crucial to use a standardized color profile.
- sRGB: Standard for web and most consumer devices.
- Adobe RGB: Preferred for professional photography and printing.
- ProPhoto RGB: Used for high-end image processing.
Choosing the right color profile ensures that your processed image retains its intended colors. This step is vital for accurate color representation in M31 images.
Balancing The Histogram
A balanced histogram is key to achieving accurate colors in your image. The histogram shows the distribution of brightness levels in your image.
- Open your image in Star Tools.
- Navigate to the histogram tool.
- Adjust the levels to balance the histogram.
A well-balanced histogram helps in reducing color casts and enhancing image clarity. This step ensures that the colors in your M31 image are true to life.
| Color Profile | Usage |
|---|---|
| sRGB | Web and consumer devices |
| Adobe RGB | Professional photography |
| ProPhoto RGB | High-end processing |
Using the right color profile and balancing the histogram ensures accurate color calibration. This practice leads to realistic and stunning images of M31.
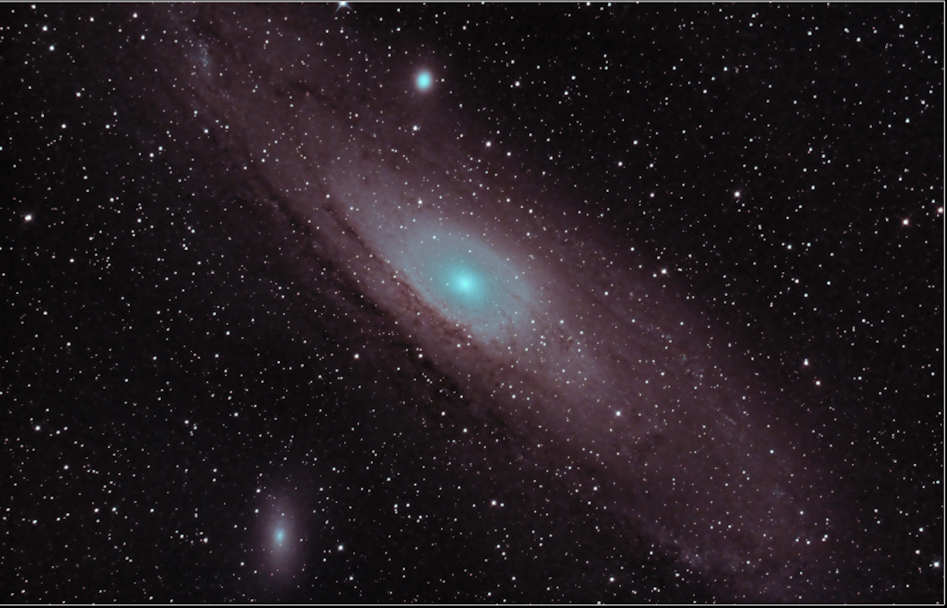
Detail Enhancement In M31
The Andromeda Galaxy, also known as M31, is a stunning celestial object. Enhancing its details can reveal amazing structures. Using Star Tools, we can bring out the hidden beauty of M31. This section explores techniques for detail enhancement.
Sharpening The Core
The core of M31 is bright and dense. Sharpening the core helps reveal fine details. Follow these steps to achieve core sharpening:
- Open your image in Star Tools.
- Navigate to the Sharpness module.
- Adjust the Amount slider to increase sharpness.
- Use the Mask tool to apply sharpening selectively.
These steps will make the core stand out. It will look sharper and clearer.
Bringing Out Spiral Structures
M31’s spiral arms are full of stars and dust. Enhancing these structures can be tricky but rewarding. Here’s how to bring out the spiral structures:
- Navigate to the Detail module in Star Tools.
- Use the Wavelet function to enhance fine details.
- Adjust the Layer sliders to target specific structures.
- Apply a Deconvolution filter to further enhance spiral arms.
These adjustments will highlight the spiral arms. You will see more intricate patterns and textures.
| Step | Action |
|---|---|
| 1 | Open image in Star Tools |
| 2 | Navigate to Sharpness module |
| 3 | Adjust Amount slider |
| 4 | Use Mask tool selectively |
| 5 | Navigate to Detail module |
| 6 | Use Wavelet function |
| 7 | Adjust Layer sliders |
| 8 | Apply Deconvolution filter |
Following these steps will transform your image of M31. The galaxy will look more vibrant and detailed.
Credit: www.cloudynights.com
Final Touches And Export
After processing the M31 image with Star Tools, it’s time for final touches and export. This stage ensures your image looks stunning and ready for presentation.
Dynamic Range Adjustment
Adjusting the dynamic range is essential to enhance image quality. This step involves tweaking highlights and shadows.
- Highlights: Increase to make bright areas stand out.
- Shadows: Decrease to darken the image’s dim parts.
A balanced dynamic range helps in highlighting the galaxy’s intricate details. Use the dynamic range tool in Star Tools for this purpose.
Preparing The Image For Presentation
Once the dynamic range is adjusted, prepare the image for presentation. This includes cropping, resizing, and adding final touches.
- Crop: Remove unnecessary parts to focus on M31.
- Resize: Adjust the image size for web or print.
- Sharpen: Enhance edges and details.
Use the tools in Star Tools to complete these tasks efficiently.
Exporting The Final Image
After final adjustments, export the image. Choose the right format based on the intended use.
| Format | Use |
|---|---|
| JPEG | Web and social media |
| TIFF | Print and high-quality storage |
In Star Tools, use the export option to save your final image in the desired format. This ensures your image is ready to share or print.
Frequently Asked Questions
How Do I Take A Star Picture With My Samsung M31?
To take star pictures with your Samsung M31, use the Pro mode. Adjust ISO to 800, set shutter speed to 10-30 seconds, and use a tripod for stability.
How To Process Andromeda In Siril?
To process Andromeda in Siril, load your image, perform background extraction, color calibration, and noise reduction. Finally, stretch and save your image.
What Is Star Tools For Image Processing?
Star Tools is a software suite designed for astrophotography image processing. It offers tools for enhancing, de-noising, and color-correcting astronomical images.
How Does Star Tools Enhance M31 Images?
Star Tools enhances M31 by optimizing contrast, sharpening details, and reducing noise. It ensures the galaxy’s features are more visible and vibrant.
Conclusion
Mastering image processing with Star Tools enhances your astrophotography skills. These tools simplify editing and reveal stunning details. Practice consistently for the best results. Unlock the full potential of your M31 images. Keep exploring and experimenting to achieve breathtaking astrophotography.
Happy stargazing!