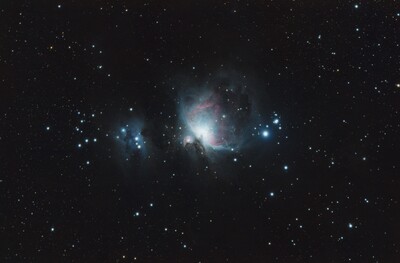
Image processing M42 with Star Tools enhances the details of the Orion Nebula. It provides stunning visuals through advanced image enhancements.
Star Tools is a powerful software designed for astrophotography enthusiasts. It simplifies the complex process of image enhancement and restoration. With Star Tools, users can bring out fine details in celestial objects like the Orion Nebula, also known as M42.
The software offers various modules that address noise reduction, sharpening, and color correction. This makes it easier for both beginners and experienced photographers to achieve professional-quality results. Star Tools leverages advanced algorithms to process raw astrophotography data, ensuring that the final image is both accurate and visually striking. Using this tool can significantly improve the quality of your astrophotography projects.

Credit: m.youtube.com
Introduction To Image Processing M42
The Introduction to Image Processing M42 opens up a fascinating world of astronomy. The M42, also known as the Orion Nebula, is one of the most observed and photographed objects in the night sky. With the right tools, you can enhance its beauty through image processing.
The Magic Of The Orion Nebula
The Orion Nebula, or M42, is a stellar nursery. It is about 1,344 light-years away from Earth. This nebula is visible to the naked eye in the constellation Orion. It’s a large cloud of gas and dust where new stars are born.
Within the nebula, bright young stars illuminate the surrounding gas. This creates a spectacular light show. The Orion Nebula is a popular target for both amateur and professional astronomers.
Star Tools: An Essential For Astronomers
Star Tools is a powerful software for astrophotography. It helps astronomers process images of celestial objects. This tool offers various features to improve image quality.
- Noise Reduction
- Detail Enhancement
- Color Calibration
- Deconvolution
- Star Masking
Star Tools simplifies complex image processing tasks. It provides an easy-to-use interface. Even beginners can achieve amazing results with it.
The software supports multiple file formats. It is compatible with many cameras and telescopes. Star Tools also offers tutorials and support for new users.
In summary, Star Tools is an essential aid for anyone interested in astrophotography. It unlocks the full potential of your images, revealing the hidden beauty of the universe.
Getting Started With Star Tools
Star Tools is a powerful software for image processing. It is especially great for processing astrophotography images, like M42. This guide will help you get started quickly with Star Tools.
Software Installation Basics
First, you need to install Star Tools on your computer. Follow these steps:
- Go to the Star Tools download page.
- Select the version for your operating system.
- Download the installer file.
- Run the installer and follow the on-screen instructions.
- Launch Star Tools from your desktop or start menu.
Importing Your M42 Images
After installation, you can import your M42 images for processing:
- Open Star Tools.
- Click on the File menu.
- Select Open and choose your M42 image file.
- Your image will appear in the main window.
You can now start processing your M42 image. Star Tools offers many powerful features to enhance your astrophotography.
Here are some basic tools you will use:
| Tool | Description |
|---|---|
| AutoDev | Automatically develops the image to bring out details. |
| Wipe | Removes gradients and vignetting from the image. |
| Decon | Improves sharpness and clarity. |
Get comfortable with these tools. Experiment to see how they affect your images. Happy processing!
Initial Adjustments Before Enhancing Stars
Before diving into the enhancement of stars in the M42 image, it’s crucial to make some initial adjustments. These adjustments lay the foundation for a stunning final image. Here, we focus on two critical steps: Setting the Right Exposure and Balancing Colors.
Setting The Right Exposure
Proper exposure is key to capturing the details in your M42 image. Follow these steps to set the correct exposure:
- Open your image in Star Tools.
- Navigate to the ‘Develop’ module.
- Adjust the exposure slider until the stars are bright but not overexposed.
Use the histogram to ensure you have a good range of tones. Avoid clipping highlights and shadows. This balance will help in preserving the details in the nebula and stars.
Balancing Colors
Color balance is essential for a natural-looking image. Here’s how you can balance colors effectively:
- Go to the ‘Color’ module in Star Tools.
- Select the ‘White Balance’ option.
- Use the color sliders to adjust the red, green, and blue channels.
Ensure the colors look natural and not too saturated. You can use the ‘Auto Color Balance’ feature for quick adjustments. Fine-tune the colors manually if needed. This step ensures that your stars and nebula have the right hues.
Below is a table summarizing the initial adjustments:
| Adjustment | Steps |
|---|---|
| Setting the Right Exposure |
|
| Balancing Colors |
|
Core Steps To Enhance Stars In M42
Enhancing stars in the M42 nebula is an essential task in astrophotography. This process brings out the beauty of the stars and makes the image more captivating. Below, we will outline the core steps to achieve this using Star Tools.
Star Mask Creation
Creating a star mask is the first crucial step. This mask isolates the stars from the rest of the image. Follow these steps:
- Open your image in Star Tools.
- Navigate to the Mask menu.
- Select the Auto option to let the software detect stars.
- Adjust the sensitivity to capture all stars.
- Manually add or remove stars using the Add and Remove tools.
Ensure the mask accurately covers all stars for better results.
Applying Star Enhancement Modules
With the star mask ready, proceed to enhance the stars. Use the following modules:
- StarShrink: Reduce star bloating for sharper stars. Access this in the Develop menu.
- Saturate: Increase star color intensity. Locate this in the Color menu.
- Deconvolution: Sharpen star edges. Find this in the Sharp menu.
Each module has sliders for fine-tuning. Adjust these sliders to achieve the desired effect. Save your progress frequently to avoid losing work.
| Module | Function | Location |
|---|---|---|
| StarShrink | Reduce star bloating | Develop Menu |
| Saturate | Increase star color | Color Menu |
| Deconvolution | Sharpen star edges | Sharp Menu |
By following these core steps, you will enhance the stars in your M42 image. Use Star Tools effectively to bring out the best in your astrophotography.
Advanced Techniques For Star Enhancement
Image processing M42 with Star Tools can transform your astrophotography. Advanced techniques for star enhancement can bring out stellar beauty. Let’s dive into two key methods: Layer Masking for Precision and Color Grading the Stellar Bodies.
Layer Masking For Precision
Layer masking allows for precise star enhancement. It helps in isolating stars from the background. Here’s how you can use layer masking effectively:
- Create a new layer for the star field.
- Use a mask to isolate the stars.
- Adjust the mask to refine edges for better precision.
This technique ensures you enhance only the stars, not the background. It makes the stars pop and appear more vibrant.
Color Grading The Stellar Bodies
Color grading can make your stars look stunning. Follow these steps to achieve the best results:
- Select the star layer for color grading.
- Use color balance tools to adjust hues.
- Enhance the saturation to make stars more vivid.
Color grading can give each star a unique look. This makes your image more dynamic and engaging.
By using these advanced techniques, your M42 images will shine. Layer masking and color grading are essential for star enhancement. Keep practicing to achieve stunning results.
Noise Reduction And Artifact Removal
Image Processing M42 with Star Tools offers powerful noise reduction and artifact removal features. These tools help enhance the quality of your astronomical images. They make it easier to spot details in the night sky. Below, we explore two key aspects: Dealing with Image Noise and Removing Unwanted Artifacts.
Dealing With Image Noise
Image noise can ruin the clarity of your photos. To tackle this, Star Tools provides several methods:
- Noise Reduction Filters: These filters smooth out noisy pixels.
- Adaptive Noise Control: This tool adjusts noise reduction based on the image.
- Layer-Based Processing: Apply noise reduction to specific image layers only.
Using these tools, you can achieve a cleaner image. This makes it easier to see stars and celestial objects.
Removing Unwanted Artifacts
Artifacts are visual errors in your images. These can appear as streaks or spots. Star Tools offers effective solutions:
- Artifact Masking: Use masks to isolate and remove artifacts.
- Healing Tools: These tools fill in gaps left by removed artifacts.
- Edge Correction: Fix distorted edges caused by artifacts.
With these methods, you can clean up your images. This helps highlight true celestial features without distractions.
Here’s a quick comparison of the tools:
| Tool | Function |
|---|---|
| Noise Reduction Filters | Smooth out noisy pixels |
| Adaptive Noise Control | Adjust noise reduction based on image |
| Layer-Based Processing | Apply noise reduction to specific layers |
| Artifact Masking | Isolate and remove artifacts |
| Healing Tools | Fill gaps left by removed artifacts |
| Edge Correction | Fix distorted edges |
These features make Star Tools a valuable asset for astronomers. They ensure your images are clear and accurate.
Final Touches To Your M42 Masterpiece
After capturing the breathtaking details of the M42 nebula, the final steps are crucial. They can transform a good image into a stunning masterpiece. In this section, we focus on the finishing touches to elevate your M42 image using Star Tools.
Contrast Adjustments
Contrast adjustments are essential for enhancing the depth and clarity of your image. Increasing contrast can make the stars and nebula stand out more vividly.
- Open the Contrast module in Star Tools.
- Adjust the sliders to find the perfect balance.
- Check the histogram to avoid clipping highlights or shadows.
Use small steps to avoid over-processing. Aim for a natural, yet dramatic look.
Sharpening The Details
Sharpening is the key to making fine details pop. This step can reveal intricate structures within the nebula.
- Navigate to the Sharpen module.
- Choose a moderate sharpening level to start.
- Zoom in to inspect the effects on star edges and nebula details.
Over-sharpening can introduce noise. Carefully find the balance that enhances details without degrading image quality.
| Adjustment | Effect |
|---|---|
| Contrast | Increases depth and highlights key features |
| Sharpening | Brings out fine details and textures |
By carefully adjusting contrast and sharpening, your M42 image will achieve a professional and stunning appearance. Remember, the goal is to enhance without overdoing it. With these final touches, your M42 masterpiece will truly shine.
Credit: www.cloudynights.com
Comparing Before And After
Image Processing M42 with Star Tools allows you to enhance your astrophotography. Comparing before and after images shows the impact of your editing. This helps you understand what changes improve the final result.
Evaluating Your Processing Work
Evaluating your processing work is crucial. It helps you see improvements clearly. Make sure to save the original image before you start editing.
Here are some steps to evaluate your work:
- Open both the original and edited images side by side.
- Look at the details in both images.
- Focus on the clarity of stars and other celestial objects.
Use these steps to ensure your edits enhance the image quality. This comparison makes it easy to spot areas needing further adjustments.
Learning From The Editing Process
Learning from the editing process helps you improve over time. Keep a record of the changes you make. This can guide you in future edits.
Consider these tips for learning:
- Take notes of each editing step.
- Compare the results with your notes.
- Adjust your techniques based on what you observe.
Here’s a simple table to track your editing steps:
| Step | Description | Result |
|---|---|---|
| 1 | Adjust Brightness | Improved star visibility |
| 2 | Reduce Noise | Cleaner background |
Using this table helps you understand what each change does. Over time, you will get better at making the right adjustments.
Image Processing M42 with Star Tools becomes easier with these methods. Continue learning and comparing to achieve stunning astrophotography results.
Sharing And Preserving Your Processed Image
After processing your stunning image of M42 with Star Tools, it’s important to share and preserve it properly. This ensures that your hard work is appreciated and saved for future reference.
Best Formats For Image Saving
Choosing the right format for saving your processed image is crucial. Here are the best formats:
| Format | Advantages | Disadvantages |
|---|---|---|
| TIFF | High quality, lossless | Large file size |
| JPEG | Smaller size, widely supported | Lossy compression |
| PNG | Lossless, supports transparency | Larger than JPEG |
Sharing Tips For Astronomy Communities
Sharing your processed image with astronomy communities can be very rewarding. Follow these tips to get the best feedback and visibility:
- Join relevant forums: Find and join forums dedicated to astrophotography.
- Use descriptive titles: Title your post clearly, e.g., “M42 Processed with Star Tools.”
- Share your settings: Include details about your equipment and processing steps.
- Engage with comments: Respond to feedback and questions to build connections.
By following these tips, you can ensure your image gets the attention it deserves. Happy sharing!
Continuing Your Journey In Astrophotography
Astrophotography is a fascinating hobby. Image Processing M42 with Star Tools offers endless opportunities for exploration. As you advance, you will learn new skills and techniques. This section will help you take your astrophotography journey to the next level.
Further Resources For Learning
Learning never stops in astrophotography. Here are some resources to help you grow:
- Books: “Astrophotography” by Thierry Legault, “The Deep-sky Imaging Primer” by Charles Bracken
- Websites: Cloudy Nights, Astrophotography.app
- Forums: Reddit’s Astrophotography community, Stargazers Lounge
- Online Courses: Udemy’s Astrophotography classes, Coursera’s Space Photography courses
Upgrading Your Astrophotography Toolkit
As you become more skilled, you might want to upgrade your toolkit. Here are some recommendations:
| Equipment | Purpose | Recommended Models |
|---|---|---|
| Telescope | Capture clearer images | Celestron NexStar, Orion SkyQuest |
| Camera | Higher resolution photos | Canon EOS Ra, Nikon D850 |
| Mount | Stable and accurate tracking | Sky-Watcher EQ6, iOptron CEM60 |
Software also plays a crucial role. Consider adding these tools to your software collection:
- PixInsight: Advanced image processing
- DeepSkyStacker: Stacking multiple exposures
- Photoshop: Final touch-ups and enhancements
Remember, upgrading your toolkit can significantly improve your results.
Credit: www.startools.org
Frequently Asked Questions
What Is The Easiest Nebula To Photograph?
The Orion Nebula is the easiest nebula to photograph. It is bright, large, and visible with basic equipment.
Can You Photograph The Orion Nebula?
Yes, you can photograph the Orion Nebula. Use a telescope and a camera with long exposure settings for best results.
What Is The Best Focal Length For Orion Nebula?
A focal length between 400mm and 800mm is ideal for capturing the Orion Nebula. This range offers a good balance of detail and field of view.
Where Is The Orion Nebula?
The Orion Nebula is located in the constellation Orion. It lies about 1,344 light-years from Earth. This nebula is visible to the naked eye and is one of the brightest nebulae in the night sky.
Conclusion
Mastering image processing of M42 with Star Tools opens up a universe of possibilities. This software enhances your astrophotography with precision. Experiment with its features for the best results. Share your stunning images and inspire fellow astrophotographers. Dive deep into the cosmos, and let Star Tools be your guide.
Happy stargazing!