To delete your Hostinger account, log in and navigate to the “Account” section, then click “Delete Account.” Follow the prompts to confirm.
Deleting your Hostinger account might be necessary for various reasons. You may have found a different hosting service that better suits your needs. Alternatively, you might be consolidating your online presence. Whatever your reason, Hostinger makes the process straightforward. Knowing how to delete your Hostinger account can save time and effort.
This guide will help you understand the steps involved. Always remember to back up any important data before proceeding. This ensures you don’t lose valuable information during the deletion process. By following these steps, you can efficiently manage your online accounts.
Preparation Steps
Before you proceed to delete your Hostinger account, it’s crucial to take a few preparation steps. These steps ensure that you don’t lose any vital information and that you are fully aware of your subscription details. Follow these steps carefully to have a smooth account deletion process.
Backup Your Data
Creating a backup of your data is essential. This step ensures you don’t lose any important files or information. Here’s how you can do it:
- Login to your Hostinger account.
- Navigate to your control panel.
- Click on File Manager.
- Select the files and databases you want to backup.
- Download the selected files to your local storage.
Keeping a backup will help you restore your data if needed. Make sure to store the backup in a secure location.
Review Subscription Details
Before deleting your account, review your subscription details. This step ensures there are no active subscriptions or pending payments. Follow these steps:
- Go to your Hostinger account dashboard.
- Click on Billing or Subscription tab.
- Check for any active subscriptions or pending payments.
- Cancel any active subscriptions if necessary.
Reviewing your subscription details will avoid unexpected charges. Make sure you have no pending invoices.
Accessing Your Account
Deleting your Hostinger account starts with accessing your account. This step is crucial. Ensure you have your login details ready. Follow the steps below to proceed.
Login To Hostinger
First, open your browser. Go to the Hostinger website. Click on the Login button at the top right corner.
Enter your email and password. Click on Sign In. This will take you to your Hostinger dashboard.
Navigate To Account Settings
Once logged in, find the Account Settings. It’s usually located in the upper right corner under your profile icon.
Click on the profile icon. A dropdown menu will appear. Select Account Settings from the list.
In the Account Settings, look for options related to account management. This is where you will find the option to delete your account.
Locating The Delete Option
Finding the delete option in Hostinger is straightforward. Follow these steps to ensure a smooth process. This guide will help you locate the necessary options with ease.
Find Account Management
First, log in to your Hostinger account. Once logged in, look for the profile icon at the top right corner of the dashboard. Click on it to reveal a dropdown menu.
From the dropdown menu, select Account Management. This section houses all essential account-related settings and options.
Spot The Delete Account Button
In the Account Management section, scroll down to find the Delete Account button. It is usually located at the bottom of the page.
Once you spot the button, click on it to proceed. A confirmation prompt will appear to ensure you want to delete your account.
| Step | Action |
|---|---|
| 1 | Log in to Hostinger account |
| 2 | Click on profile icon |
| 3 | Select Account Management |
| 4 | Scroll to find Delete Account button |
| 5 | Click the Delete Account button |
Follow these steps carefully to delete your Hostinger account successfully. Remember to back up any important data before proceeding.

Credit: m.youtube.com
Initiating The Deletion Process
Deleting your Hostinger account is a straightforward process. Ensure you follow the steps carefully. This section will guide you through the initial steps required.
Click Delete Account
First, log into your Hostinger dashboard. Locate the Account Settings section. Scroll down to find the Delete Account option. Click on it to proceed.
Make sure you have backed up all your data. Deleting the account will erase everything permanently.
Confirm Deletion Prompt
After clicking Delete Account, a confirmation prompt will appear. This prompt is crucial to prevent accidental deletions. Read the prompt carefully.
Click Confirm to proceed. Your account will then start the deletion process. This may take a few minutes.
Once confirmed, you will receive an email. This email will contain the final steps to complete the deletion.
Finalizing The Deletion
Deleting your Hostinger account requires several steps to ensure security. After requesting account deletion, you need to verify and complete some checks. This process ensures your data and account are securely handled.
Verify Email Confirmation
After initiating the account deletion, Hostinger sends you an email. Open this email to find a confirmation link. Click on this link to verify your deletion request.
Check your spam folder if you don’t see the email. The email verification step is crucial to prevent unauthorized deletions. Ensure you complete this step promptly.
Complete Security Checks
Once the email is verified, Hostinger asks for additional security checks. These checks may include entering your password again or answering security questions.
Make sure you have your security details handy. Completing these checks ensures that the account deletion request is legitimate. This step helps protect your account from unauthorized access.
| Step | Description |
|---|---|
| 1 | Verify Email Confirmation |
| 2 | Complete Security Checks |
Completing these steps finalizes your Hostinger account deletion. Ensure you have backed up any necessary data before you begin this process.
Credit: www.quora.com
Post-deletion Steps
Deleting your Hostinger account is just the first step. To ensure a smooth transition, follow these post-deletion steps. These actions will help you manage any residual effects from closing your account.
Remove Linked Services
After deleting your Hostinger account, remove any linked services. This ensures that no unwanted charges or security risks remain. Follow these steps:
- Check all email accounts for linked services.
- Update or delete any saved payment methods.
- Unlink your domain from any third-party services.
- Remove Hostinger integrations from any web apps.
Removing linked services helps protect your personal information.
Check Billing Statements
Check your billing statements to ensure no unexpected charges appear. Follow these steps to keep your finances secure:
- Review recent credit card statements.
- Check your PayPal account for Hostinger transactions.
- Ensure all pending invoices are resolved.
- Contact Hostinger support if any charges seem incorrect.
Regularly monitoring your billing statements can prevent financial surprises.
Handling Common Issues
Deleting your Hostinger account may seem simple, but issues can arise. This section covers common problems you might face and how to resolve them. It includes troubleshooting login problems and contacting support.
Troubleshooting Login Problems
If you can’t log in, start by checking your credentials. Ensure your email and password are correct. Sometimes, typos can cause login failures. If you’ve forgotten your password, use the ‘Forgot Password’ option.
- Go to the Hostinger login page.
- Click on the ‘Forgot Password’ link.
- Enter your registered email address.
- Check your email for the reset link.
Follow the instructions in the email to reset your password. If you don’t receive the email, check your spam folder.
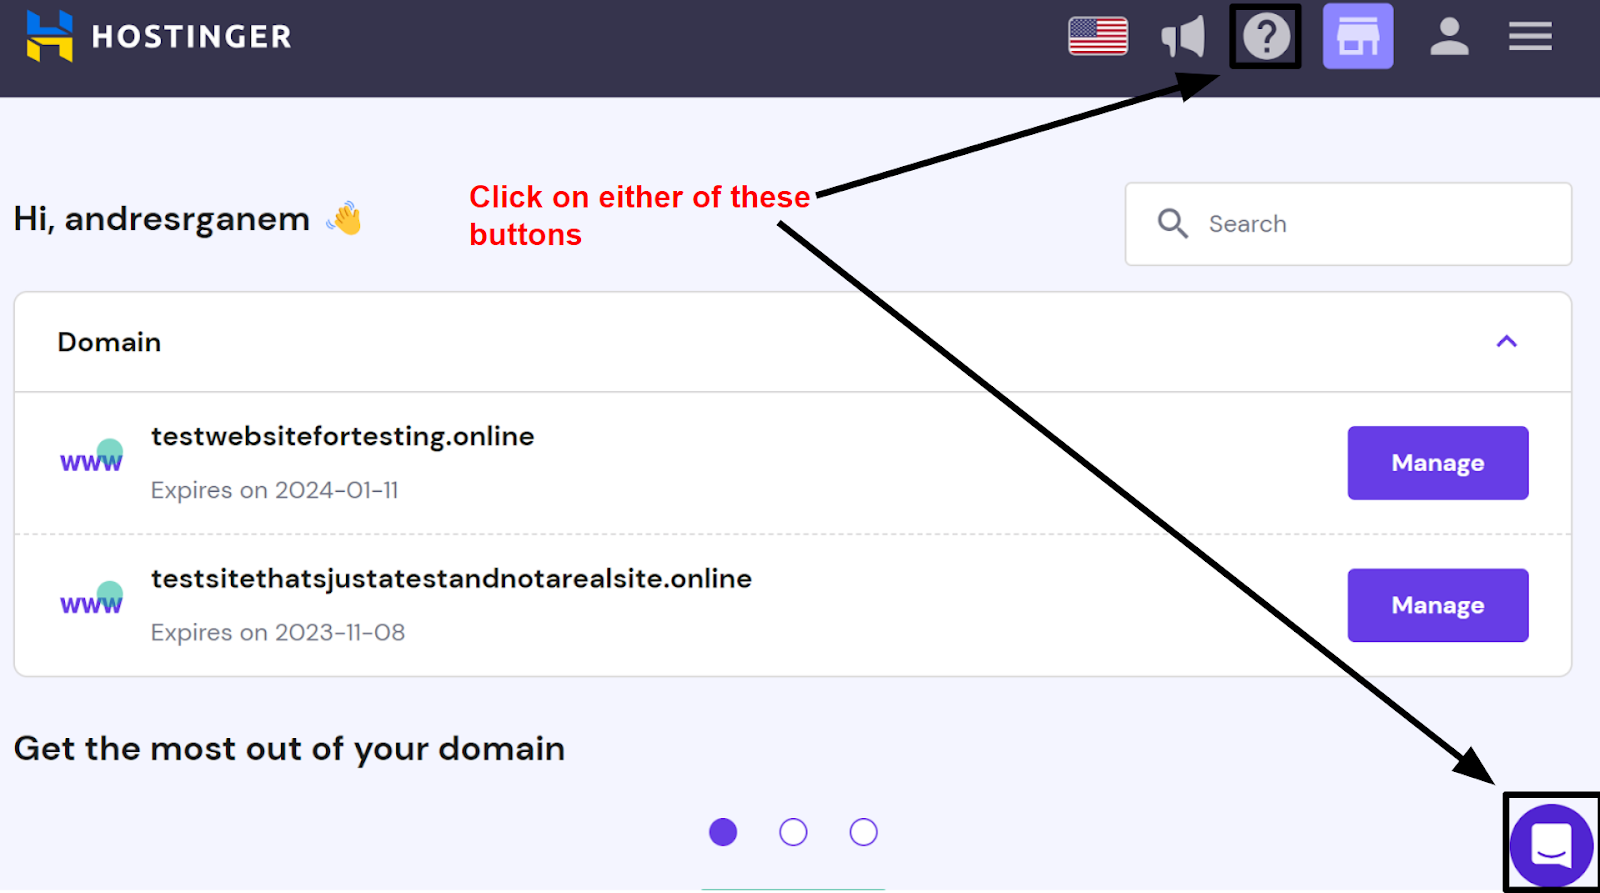
Contacting Support
If you still face issues, contacting Hostinger support can help. Their support team is available 24/7. Follow these steps:
- Log in to your Hostinger account.
- Click on the ‘Help’ button at the bottom right.
- Choose ‘Contact Us’.
- Fill out the form with your issue details.
- Submit the form.
You’ll receive a response from the support team soon. They will guide you through resolving your issue.
For quick help, you can also use their live chat feature. This option is available on the Hostinger website.
By following these steps, you can handle common issues effectively. This ensures a smooth process for deleting your Hostinger account.

Credit: www.youtube.com
Reactivating A Deleted Account
Sometimes you may need to reactivate your Hostinger account after deleting it. Understanding the reactivation process ensures you regain access to your services quickly. This guide will walk you through the necessary steps.
Understanding Reactivation Policies
Hostinger has specific policies for reactivating deleted accounts. Knowing these policies helps you understand the reactivation process better.
| Policy | Description |
|---|---|
| Time Frame | You can reactivate within 30 days of deletion. |
| Data Retention | Deleted data is stored for 30 days. |
| Support Contact | Contact support to initiate reactivation. |
Steps To Reactivate
Follow these steps to reactivate your Hostinger account:
- Log in to your Hostinger account using your credentials.
- Navigate to the Account Settings section.
- Select the Reactivate Account option.
- Fill out the necessary reactivation form.
- Submit the form and wait for confirmation.
- Check your email for a reactivation confirmation message.
- Follow the instructions in the email to complete the reactivation.
If you face issues, contact Hostinger customer support for help.
Frequently Asked Questions
How Do I Cancel My Hostinger?
Log in to your Hostinger account. Go to the “Billing” section. Click “Cancel Services. ” Confirm your cancellation request.
Can I Delete Domain Hostinger?
Yes, you can delete a domain from Hostinger. Go to the Domain section in your Hostinger account. Select the domain and choose the delete option.
How Do I Delete My Webhost Account?
Log in to your Webhost account. Go to the account settings. Locate the delete account option. Follow the prompts to confirm. Your account will be deleted.
How Do I Delete An Email Account On Hostinger?
To delete an email account on Hostinger, log into your hPanel. Go to the “Emails” section, select the account, and click “Delete. ” Confirm the action to complete the process.
Conclusion
Deleting your Hostinger account is simple with our step-by-step guide. Follow the instructions carefully, and you’ll complete the process effortlessly. Always back up important data before deleting your account. For more tips and guides, keep visiting our blog. Thank you for reading, and happy hosting!