
To make a domain in Hostinger, log in to your account and navigate to the “Domains” section. Select “Register a New Domain” and follow the prompts.
Registering a domain with Hostinger is a simple and efficient process, ideal for both beginners and experienced users. Hostinger provides an intuitive interface that makes domain registration straightforward. First, access the Hostinger control panel and head to the “Domains” section.
There, you can search for your desired domain name to check its availability. Once you find an available domain, select it and proceed to checkout. Hostinger offers various payment methods, ensuring flexibility and convenience. After payment, the domain is registered, and you can manage it directly from the Hostinger dashboard. This seamless process enables you to focus on building and growing your online presence.

Credit: m.youtube.com
Choosing A Domain Name
Choosing a domain name is a crucial step in establishing your online presence. A well-chosen domain name can make your website memorable and accessible. In this section, we will guide you through the process of selecting the perfect domain name for your site.
Brainstorming Ideas
Start by brainstorming ideas for your domain name. Think about your niche, your brand, and what you want to convey. Here are some tips to help you:
- Keep it short and simple.
- Make it easy to spell and pronounce.
- Avoid numbers and hyphens.
- Include keywords related to your business.
- Use a domain name generator for inspiration.
Checking Availability
Once you have a list of potential domain names, check their availability. Hostinger offers a domain checker tool that makes this process easy. Follow these steps:
- Go to Hostinger’s website.
- Navigate to the Domain Checker tool.
- Enter your desired domain name.
- Click on the Check button.
The tool will show you if the domain name is available. If not, it will suggest alternatives. Repeat this process until you find an available name that fits your needs.
After finding an available domain name, consider registering it immediately. Domain names can be snatched up quickly, so act fast!
Setting Up A Hostinger Account
Creating a Hostinger account is the first step to hosting a domain. Follow these simple steps to get started quickly and easily.
Creating An Account
Visit the Hostinger website. Click on the Sign Up button.
Fill in your email address and choose a strong password. Click on Create Account.
Alternatively, you can sign up using Google or Facebook. Just click the respective buttons.
| Sign Up Method | Steps |
|---|---|
|
|
| Google/Facebook |
|
Verifying Your Email
After creating your account, check your email inbox. Look for a verification email from Hostinger.
Open the email and click on the Verify Email button. This ensures your account is secure and ready for use.
If you don’t see the email, check your spam folder. Resend the verification email if needed.
Accessing The Domain Registration Page
Creating your domain in Hostinger is easy and quick. First, you need to access the domain registration page. Follow these steps to find the domain registration page on Hostinger’s platform.
Navigating The Dashboard
Once you log in to your Hostinger account, you will land on the dashboard. The dashboard is your control center for all activities. The interface is user-friendly and intuitive.
On the dashboard, you will see various options. These include hosting, domains, emails, and more. Ensure you are familiar with this interface, as you will use it often.
Locating The Domain Section
To find the domain section, look at the left-hand menu. This menu has several options, such as:
- Home
- Hosting
- Emails
- Domains
- Billing
Click on the Domains option. This will redirect you to the domain management page. Here, you can register a new domain or manage existing ones.
On the domain management page, you will see a search bar. Use this bar to check the availability of your desired domain. If available, proceed with the registration steps. This section also provides detailed information about your current domains.
Here’s a quick overview of the Domain Section options:
| Option | Description |
|---|---|
| New Domain | Register a new domain name. |
| My Domains | View and manage your existing domains. |
| Transfer Domain | Transfer an existing domain to Hostinger. |
By following these steps, you can easily access the domain registration page. Hostinger makes domain management straightforward and efficient.
Registering Your Domain
Registering your domain with Hostinger is a simple and crucial step. It’s the first move to establish your online presence. This guide will help you through the process.
Entering Domain Name
Begin by entering your desired domain name. This is the unique address people will use to find your site. Ensure your domain name is easy to spell and remember.
Follow these steps to enter your domain name:
- Go to Hostinger’s domain registration page.
- Type your desired domain name in the search box.
- Click the “Search” button to check its availability.
If the domain name is available, you can proceed. If not, try a different name or use suggested alternatives.
Selecting A Domain Extension
Next, select a domain extension. This is the suffix at the end of your domain name. Common extensions include .com, .net, and .org. Each extension serves different purposes.
Here’s a quick guide to domain extensions:
| Extension | Purpose |
|---|---|
| .com | Commercial and general use |
| .net | Network-related businesses |
| .org | Non-profits and organizations |
Choose an extension that best fits your website’s purpose. A .com extension is often the best choice for general use.
Once you have selected your domain name and extension, click “Add to Cart.” You are now ready to proceed to the checkout process.
Completing The Purchase
Completing the purchase of a domain on Hostinger is the final step. Follow these steps to finalize your domain purchase. It’s quick and easy!
Reviewing The Order
First, review your order details. Check the domain name you selected. Ensure it is spelled correctly.
Next, review the pricing details. Hostinger often provides discounts. Look for any applicable discount codes.
Here are some things to check:
- Domain name spelling
- Domain pricing
- Applied discounts
Making The Payment
After reviewing, proceed to payment. Hostinger offers several payment methods. Choose the one that suits you best.
Here are the available payment methods:
| Payment Method | Description |
|---|---|
| Credit/Debit Card | Fast and secure |
| PayPal | Convenient and popular |
| Bitcoin | For cryptocurrency users |
Enter your payment details carefully. Double-check for any errors. Once done, click the Confirm Payment button.
After payment, you will receive a confirmation email. This email includes your purchase details and domain information.
Your domain is now ready for use. You can start creating your website!

Credit: www.hostinger.com
Configuring Domain Settings
Configuring domain settings is crucial when setting up a domain on Hostinger. Proper configuration ensures your website runs smoothly and efficiently. This guide helps you manage DNS records and set up email forwarding.
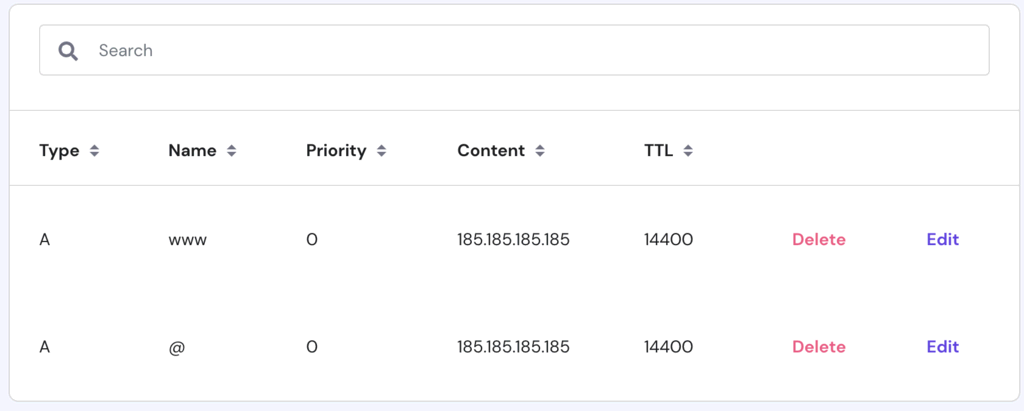
Managing Dns Records
DNS records are essential for domain configuration. They direct your domain to the correct IP address. To manage your DNS records in Hostinger, follow these steps:
- Log into your Hostinger account.
- Go to the Dashboard and select your domain.
- Click on the DNS Zone tab.
- Here, you can add, edit, or delete DNS records.
Common types of DNS records include:
- A Record: Points your domain to an IP address.
- CNAME Record: Redirects one domain to another domain.
- MX Record: Directs emails to your mail server.
Ensure your DNS records are correctly configured to avoid downtime.
Setting Up Email Forwarding
Email forwarding is useful to direct emails from one address to another. Follow these steps to set up email forwarding in Hostinger:
- Log into your Hostinger account.
- Navigate to the Email section.
- Select Email Forwarders.
- Click on Add Forwarder.
- Enter the email address to forward emails from.
- Enter the email address to forward emails to.
- Click Create to save the settings.
Now, emails sent to your domain email will be forwarded to the specified address.
Linking Domain To Hosting
Linking your domain to your hosting server is essential. It ensures your website is accessible online. Follow these steps to connect your domain with Hostinger hosting.
Pointing Domain To Server
First, log in to your Hostinger account. Go to the Domains section. Select the domain you want to link.
Next, find the DNS Settings. You need to change the Nameservers. Use the following Hostinger nameservers:
- ns1.dns-parking.com
- ns2.dns-parking.com
After updating the nameservers, save the changes. This process might take up to 48 hours to propagate.
Verifying Connection
Once you have pointed your domain, it’s time to verify the connection. Log in to your Hostinger account again.
Go to the Hosting section. Find your hosting plan and click Manage.
In the Domain tab, check if your domain appears connected. If not, repeat the steps above.
Use online tools like WhatsMyDNS to check DNS propagation status.
Once the domain is connected, your website will be live. You can now start building your website.
Renewing Your Domain
Renewing your domain is essential to keep your website active. If your domain expires, your site will be inaccessible. Hostinger provides simple ways to renew your domain. You can choose between auto-renewal or manual renewal.
Setting Up Auto-renewal
Auto-renewal ensures your domain never expires. You won’t need to remember renewal dates.
- Log in to your Hostinger account.
- Navigate to the Domains section.
- Click on Manage next to your domain.
- Find the Auto-Renewal option.
- Toggle the switch to Enable auto-renewal.
Auto-renewal will charge your card automatically. This ensures uninterrupted service.
Manual Renewal Process
Prefer to handle renewals yourself? Manual renewal is straightforward.
- Log in to your Hostinger account.
- Go to the Domains section.
- Click on Manage next to the domain you wish to renew.
- Select Renew Now.
- Choose the renewal period and proceed to payment.
Manual renewal lets you control the renewal period. It also allows you to update payment details as needed.
Troubleshooting Common Issues
Setting up a domain in Hostinger can be smooth. Yet, sometimes, issues arise. This section will help you troubleshoot common problems. Let’s get started!
Domain Not Found
Your domain might not be found for several reasons. Below are key points to check:
- Incorrect Domain Name: Double-check the spelling of your domain name.
- Domain Registration: Ensure your domain is registered and active.
- DNS Settings: Verify your DNS settings are correct in the Hostinger panel.
Dns Propagation Delay
DNS propagation can take time. This period is usually between 24-48 hours.
To check your DNS status, follow these steps:
- Access DNS Checker: Use an online DNS checker tool.
- Enter Domain: Input your domain name into the search box.
- Review Results: Check if the DNS records have propagated worldwide.
If propagation takes longer, contact Hostinger support for help.
Credit: www.hostinger.com
Frequently Asked Questions
How Much Does A Domain Cost In Hostinger?
Domain prices at Hostinger start at $0. 99 for the first year. Prices vary based on the domain extension.
How Do I Point A Domain To The Hostinger Website Builder?
To point a domain to the Hostinger website builder, update your domain’s DNS settings. Set the A record to Hostinger’s IP address and the CNAME to “www” pointing to your domain. Save the changes and allow up to 24 hours for propagation.
How Do I Add A Domain To Hosting?
Log in to your hosting account. Go to the domain management section. Click on “Add Domain. ” Enter your domain name. Save changes.
Do You Get A Free Domain With Hostinger?
Yes, Hostinger offers a free domain with its Premium and Business shared hosting plans. This applies to annual subscriptions.
Conclusion
Creating a domain in Hostinger is straightforward and efficient. Follow the steps outlined, and you’ll be online quickly. Remember, a good domain name is key to your website’s success. Hostinger provides excellent tools and support to make the process seamless.
Start your online journey with confidence today!