To cancel Bluehost, log in to your Bluehost account and navigate to the ‘Account Settings’ section. Click on ‘Cancel Subscription’ and follow the prompts.
Bluehost is a popular web hosting service known for its reliability and customer support. Sometimes, users need to cancel their subscription due to various reasons, such as switching to another provider or closing a project. Canceling your Bluehost account is a straightforward process that ensures you won’t be billed further.
Always back up your data before initiating the cancellation to avoid losing any important information. Understanding how to navigate the cancellation process can save you time and ensure a smooth transition. This guide will help you effectively cancel your Bluehost account with ease.
Preparing For Cancellation
Before canceling your Bluehost account, take some important steps. These steps ensure a smooth transition without losing data or facing unexpected charges.
Backup Your Data
Ensure you save all your important files. Use Bluehost’s cPanel to create backups. This includes website files, databases, and email accounts.
Follow these simple steps:
- Log in to your Bluehost account.
- Go to the cPanel section.
- Click on the Backup icon.
- Select Full Backup and download it to your computer.
Keep these backups safe. They are crucial for restoring your data if needed.
Review Terms And Conditions
Understand Bluehost’s cancellation policy. Check the terms and conditions for refunds and fees.
Key points to review:
- Any early termination fees?
- Are there non-refundable charges?
- How to get a refund for unused services?
Read the terms carefully. Knowing these details helps avoid surprises.
Credit: www.hostinger.com
Accessing Your Bluehost Account
Before you can cancel your Bluehost account, you need to access it first. This involves logging in and navigating to the right section on the dashboard. Follow these steps to make the process smooth and straightforward.
Logging In
First, open your web browser and go to the Bluehost website. On the top right corner, click on the “Login” button.
You will be directed to the login page. Enter your username and password in the respective fields. Click on the “Submit” button to access your account.
If you have forgotten your password, click on the “Forgot Password” link. Follow the instructions to reset your password and regain access.
Navigating To The Dashboard
Once you are logged in, you will be taken to the Bluehost dashboard. This is the main control panel for managing your account.
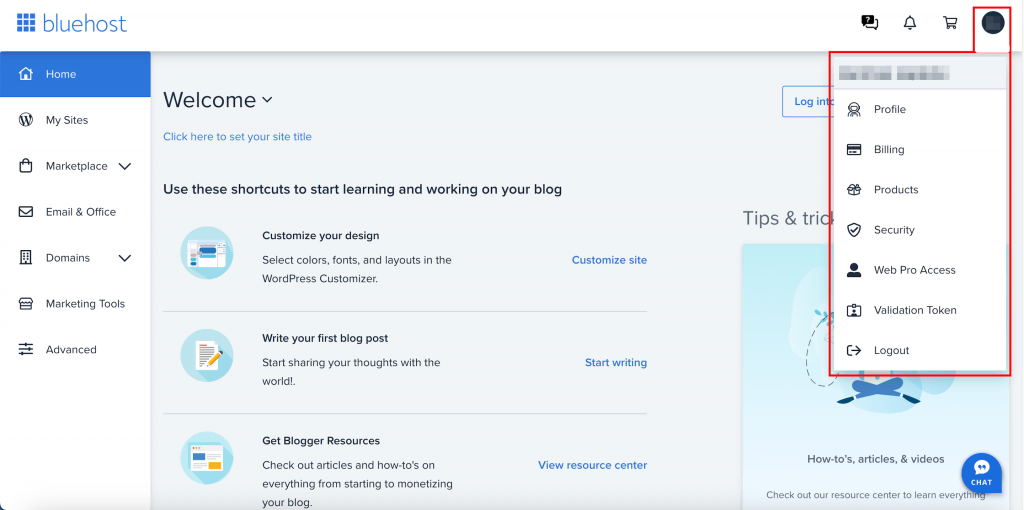
On the left-hand side, you will see a menu with several options. Look for the section labeled “Account” or “Account Settings”. Click on it to proceed.
In the account settings, you will find various options related to your subscription. Locate the “Billing” or “Billing Information” section. This is where you can manage your billing details and subscriptions.
To cancel your account, look for a link or button labeled “Cancel” or “Terminate Account”. Click on it and follow the on-screen instructions to complete the cancellation process.
| Step | Action | Details |
|---|---|---|
| 1 | Go to Bluehost Website | Open your browser and navigate to Bluehost.com |
| 2 | Click Login | Top right corner of the homepage |
| 3 | Enter Credentials | Enter your username and password |
| 4 | Navigate to Dashboard | Look for “Account” or “Account Settings” |
| 5 | Find Billing Section | Look for “Billing” or “Billing Information” |
| 6 | Click Cancel | Follow on-screen instructions to cancel |
Initiating The Cancellation Process
Cancelling your Bluehost account involves a few simple steps. Follow this guide to ensure a smooth process.
Contacting Support
First, you need to reach out to Bluehost support. They are available 24/7 to assist you.
- Visit the Bluehost website.
- Click on the Support link at the top.
- Choose the method to contact support: Live Chat or Phone Call.
Explain to the support agent that you want to cancel your account. They will guide you through the necessary steps.
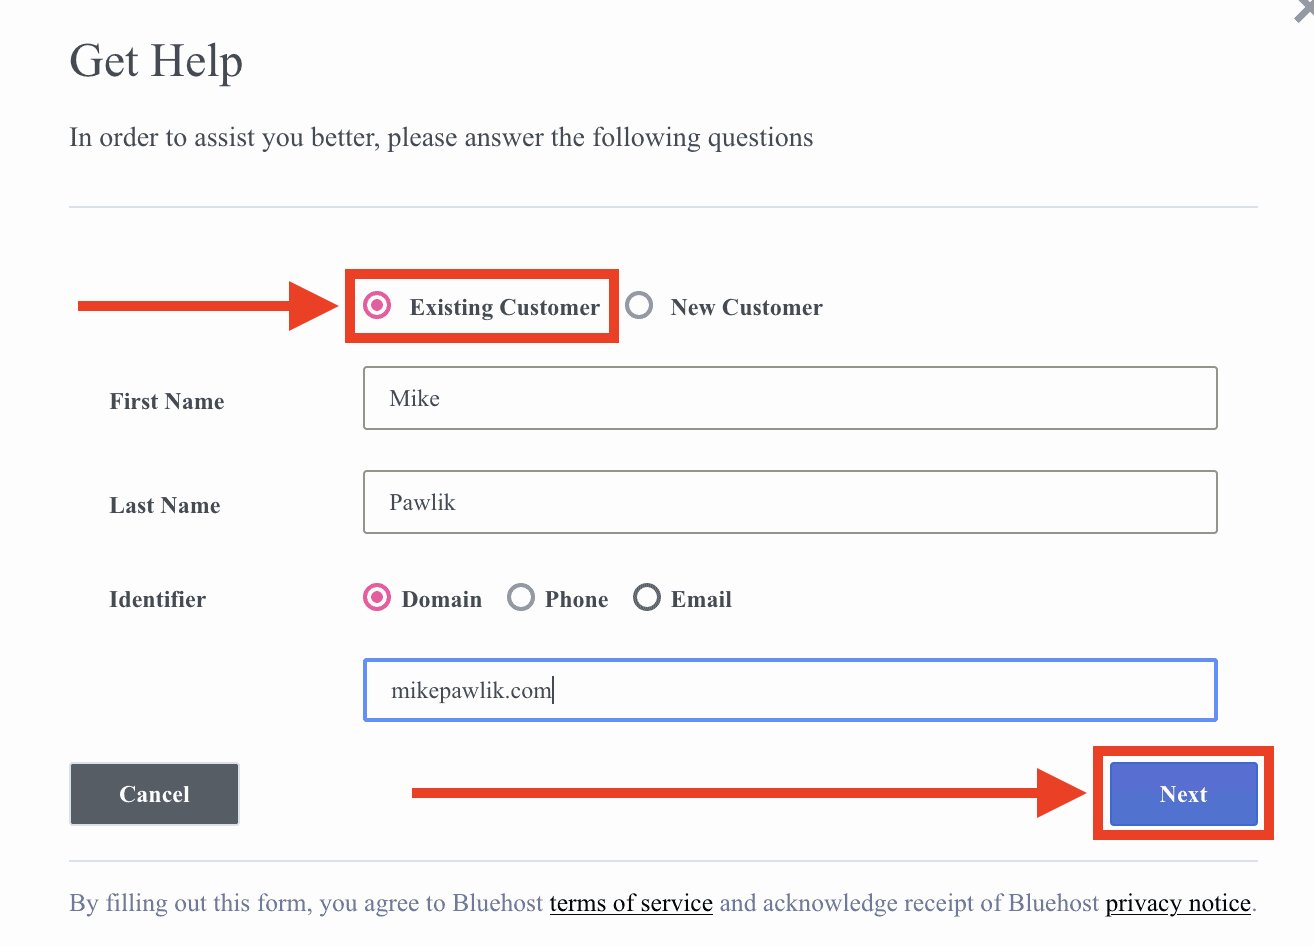
Filling Out The Cancellation Form
After contacting support, you need to fill out the cancellation form. This form is essential for processing your request.
- Log in to your Bluehost account.
- Navigate to the Account Settings section.
- Find and click on Cancel Account.
- Complete the Cancellation Form with accurate details.
Ensure all fields are filled correctly to avoid delays. Double-check your entries before submitting the form.
Once the form is submitted, Bluehost will review your request. You will receive a confirmation email shortly.
Credit: www.youtube.com
Handling Refunds
When you cancel your Bluehost account, handling refunds is essential. Understanding the eligibility criteria and refund processing time helps ensure a smooth experience.
Eligibility Criteria
To qualify for a refund, you must meet specific criteria. Here are the main points:
- You must cancel within 30 days of purchase.
- The refund policy applies only to hosting plans.
- Domain names are not refundable.
- Additional services may not qualify for refunds.
Refund Processing Time
Once you request a refund, it takes some time to process. Here is what you can expect:
| Refund Method | Processing Time |
|---|---|
| Credit Card | 5-7 business days |
| PayPal | 24 hours |
Ensure you check your email for confirmation. Always keep a copy of the refund request for your records.
Confirming Cancellation
After you have gone through the steps to cancel your Bluehost account, the final and crucial step is to confirm the cancellation. This ensures that your request has been processed successfully and that your account will be properly deactivated. Below are the steps you need to follow to confirm your cancellation.
Receiving Confirmation Email
Once you submit your cancellation request, Bluehost will send a confirmation email. This email serves as proof that your cancellation has been received and is being processed.
Make sure to check your inbox and spam folders for this email. The subject line usually includes phrases like “Cancellation Confirmation” or “Service Termination”.
Keep this email for your records as it contains important information about your cancellation.
Double-checking Account Status
Log in to your Bluehost account to verify your account status. Navigate to your account dashboard and look for any notifications or changes in your account status.
You should see a status update indicating that your account is scheduled for cancellation. If there are any discrepancies, contact Bluehost support immediately for clarification.
It’s always a good idea to double-check to ensure that everything is in order and your cancellation request has been processed correctly.
Alternatives To Cancellation
Considering cancelling your Bluehost account? Before taking that step, explore some alternatives. These options can help you save money or pause services without losing your data.
Downgrading Plan
Downgrading your plan can save you money while keeping your website live. Bluehost offers various plans that cater to different needs. Follow these steps to downgrade:
- Log in to your Bluehost account.
- Navigate to the My Products tab.
- Find your current plan and click Options.
- Select Change Plan from the dropdown menu.
- Choose a lower-tier plan that suits your needs.
- Confirm your selection and follow the on-screen prompts.
By downgrading, you can keep your site running without the higher costs.
Pausing Services
If you need a temporary break, consider pausing your services. This option allows you to halt your website without losing data. To pause services, follow these steps:
- Log in to your Bluehost account.
- Go to the My Products tab.
- Locate the Pause Services option.
- Click on Pause and select the duration.
- Confirm your choice and follow the instructions.
Pausing services can be a smart way to manage short-term breaks. You won’t have to start from scratch when you resume.
If you have any questions, Bluehost’s customer support team can help. They can guide you through these options and ensure you make the best decision.
Post-cancellation Steps
After canceling your Bluehost account, some steps are crucial to ensure your website remains functional. Follow these steps to make a smooth transition to a new hosting provider and keep your domain active.
Choosing A New Provider
First, find a new hosting provider that fits your needs. Compare different providers based on:
- Pricing
- Customer Support
- Uptime Guarantee
- Features
Create a table to compare these features:
| Provider | Pricing | Support | Uptime | Features |
|---|---|---|---|---|
| Provider A | $5/month | 24/7 | 99.9% | Free SSL, Backup |
| Provider B | $7/month | 24/7 | 99.8% | Free SSL, Backup, Email |
Transferring Your Domain
Transfer your domain to the new provider. Follow these steps:
- Unlock your domain at Bluehost.
- Get the transfer code.
- Enter the code at your new provider.
- Wait for the transfer to complete.
Make sure your domain details are up-to-date:
- Contact Information
- Nameservers
After the transfer, set up your website with the new provider. Ensure all files and databases are moved.
Customer Support Options
Canceling your Bluehost account might seem like a daunting task. Thankfully, Bluehost provides various customer support options to make the process easier. This section will explore the primary support channels available to you.
Live Chat
Bluehost offers a Live Chat option for quick assistance. This is ideal if you need immediate help. Follow these steps to use Live Chat:
- Log in to your Bluehost account.
- Navigate to the Support section.
- Click on the Live Chat button.
- Type your query and wait for a response.
Live Chat is available 24/7. It provides swift solutions to your problems.
Phone Support
If you prefer speaking to someone, you can use Phone Support. Here are the steps:
- Dial the Bluehost support number: 1-888-401-4678.
- Follow the voice prompts to reach the right department.
- Speak with a customer service representative.
Phone Support is also available 24/7. This allows you to get help anytime you need it.
Credit: www.websiteplanet.com
Frequently Asked Questions
How Do I Cancel My Subscription From Bluehost?
To cancel your Bluehost subscription, log in to your account, go to the “Account” tab, and select “Cancel”. Confirm your cancellation.
How Do I Permanently Delete My Bluehost Account?
To permanently delete your Bluehost account, log in, go to the “Account” tab, and select “Cancel Account. ” Confirm cancellation.
What Happens When You Don’t Renew Bluehost?
Your website will go offline. You risk losing your domain name and data. Renew promptly to avoid disruptions.
How Do I Get My Money Back From Bluehost?
To get a refund from Bluehost, contact their support within 30 days of purchase. Request a refund through live chat or phone.
Conclusion
Canceling Bluehost can seem daunting, but following these steps makes it straightforward. Ensure you back up your data before proceeding. Remember, customer support is available for any issues. We hope this guide has simplified the process for you. Now, you’re ready to move forward with your new hosting plans.