To configure Hostinger Mail in Outlook, access Outlook’s account settings and enter your Hostinger email details. Follow the prompts to complete setup.
Configuring Hostinger Mail in Outlook is a straightforward process that ensures seamless email communication. Outlook, a popular email client, allows users to manage multiple email accounts efficiently. By integrating your Hostinger email, you can access and manage your emails from a single interface.
This setup boosts productivity and keeps your communications organized. Hostinger provides specific server settings required for the configuration, which you must enter correctly in Outlook. With this integration, you can enjoy the full features of both Hostinger Mail and Outlook, making your email management easier and more effective. This guide will help you through the steps to achieve this integration seamlessly.
Introduction To Hostinger Mail
Hostinger Mail offers a reliable email service. It’s designed for businesses and individuals. This service ensures secure and professional communication. Configuring Hostinger Mail in Outlook is straightforward.
What Is Hostinger Mail?
Hostinger Mail is an email service provided by Hostinger. It allows users to create and manage email accounts linked to their domain. This service ensures seamless communication.
| Feature | Description |
|---|---|
| Custom Domains | Use your domain for professional email addresses. |
| Security | Advanced security measures to protect your emails. |
| Storage | Ample storage space for all your emails. |
Benefits Of Using Hostinger Mail
- Professionalism: Custom domain emails look professional.
- Security: Your data remains safe and encrypted.
- Reliability: Enjoy consistent and reliable email service.
- Easy Management: User-friendly interface for easy email management.
Using Hostinger Mail with Outlook enhances productivity. It combines the power of Hostinger with Outlook’s features. This integration ensures you never miss an important email. Follow the steps to configure Hostinger Mail in Outlook. Enjoy seamless communication with these tools.
Credit: www.hostinger.com
Pre-configuration Steps
Before setting up Hostinger Mail in Outlook, some steps are essential. These steps ensure a smooth configuration process. Let’s dive into the pre-configuration steps needed for success.
Gathering Account Information
First, gather all required account details. This includes your email address, password, and mail server settings. You will need the IMAP and SMTP server information. Here’s a quick table to help:
| Information | Details |
|---|---|
| Email Address | Your Hostinger email |
| Password | Your email account password |
| IMAP Server | imap.hostinger.com |
| IMAP Port | 993 |
| SMTP Server | smtp.hostinger.com |
| SMTP Port | 465 |
Checking Internet Connectivity
Ensure a stable internet connection. This prevents interruptions during the setup process. Follow these simple steps:
- Check your Wi-Fi or Ethernet connection.
- Open a browser and visit a website.
- Confirm that the website loads correctly.
If the website loads, your connection is stable. If not, troubleshoot your internet connection first.
Accessing Outlook
Configuring Hostinger Mail in Outlook is simple. First, access the Outlook application on your device. Follow this guide to set up your email smoothly.
Opening Outlook Application
To start, open the Outlook application on your computer. This is available on both Windows and Mac operating systems. If you don’t have Outlook installed, download it from the Microsoft website.
Once installed, locate the Outlook icon on your desktop or in your start menu. Click to open the application. You will see the main Outlook interface, ready for configuration.
Navigating To Account Settings
After opening Outlook, you need to navigate to the Account Settings section. This is where you will add your Hostinger Mail account.
Follow these steps to find Account Settings:
- Click on the File tab at the top left corner.
- Select Account Settings from the dropdown menu.
- In the Account Settings window, click on New.
Now you are ready to enter your Hostinger Mail account details.
| Step | Action |
|---|---|
| 1 | Click on the File tab. |
| 2 | Select Account Settings. |
| 3 | Click on New in the Account Settings window. |
You are now ready to enter the email configuration details for Hostinger Mail.
Adding A New Email Account
Configuring your Hostinger mail in Outlook is essential for seamless communication. Follow these steps to add a new email account effortlessly. This guide covers the necessary steps to get you started.
Selecting Add Account Option
Open Outlook on your computer. Click on the File tab at the top-left corner.
Next, click on the Add Account button. This action will open a new window for you to enter your email details.
Entering Email Address
In the new window, you will see a field labeled Email Address. Enter your Hostinger email address here.
Ensure you type the full email address, including the domain. For example, yourname@yourdomain.com.
After entering your email address, click Connect.
| Field | Information |
|---|---|
| Email Address | Enter your full Hostinger email address. |
- Open Outlook and click File.
- Select Add Account.
- Type your full Hostinger email address.
- Click Connect.
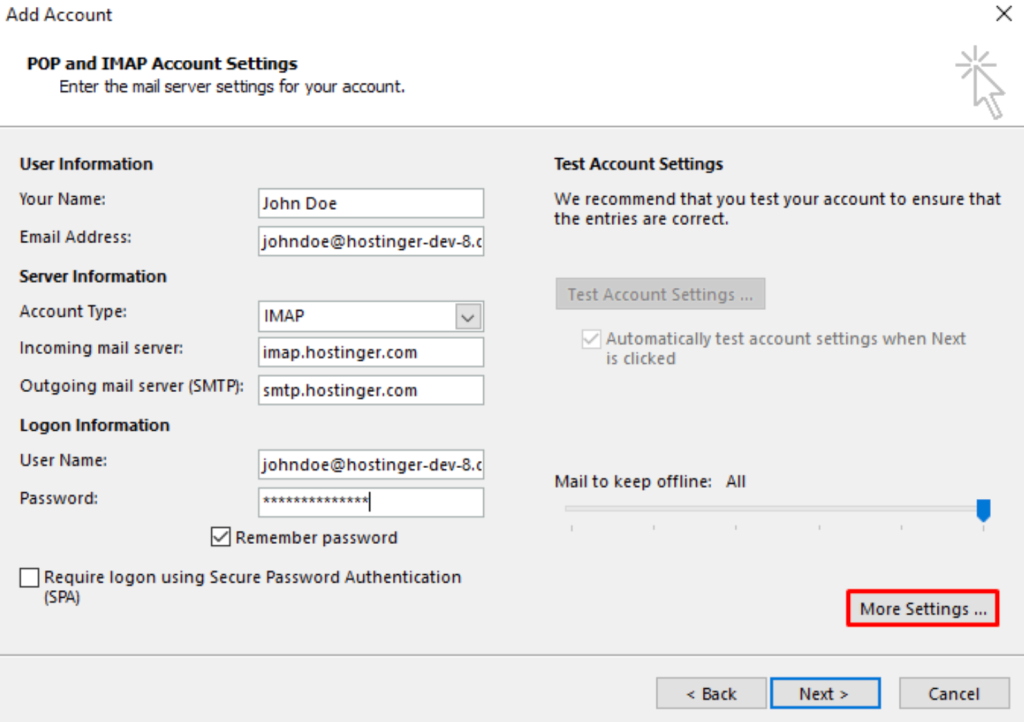
Server Settings Configuration
Configuring your Hostinger Mail in Outlook involves several steps. One of the crucial steps is the Server Settings Configuration. This process ensures your email client communicates correctly with the mail servers. Follow these instructions to configure your server settings properly.
Choosing Account Type
First, choose the account type. Outlook offers two main types:
- IMAP – Synchronizes emails across multiple devices.
- POP3 – Downloads emails to one device.
Most users prefer IMAP for its flexibility. Select IMAP to continue.
Entering Incoming Server Details
Next, input the incoming server details. These details are crucial for receiving emails.
| Field | Value |
|---|---|
| Server | imap.hostinger.com |
| Port | 993 (SSL) |
| Encryption | SSL/TLS |
| Username | Your full email address |
| Password | Your email password |
Ensure all fields are accurately filled. Incorrect details prevent email reception.
Entering Outgoing Server Details
Finally, configure the outgoing server details to send emails.
| Field | Value |
|---|---|
| Server | smtp.hostinger.com |
| Port | 465 (SSL) |
| Encryption | SSL/TLS |
| Username | Your full email address |
| Password | Your email password |
Double-check all outgoing server settings. This step ensures successful email delivery.
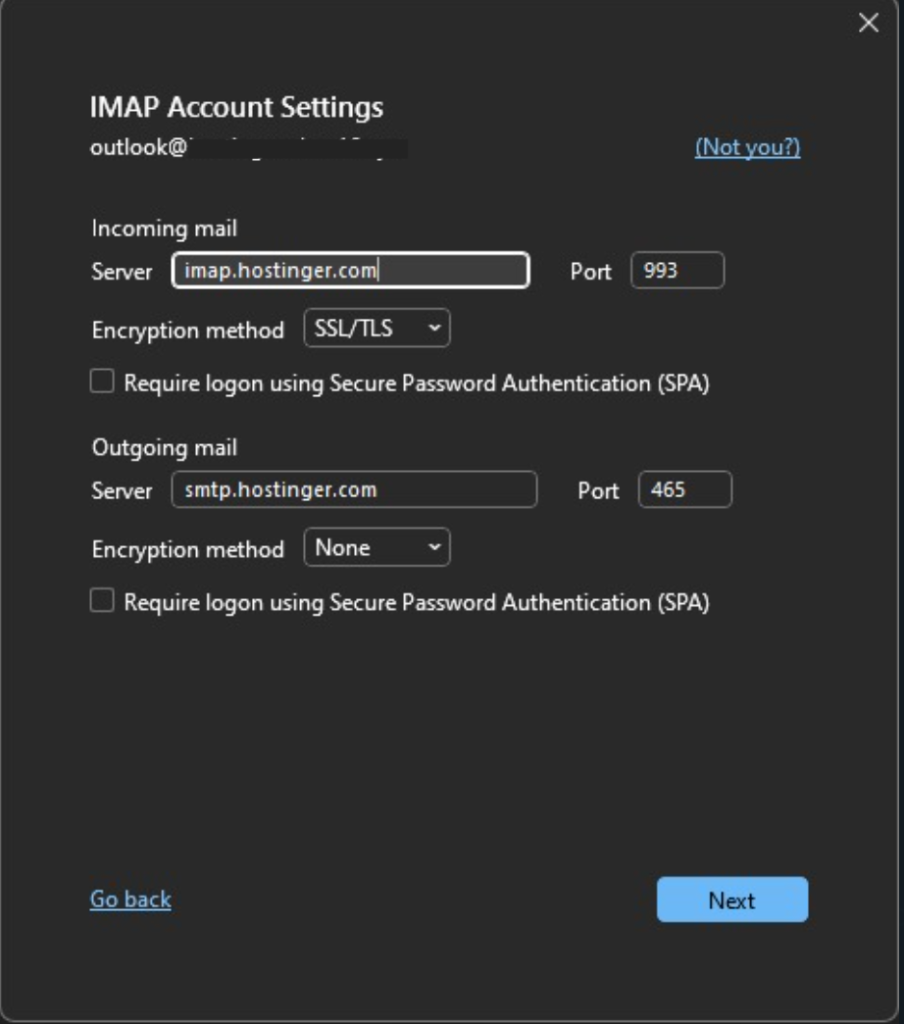
Advanced Settings
After setting up basic configurations, configuring advanced settings ensures optimal email performance. These settings include port numbers and encryption methods. They enhance security and functionality.
Configuring Port Numbers
Correct port numbers are crucial for smooth email communication. Here’s a detailed table of the necessary port numbers:
| Protocol | Port Number |
|---|---|
| IMAP | 993 |
| POP3 | 995 |
| SMTP | 465 |
Follow these steps to configure port numbers in Outlook:
- Open Outlook and go to File > Account Settings.
- Select your Hostinger email account and click Change.
- Click on More Settings and navigate to the Advanced tab.
- Input the port numbers from the table above.
- Click OK to save your settings.
Setting Up Encryption Methods
Encryption methods protect your email data from unauthorized access. Follow these steps to set up encryption:
- In the Advanced settings tab, find the Use the following type of encrypted connection option.
- Select SSL/TLS for IMAP and SMTP protocols.
- Ensure SSL is selected for POP3.
- Click OK to apply the encryption settings.
Proper configuration of these settings improves your email security and performance. Always verify the settings to ensure seamless email communication.
Testing The Configuration
Once you have set up Hostinger Mail in Outlook, it’s crucial to ensure that everything works perfectly. This involves testing both outgoing and incoming emails. Performing these tests helps confirm that your email configuration is correct and that you can communicate efficiently.
Sending A Test Email
To verify the outgoing email settings, send a test email. Follow these steps:
- Open Outlook and click on the New Email button.
- In the To field, enter your email address.
- Type a subject, such as Test Email.
- Write a brief message in the body.
- Click Send to dispatch the email.
Check the Sent Items folder to confirm the email was sent. If the email appears, your outgoing settings are correct.
Checking For Incoming Emails
Next, confirm that you can receive emails properly. Here’s how:
- Wait a few moments for the test email to arrive.
- Open your Inbox in Outlook.
- Look for the test email you sent to yourself.
If the email appears in your Inbox, your incoming settings are correct. You can also ask a friend to send you an email to double-check.

Credit: m.youtube.com
Troubleshooting Common Issues
Configuring Hostinger Mail in Outlook can sometimes present challenges. These issues may seem daunting, but they are often easy to fix. This section will guide you through some common problems and their solutions.
Incorrect Password
An incorrect password is one of the most frequent issues. Ensure you are using the correct password for your Hostinger Mail account.
Steps to verify your password:
- Log in to your Hostinger account via a web browser.
- Navigate to the email section and verify your password.
- If you’ve forgotten your password, reset it using the “Forgot Password” option.
Update the new password in Outlook to resume email syncing.
Server Connection Problems
Server connection problems can disrupt your email configuration. Verify your server settings for accuracy.
| Setting | Value |
|---|---|
| Incoming Server (IMAP) | imap.hostinger.com |
| Outgoing Server (SMTP) | smtp.hostinger.com |
| Port for IMAP | 993 |
| Port for SMTP | 465 |
Ensure you have the correct port numbers and server addresses.
Email Sync Issues
Email sync issues can lead to missing emails or delays. Here are steps to troubleshoot:
- Check your internet connection.
- Ensure Outlook is updated to the latest version.
- Verify your account settings in Outlook.
- Disable and re-enable your email account in Outlook.
These steps should help resolve sync problems.
Credit: www.hostinger.com
Frequently Asked Questions
How To Integrate Hostinger Mail In Outlook?
To integrate Hostinger mail in Outlook, open Outlook, go to File > Add Account, enter your Hostinger email and follow the prompts. Use IMAP/SMTP settings from Hostinger’s email configuration page.
What Is The Smtp Setting For Hostinger?
Hostinger’s SMTP settings are: SMTP Server: smtp. hostinger. com, Port: 587, TLS/SSL: Enabled, Username: Your email, Password: Your email password.
How Do I Configure My Email In Outlook?
Open Outlook. Go to File > Add Account. Enter your email address. Follow the on-screen instructions to configure settings. Save changes.
How Do I Add An Hostinger Email To Microsoft 365?
To add Hostinger email to Microsoft 365, go to the Admin Center, select “Setup,” and follow the prompts. Use IMAP/SMTP settings from Hostinger.
Conclusion
Configuring Hostinger Mail in Outlook is straightforward with our guide. Follow these steps to ensure seamless email communication. Proper setup enhances your productivity and keeps you connected. Enjoy the benefits of efficient email management. Start configuring your Hostinger Mail in Outlook today and experience hassle-free emailing.
Happy emailing!