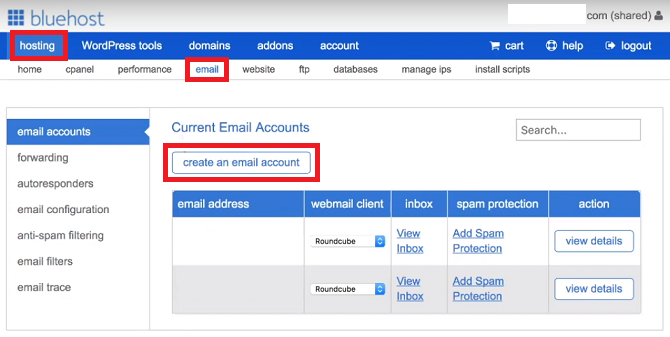
To create a Bluehost email, log into your Bluehost account and navigate to the Email & Office tab. Click on the Create button to set up your new email account.
Bluehost offers a straightforward way to set up a professional email address for your domain. Having a custom email address enhances your brand’s credibility and can improve communication with clients and customers. Bluehost’s user-friendly interface makes this process simple, even for beginners.
Creating an email account takes only a few minutes and involves minimal technical knowledge. This guide will walk you through the necessary steps to set up your Bluehost email account effectively, ensuring you can start using it right away. Follow these instructions to establish a reliable and professional email communication channel for your business.
Introduction To Bluehost Email
Creating a professional email through Bluehost is simple and beneficial. This guide will help you understand how to set up your own Bluehost email.
Importance Of A Professional Email
Using a professional email builds trust with your audience. It shows you are serious about your business.
A custom email address looks more credible. For example, info@yourdomain.com is better than yourname@gmail.com.
Customers are more likely to open emails from a professional address. This increases the chance of successful communication.
Bluehost Email Features
Bluehost offers many features for your email needs. These features help you manage your email effectively.
- Spam Protection: Keeps your inbox clean and safe.
- Webmail Access: Access your email from any device.
- Email Forwarding: Send emails to multiple addresses.
- Storage: Ample space to store your important emails.
These features make Bluehost a great choice for professional email. They ensure your email is secure and easy to use.

Credit: itsalovelylife.com
Setting Up Your Bluehost Account
Creating a Bluehost email is easy. First, you must set up your Bluehost account. This section will guide you through the steps.
Signing Up For Bluehost
Visit the Bluehost website and click on the “Get Started” button. Choose a plan that fits your needs. Enter your domain name or choose a new one. Fill in your account information.
Next, select your package information. Bluehost offers various options. You can choose to add extras like domain privacy and protection. Finally, enter your payment details and submit.
Navigating The Dashboard
Once your account is active, log in to the Bluehost dashboard. The dashboard is user-friendly. You can find different sections easily.
On the left side, you will see a menu. Here you can access your emails, websites, and domains. Click on the “Email & Office” tab to proceed. This will help you create your email account.
| Step | Action |
|---|---|
| 1 | Visit Bluehost website |
| 2 | Click “Get Started” |
| 3 | Choose a plan |
| 4 | Enter domain name |
| 5 | Fill in account information |
| 6 | Select package information |
| 7 | Enter payment details |
| 8 | Submit and log in |
Follow these steps carefully. Setting up your Bluehost account is simple. Once done, you can create your email account with ease.
Creating Your Email Address
Creating a personalized email address on Bluehost is simple. This guide will help you through each step. Let’s start with accessing the email setup.
Accessing Email Setup
First, log in to your Bluehost account. Once logged in, go to the Advanced section.
In the Advanced section, find the Email Accounts option. Click on it to proceed.
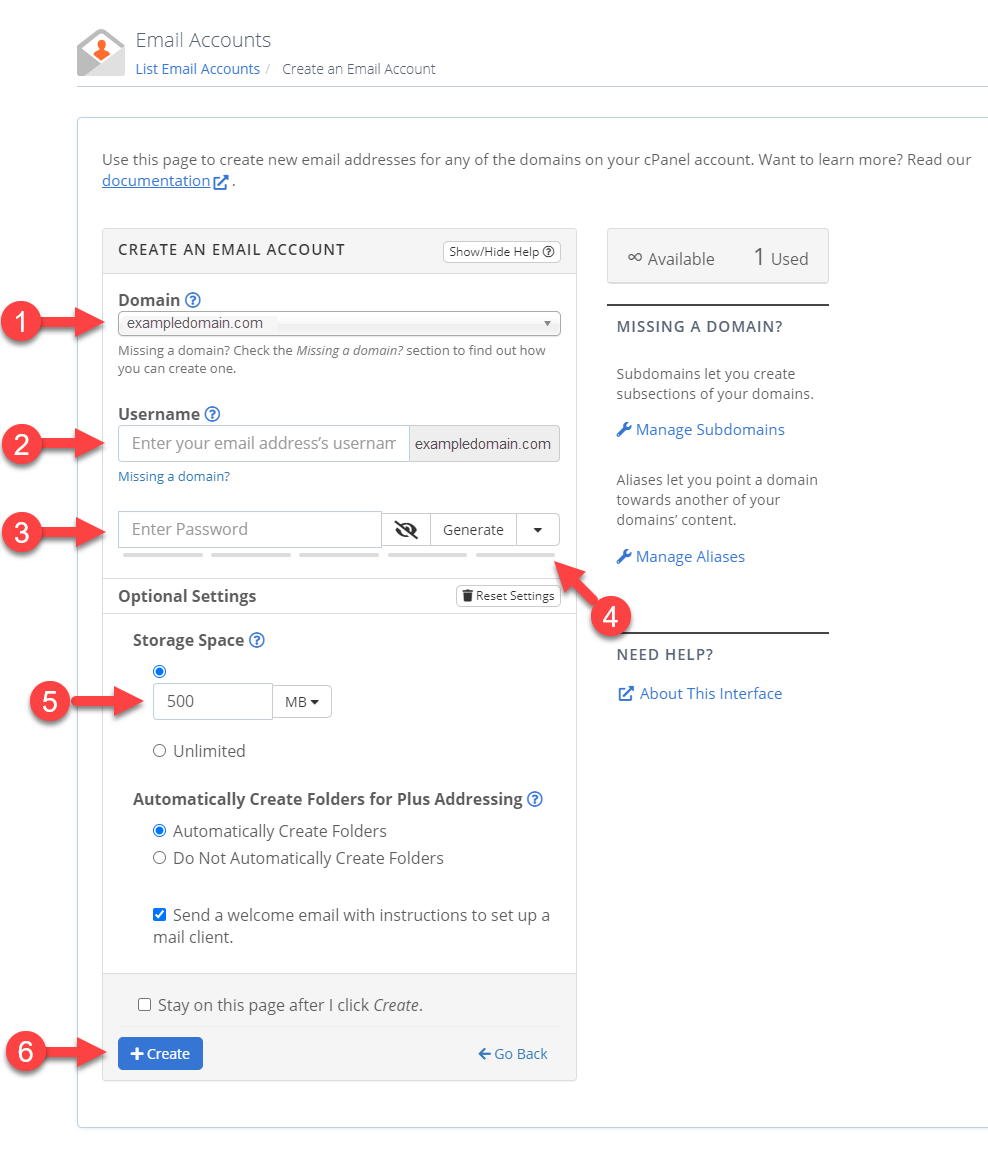
Choosing Your Email Name
Now, you need to pick an email name. This name should be professional and easy to remember.
Here are some tips to choose a good email name:
- Use your first and last name.
- Avoid using numbers or special characters.
- Keep it short and simple.
Once you decide on the name, type it into the provided field. Click on the Create button to finalize your new email address.
Configuring Email Settings
Creating a Bluehost email account is only the first step. To ensure smooth email communication, you need to configure your email settings properly. This involves setting passwords and managing storage effectively. Let’s dive into the details!
Setting Passwords
Passwords are crucial for securing your email account. Follow these steps to set a strong password:
- Log in to your Bluehost account.
- Navigate to Email & Office.
- Select the email account you want to secure.
- Click on Manage.
- Choose Password and enter a strong password.
- Click Save to update your settings.
Ensure your password includes a mix of letters, numbers, and special characters.
Managing Storage
Managing storage helps in keeping your email account efficient. Here’s how you can manage your email storage:
- Log in to your Bluehost account.
- Go to Email & Office.
- Select the email account you want to manage.
- Click on Manage.
- Choose Storage settings.
You can see the current storage usage. You can also set storage limits.
Consider deleting old emails or attachments to free up space. Regularly check your storage to avoid reaching the limit.
Here’s a quick look at the storage options:
| Storage Option | Description |
|---|---|
| Basic | Suitable for light email users. Low storage limit. |
| Plus | Better for moderate usage. Higher storage limit. |
| Choice Plus | Ideal for heavy email usage. Maximum storage limit. |
Choosing the right storage plan can help you manage your emails better. Always monitor your storage to avoid disruptions.
Accessing Your Email
After you set up your Bluehost email, you need to access it. There are a few ways to do this. You can use Webmail or set up email clients. Let’s explore these options.
Using Webmail
Webmail is the easiest way to access your Bluehost email. It works directly from your web browser. Follow these steps to log in:
- Go to the Bluehost website.
- Click on the Login button.
- Select Webmail from the dropdown menu.
- Enter your email address and password.
- Click Login to access your inbox.
With Webmail, you don’t need any additional software. You can check your email from any device with internet access.
Setting Up Email Clients
Many people prefer using email clients. These programs download your emails and let you read them offline. Popular email clients include Outlook, Apple Mail, and Thunderbird. To set up your Bluehost email on these clients, follow these steps:
- Open your email client.
- Go to the Account Settings or Add Account section.
- Choose the option to add a new email account.
- Enter your Bluehost email address and password.
- For IMAP settings, use these:
- Incoming Mail Server: mail.yourdomain.com
- Outgoing Mail Server: mail.yourdomain.com
- IMAP Port: 993
- SMTP Port: 465
- For POP3 settings, use these:
- Incoming Mail Server: mail.yourdomain.com
- Outgoing Mail Server: mail.yourdomain.com
- POP3 Port: 995
- SMTP Port: 465
- Save the settings and test your email.
Using email clients can enhance your email experience. They offer better organization and offline access. Choose the method that suits you best.
Customizing Your Email
Customizing your Bluehost email can make it more professional and efficient. Use these features to enhance your email experience. Below, we explain how to add signatures and set up auto-responders.
Adding Signatures
Adding a signature to your email provides a personal touch. It also ensures your contact details are always included. Follow these steps to add a signature:
- Log in to your Bluehost email account.
- Navigate to the settings menu.
- Select the Signatures option.
- Click on Create New Signature.
- Enter your desired text in the signature box.
- Use formatting options to style your signature.
- Click Save to apply your new signature.
Setting Up Auto-responders
Auto-responders are useful for sending automated replies. This feature is helpful when you are unavailable. Here’s how to set up an auto-responder:
- Log in to your Bluehost email account.
- Go to the settings menu.
- Select the Auto-Responders option.
- Click on Create Auto-Responder.
- Fill in the required fields:
- Subject: The subject line of your auto-response.
- Body: The message you want to send.
- Start Date: When the auto-responder should start.
- End Date: When the auto-responder should end.
- Click Save to activate your auto-responder.
By customizing your email, you can improve your communication. Signatures and auto-responders are just the beginning. Start exploring these features today!
Troubleshooting Common Issues
Creating a Bluehost email is usually straightforward. Yet, issues may arise. This section helps resolve common problems you might face. Follow these tips to get back on track quickly.
Password Recovery
Forgetting your email password can be frustrating. Luckily, Bluehost makes it easy to recover.
- Log into your Bluehost account.
- Navigate to the Email & Office tab.
- Find your email address and click Manage.
- Click Reset Password and follow the prompts.
Ensure your new password is strong. Use a mix of letters, numbers, and symbols.
Syncing Problems
Syncing issues can disrupt your workflow. These steps can help resolve syncing problems.
- Check your internet connection. A stable connection is essential.
- Update your email app. Outdated apps can cause syncing errors.
- Re-enter your email settings. Ensure they match Bluehost’s recommendations.
- Contact Bluehost support if the problem persists.
Use the table below for Bluehost’s recommended email settings:
| Setting | Value |
|---|---|
| Incoming Server | mail.yourdomain.com |
| Outgoing Server | mail.yourdomain.com |
| IMAP Port | 993 |
| POP3 Port | 995 |
| SMTP Port | 465 |
Following these tips and settings should resolve most syncing issues. Stay connected and productive with your Bluehost email.
Advanced Features
Creating a Bluehost email account offers more than just basic email services. It includes a range of advanced features. These features enhance your email experience and improve productivity. Let’s dive into some of these advanced functionalities.
Email Forwarding
Email Forwarding allows you to redirect incoming emails to another email address. This feature is particularly useful if you manage multiple email accounts. You can forward emails from your Bluehost account to your primary email. This way, you will never miss any important messages.
To set up email forwarding, follow these steps:
- Log in to your Bluehost account.
- Navigate to the ‘Email’ section.
- Select ‘Forwarding’ from the options.
- Enter the email address you want to forward messages to.
- Click ‘Save’ to activate the forwarding.
Spam Filters
Spam Filters help keep your inbox clean and organized. They automatically detect and filter out spam emails. This ensures that your inbox remains clutter-free.
Bluehost provides robust spam filtering options. You can customize these settings to suit your needs.
| Filter Level | Description |
|---|---|
| Low | Filters obvious spam emails. |
| Medium | Filters most spam emails. |
| High | Filters all suspected spam emails. |
To configure spam filters:
- Access your Bluehost account.
- Go to the ‘Email’ section.
- Select ‘Spam Filters.’
- Choose your desired filter level.
- Click ‘Apply’ to save the settings.
These advanced features make managing your Bluehost email account easier. They help you stay organized and efficient.
Best Practices For Professional Email
Creating a professional email with Bluehost is straightforward. Following best practices ensures your communication remains effective and polished. This section covers essential tips.
Email Etiquette
Email etiquette is crucial for maintaining professionalism. Here are some key points:
- Use a clear and concise subject line.
- Greet the recipient with a formal salutation.
- Keep your message short and to the point.
- Use proper grammar and spelling.
- Sign off with a professional closing.
Managing Contacts
Managing your contacts efficiently ensures you stay organized. Follow these tips:
| Tip | Details |
|---|---|
| Organize contacts | Group contacts into categories for easy access. |
| Update information | Keep contact details current to avoid miscommunication. |
| Use tags | Tag contacts based on their role or relevance. |
These practices help you maintain a professional email setup. Proper email etiquette and contact management are key.
Credit: seofy.medium.com

Credit: m.youtube.com
Frequently Asked Questions
Is Bluehost Email Free?
Bluehost offers free email accounts with its hosting plans. You can create multiple email addresses.
What Email Provider Does Bluehost Use?
Bluehost uses its own custom email service. It also supports third-party email providers like Google Workspace and Microsoft 365.
How Do I Set Up Bluehost Email On My Mac?
Open Mail on your Mac. Select “Add Account” and choose “Other Mail Account. ” Enter your Bluehost email details. Use “mail. yourdomain. com” for incoming and outgoing servers. Click “Sign In” to complete the setup.
How Do I Setup My Bluehost Email In Outlook?
To set up your Bluehost email in Outlook, open Outlook, go to “File” > “Add Account”, enter your email, click “Connect”, and follow the prompts. Use IMAP settings: Incoming mail server: mail. yourdomain. com, Outgoing mail server: mail. yourdomain. com.
Enter your Bluehost email and password.
Conclusion
Creating a Bluehost email is simple and efficient. Follow the steps outlined for a seamless setup. A professional email enhances credibility and communication. Start today and elevate your business with a Bluehost email. Your journey to a professional online presence begins with just a few clicks.