To create a Hostinger account, visit Hostinger’s website and click the “Get Started” button. Follow the prompts to sign up.
Creating a Hostinger account is a straightforward process that allows you to access a wide range of web hosting services. Hostinger is renowned for its affordable pricing, user-friendly interface, and reliable performance. Whether you are a beginner or an experienced webmaster, Hostinger provides various plans to suit your needs.
The platform offers shared hosting, VPS hosting, and cloud hosting, among other options. With an intuitive dashboard, you can manage your websites, domains, and emails effortlessly. Hostinger also provides 24/7 customer support to assist you with any issues or questions. By creating an account, you unlock powerful tools to build and maintain your online presence efficiently.

Credit: m.youtube.com
Getting Started
Creating a Hostinger account is simple and quick. Follow these steps to get started. First, navigate to the Hostinger website. Then, choose the right plan for your needs. Let’s dive in!
Navigating To Hostinger
Open your web browser. Type www.hostinger.com in the address bar. Press Enter. You will see the Hostinger homepage. Look for the Sign Up button. Click on it to begin.
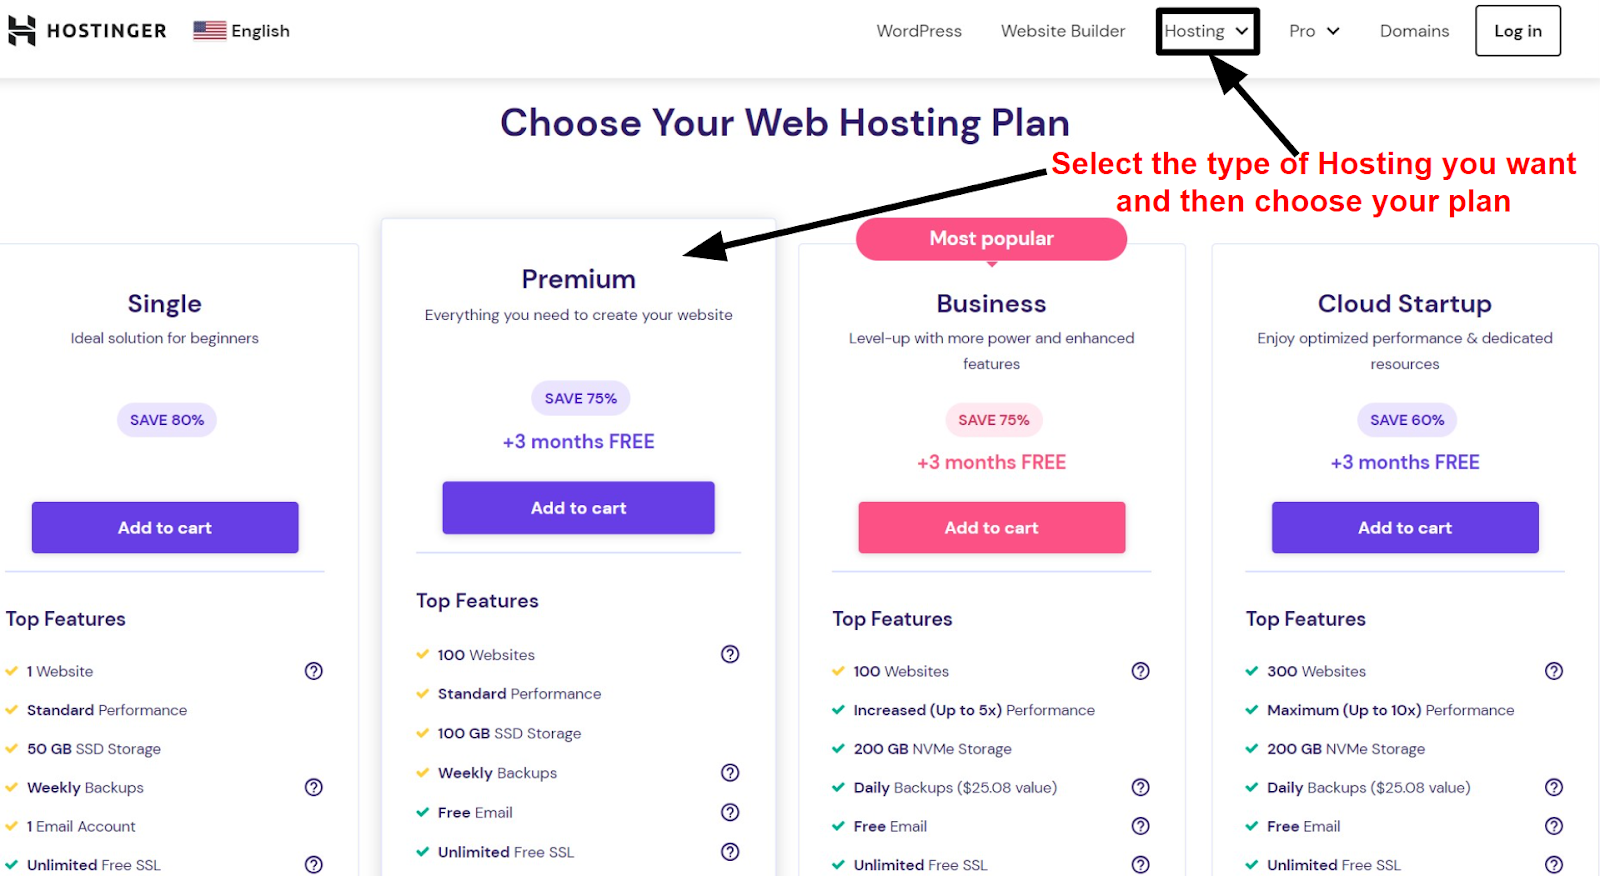
Choosing A Plan
Hostinger offers various plans. Each plan caters to different needs. Review the options carefully. Here are some popular plans:
| Plan | Features | Price |
|---|---|---|
| Single Shared Hosting | 1 Website, 10GB Storage | $0.99/month |
| Premium Shared Hosting | Unlimited Websites, 20GB Storage | $2.89/month |
| Business Shared Hosting | Unlimited Websites, 30GB Storage | $3.99/month |
Compare these plans. Choose the one that fits you best. After selecting a plan, click Add to Cart. Follow the on-screen instructions to complete your purchase.
Once you have chosen and purchased a plan, you are ready to set up your Hostinger account. Enjoy your new web hosting service!
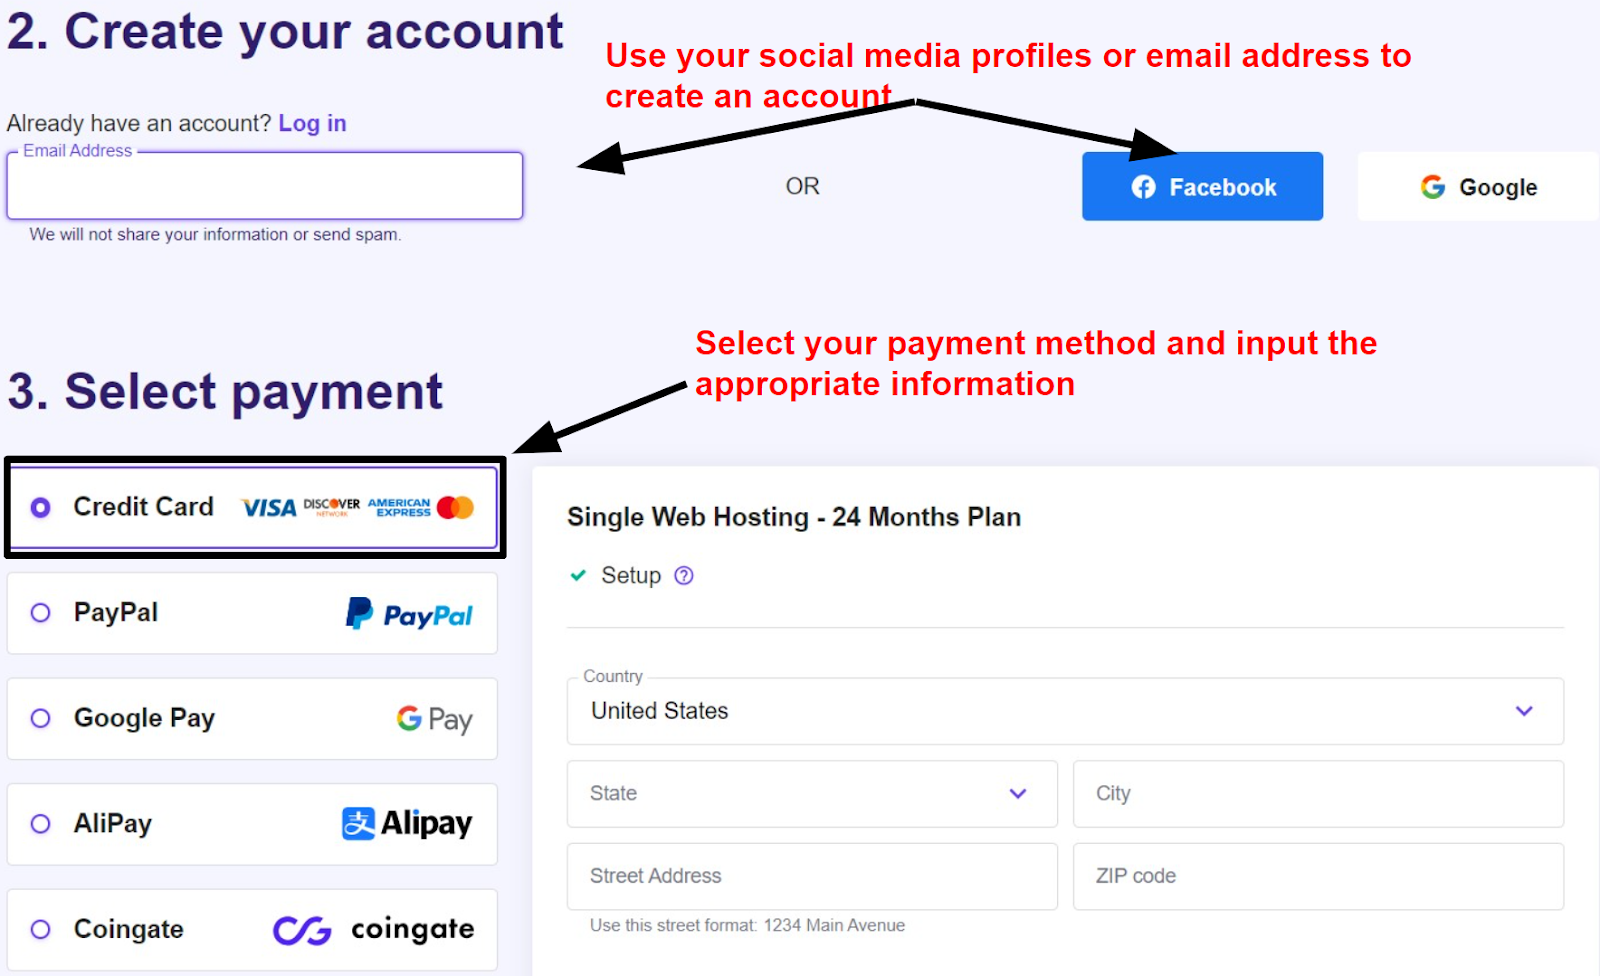
Creating An Account
Creating an account on Hostinger is simple and quick. Follow these steps to get started. You will need to enter some basic information and set up your login credentials.
Entering Basic Information
Begin by visiting the Hostinger website. Look for the Sign Up button at the top right corner.
- Click on Sign Up to start the process.
- You will be directed to a new page.
- Fill in your email address.
- Provide your first name and last name.
- Make sure to use a valid email address.
Check the box to agree to the terms and conditions. Then click on the Next button to proceed.
Setting Up Login Credentials
Now, it’s time to set up your login credentials. This will keep your account secure.
- Choose a strong password.
- Re-enter the password to confirm it.
- Make sure your password is at least 8 characters long.
Consider using a mix of letters, numbers, and symbols. This makes your password more secure.
Once you’ve entered your password, click the Create Account button. You will receive a confirmation email. Follow the link in the email to verify your account.
That’s it! Your Hostinger account is now ready to use.
Payment Process
Creating a Hostinger account is quick and easy. One of the final steps is the payment process. This step ensures you secure your hosting plan. Let’s break it down into simple steps.
Selecting Payment Method
Hostinger offers various payment methods to choose from. Here are some options:
- Credit/Debit Card
- PayPal
- Cryptocurrencies
- Google Pay
Select your preferred payment method. Ensure you have the necessary details ready. This will make the process smooth and fast.
Completing The Transaction
Once you have chosen your payment method, it’s time to complete the transaction.
- Enter your payment details.
- Double-check the details for accuracy.
- Click the Pay Now button.
- Wait for the confirmation message.
If paying by card, enter your card number, expiry date, and CVV. For PayPal, log into your PayPal account and confirm the payment.
After completing these steps, you will receive a confirmation email. This email includes all the details of your purchase. You now have a Hostinger account ready to use.
Verifying Account
Verifying your account is an important step. It ensures the security of your Hostinger account. This process includes email confirmation and account activation.
Email Confirmation
After creating your Hostinger account, check your email. Hostinger will send you a confirmation email. This email contains a verification link.
Follow these steps to confirm your email:
- Open your email inbox.
- Look for an email from Hostinger.
- Click on the verification link provided in the email.
If you do not see the email, check your spam folder. You can also request another email from Hostinger.
Account Activation
Once your email is confirmed, your account needs activation. This step ensures that your account is fully functional.
To activate your account:
- Log in to your Hostinger account.
- Complete any additional information requested.
- Click on the Activate Account button.
After activation, you can start using Hostinger services. Make sure all information is accurate and up-to-date.
Setting Up Your Domain
Creating a Hostinger account is easy. Setting up your domain is the next step. Your domain is the address people use to find your website. Let’s explore how to set up your domain with Hostinger.
Registering A New Domain
Do you want a new domain? Hostinger makes it simple. Follow these steps:
- Login to your Hostinger account.
- Go to the Control Panel.
- Click on Domains and select Register a New Domain.
- Type your desired domain name in the search bar.
- Select from the available options and click Add to Cart.
- Complete the payment process to register your domain.
After payment, your domain will be active. It might take a few minutes.
Connecting An Existing Domain
Do you have a domain already? Connect it to Hostinger by following these steps:
- Login to your Hostinger account.
- Go to the Control Panel.
- Click on Domains and select Use an Existing Domain.
- Enter your domain name and click Continue.
- Update your domain’s nameservers to Hostinger’s nameservers. Use these:
| Nameserver | Hostinger Nameserver |
|---|---|
| NS1 | ns1.dns-parking.com |
| NS2 | ns2.dns-parking.com |
Update your nameservers at your domain registrar’s website. This might take up to 24 hours to propagate.
Once your domain is connected, you can start building your website.
Credit: www.websiteplanet.com
Configuring Hosting
After creating your Hostinger account, the next step is configuring your hosting. This process ensures your website runs smoothly. You’ll need to access the control panel and install a Content Management System (CMS). Let’s dive into these steps.
Accessing Control Panel
Start by logging into your Hostinger account. Once logged in, click on the “Hosting” tab. This will show all your hosting plans. Choose the one you wish to configure.
Next, click on the “Manage” button. This will take you to the control panel. The control panel is where you control your website’s settings. You’ll find various tools and options here. Take a moment to explore these features.
Installing Cms
Now, it’s time to install a CMS. A CMS makes managing your website easier. The most popular CMS is WordPress. Hostinger provides an easy way to install it.
In the control panel, look for “Auto Installer”. Click on it to open the installer. You’ll see a list of software available for installation. Find and select “WordPress”.
Fill in the required details. This includes your website’s name, admin username, and password. Once done, click “Install”. Hostinger will handle the rest. In a few minutes, your CMS will be ready to use.
Here’s a quick summary in table form:
| Steps | Actions |
|---|---|
| 1 | Log into Hostinger account |
| 2 | Click on “Hosting” tab |
| 3 | Select your hosting plan |
| 4 | Click “Manage” to access the control panel |
| 5 | Find and click “Auto Installer” |
| 6 | Select “WordPress” and fill in details |
| 7 | Click “Install” and wait |
Once the CMS is installed, you can start building your website. Your hosting is now configured and ready to use.
Final Steps
Congratulations on reaching the final steps of creating your Hostinger account! Here, we will guide you through securing your account and exploring additional features. These steps ensure your online presence is safe and efficient.
Securing Your Account
Security is vital for your online activities. Follow these steps to secure your Hostinger account:
- Set a strong password: Use a mix of letters, numbers, and symbols.
- Enable two-factor authentication (2FA): Add an extra layer of security.
- Keep your recovery information updated: Ensure your email and phone number are current.
Below is a table summarizing the security measures:
| Security Measure | Details |
|---|---|
| Strong Password | Mix of letters, numbers, and symbols |
| Two-Factor Authentication | Extra layer of security |
| Recovery Information | Updated email and phone number |
Exploring Additional Features
Hostinger offers a range of features. Explore these to enhance your experience:
- Website Builder: Create stunning websites with ease.
- Email Hosting: Manage professional emails effortlessly.
- Domain Registration: Secure your domain names easily.
- SSL Certificates: Protect your site with SSL certificates.
Here is a quick overview:
| Feature | Benefit |
|---|---|
| Website Builder | Create websites easily |
| Email Hosting | Manage professional emails |
| Domain Registration | Secure domain names |
| SSL Certificates | Protect your site |
By securing your account and exploring additional features, you can maximize the benefits of Hostinger. Enjoy a safe and efficient online experience!

Credit: m.youtube.com
Frequently Asked Questions
How Do I Create A Hostinger Email Account?
Log in to your Hostinger account. Go to the “Emails” section. Click “Create Email Account. ” Enter your desired email address and password. Click “Create. “
Can You Use Hostinger For Free?
Hostinger does not offer a completely free plan. They provide affordable hosting plans with various features and benefits.
How To Start With Hostinger?
Sign up on Hostinger’s website. Choose a hosting plan that suits your needs. Complete the purchase and set up your domain. Access the control panel to install WordPress or other applications. Start building your website.
Does Hostinger Give Free Email?
Yes, Hostinger offers free email with certain hosting plans. Check their website for specific plan details.
Conclusion
Creating a Hostinger account is simple and straightforward. Follow the steps to get started with your hosting needs. Hostinger offers reliable services, making it a great choice for beginners and professionals. Sign up today and enjoy seamless web hosting and excellent customer support.
Happy hosting!