To create a subdomain in Hostinger, log in to your account and navigate to the “Domains” section. Select “Subdomains” and fill in the required details.
Creating a subdomain in Hostinger is straightforward and enhances your website’s structure. Subdomains help you organize content, making it easier for visitors to navigate your site. For instance, you can create a blog subdomain for your main website. This separates your blog content from other sections, improving user experience.
Subdomains also help with SEO by targeting specific keywords and audiences. Hostinger provides a user-friendly interface, making the process simple. Whether you’re running a personal blog or a business site, subdomains offer flexibility. With just a few clicks, you can create subdomains and enhance your website’s functionality.

Credit: m.youtube.com
Setting Up A Hostinger Account
Before creating a subdomain, you need a Hostinger account. It is the first step. Setting up an account is simple. Follow the steps below to get started.
Creating An Account
To create an account, visit the Hostinger website. Click on the Sign Up button. You will see a form. Fill in your email address and choose a password. You can also sign up using Google or Facebook.
After filling in your details, click Create Account. Hostinger will send a verification email. Check your inbox and click on the link to verify your email address. Your account is now ready.
Choosing A Hosting Plan
Once your account is set up, choose a hosting plan. Hostinger offers various plans. They have options for different needs and budgets. Below is a table that summarizes the available plans:
| Plan | Features | Price |
|---|---|---|
| Single Shared Hosting | 1 Website, 30 GB SSD Storage, Free SSL | $1.39/month |
| Premium Shared Hosting | Unlimited Websites, 100 GB SSD Storage, Free Domain | $2.59/month |
| Business Shared Hosting | Unlimited Websites, 200 GB SSD Storage, Daily Backups | $3.99/month |
Select a plan that fits your needs. Click on the Select button. Follow the on-screen instructions to complete the purchase. Once done, you can start creating your subdomain.

Credit: m.youtube.com
Accessing Your Hosting Dashboard
Creating a subdomain in Hostinger starts with accessing your hosting dashboard. The dashboard is where you manage your website and hosting settings. Follow these steps to begin the process.
Navigating To Hpanel
First, you need to log in to your Hostinger account. Once logged in, you will be directed to the main dashboard.
- Click on the “Hosting” tab at the top of the page.
- Select your domain from the list of hosted domains.
This action will lead you to the hPanel, Hostinger’s control panel. The hPanel is user-friendly and intuitive, making it easy to navigate.
Locating The Subdomains Section
In the hPanel, scroll down to the Domains section.
- Click on the “Subdomains” option.
A new window will open, allowing you to create and manage subdomains. This is where you will input the desired name for your subdomain.
Fill in the required fields and click “Create” to add your new subdomain. Hostinger will handle the rest, and your subdomain will be ready in minutes.
Creating A Subdomain
Creating a subdomain in Hostinger is a simple process. A subdomain helps organize your website into sections. This is especially useful for large websites. Follow these steps to create your subdomain.
Inputting Subdomain Name
First, you need to decide on a name for your subdomain. The name should be short and memorable. It should also be relevant to the content it will host.
Login to your Hostinger account. Go to the “Control Panel”. Look for the “Subdomains” section. Click on it to open the subdomain settings.
In the subdomain settings, you will see an input field labeled “Subdomain Name”. Type your desired subdomain name in this field. Make sure it is unique and easy to remember.
For example, if your main domain is example.com, and you want a blog subdomain, you might enter blog. This will create blog.example.com.
Selecting The Main Domain
Next, select the main domain for your subdomain. This tells Hostinger where to attach your new subdomain.
In the same subdomain settings, you will find a drop-down menu. This menu lists all your domains. Choose the main domain from this list.
For instance, if your main domain is example.com, select it from the menu. This ensures your subdomain will be subdomain.example.com.
After selecting the main domain, click the “Create” button. Hostinger will now set up your subdomain. This process may take a few minutes.
Once done, you will see your new subdomain listed. You can now start adding content to it. Use the File Manager or FTP to upload your files.
| Step | Action |
|---|---|
| 1 | Login to Hostinger |
| 2 | Go to Control Panel |
| 3 | Click on Subdomains |
| 4 | Input Subdomain Name |
| 5 | Select Main Domain |
| 6 | Click Create |
Creating a subdomain can help you better manage your website. It makes navigation easier for your users. Follow these steps, and you will have your subdomain ready in no time.
Configuring Dns Settings
Creating a subdomain in Hostinger requires proper DNS configuration. This ensures your subdomain points to the correct server. Let’s break down the process into simple steps.
Understanding Dns Records
DNS records are like the internet’s phone book. They tell browsers where to find your website. Each record has a specific purpose. Here’s a quick overview:
| Record Type | Description |
|---|---|
| A Record | Maps a domain to an IP address. |
| CNAME Record | Points a domain to another domain. |
| MX Record | Directs email to a mail server. |
| TXT Record | Provides text information to sources outside your domain. |
Adding Necessary Records
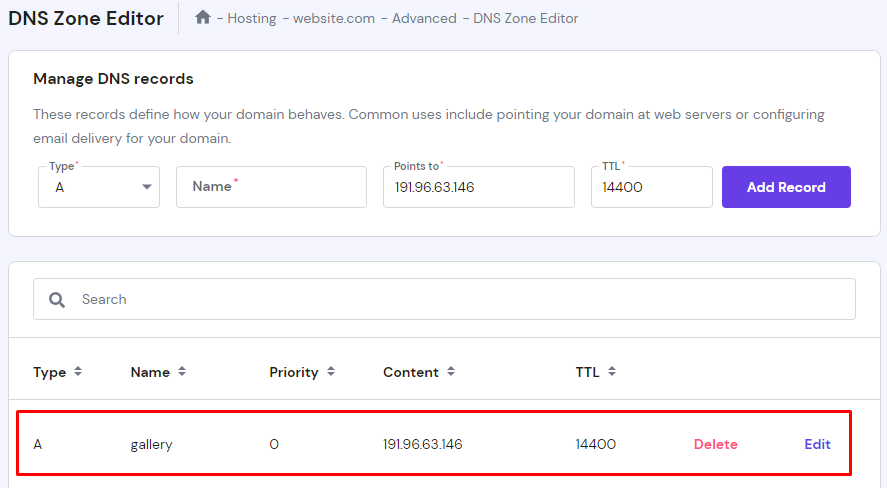
To create your subdomain, you need to add specific DNS records. Follow these steps:
- Login to your Hostinger account.
- Navigate to the DNS Zone Editor.
- Click on Add New Record.
- Select the type of record you need.
- Enter the necessary details:
- Type: Choose A or CNAME.
- Name: Your subdomain name (e.g., sub.example.com).
- Value: IP address (A record) or domain (CNAME).
- TTL: Set to default (usually 14400).
- Click Save to add the record.
After adding the records, it might take some time to propagate. Your subdomain should be up and running soon.
Uploading Content To Subdomain
Uploading content to your subdomain in Hostinger is easy. You can use two main methods. These are the File Manager and FTP (File Transfer Protocol). Both methods are straightforward and user-friendly.
Using File Manager
The File Manager is a simple way to upload files. Follow these steps:
- Log into your Hostinger account.
- Go to the Hosting section.
- Select your domain and click on Manage.
- Find the File Manager under the Files tab.
- Open the public_html directory.
- Select your subdomain folder.
- Click the Upload Files button.
- Select the files you want to upload.
The files will upload quickly. You can see them in the File Manager once uploaded.
Uploading Via Ftp
Uploading via FTP is another method. You need an FTP client like FileZilla. Follow these steps:
- Download and install FileZilla.
- Open FileZilla and enter your FTP details:
- Host: Your domain name.
- Username: Your FTP username.
- Password: Your FTP password.
- Port: Leave it blank or enter 21.
- Click Quickconnect.
- Navigate to the public_html directory in the right panel.
- Open your subdomain folder.
- Drag and drop files from your computer to the subdomain folder.
Your files will start uploading. You can monitor the progress in FileZilla.
Testing Your Subdomain
Once you’ve created a subdomain in Hostinger, it’s crucial to test it. This helps ensure everything is set up correctly. Testing your subdomain involves several steps. Here, we will guide you through the process.
Checking Propagation
DNS propagation is the time it takes for DNS changes to update across the web. It can take up to 48 hours. To check if your subdomain has propagated:
- Open a web browser.
- Type your subdomain URL (e.g.,
subdomain.yoursite.com) in the address bar. - Press Enter.
If your subdomain loads, it’s working. If not, wait a bit longer and try again. Alternatively, use online tools like WhatsMyDNS to check propagation status.
Troubleshooting Common Issues
Sometimes, your subdomain might not work as expected. Here are some common issues and fixes:
| Issue | Possible Cause | Solution |
|---|---|---|
| Page Not Found | Incorrect DNS Settings | Double-check your DNS settings in Hostinger. |
| Slow Loading | Propagation Delay | Wait up to 48 hours for full propagation. |
| Security Warning | SSL Certificate Missing | Install an SSL certificate via Hostinger’s control panel. |
By following these steps, you can resolve most issues. If problems persist, contact Hostinger support for further assistance.
Managing Subdomains
Managing subdomains in Hostinger is easy. You can edit or delete subdomains with a few clicks. This section will guide you through editing subdomain settings and deleting a subdomain.
Editing Subdomain Settings
Editing subdomain settings in Hostinger is simple. Follow these steps:
- Log in to your Hostinger account.
- Navigate to the Hosting tab.
- Select the domain you want to manage.
- Click on Subdomains.
- Find the subdomain you want to edit.
- Click on the Manage button next to it.
- Modify the settings as needed.
- Click Save to apply changes.
Remember to review the changes before saving. This ensures the subdomain works as expected.
Deleting A Subdomain
Deleting a subdomain in Hostinger is quick. Follow these steps:
- Log in to your Hostinger account.
- Go to the Hosting tab.
- Select the domain associated with the subdomain.
- Click on Subdomains.
- Locate the subdomain you want to delete.
- Click the Delete button next to it.
- Confirm the deletion by clicking Yes.
Deleting a subdomain will remove all files and data associated with it. Ensure you back up any important data before proceeding.

Credit: www.hostinger.com
Advanced Tips
Creating a subdomain in Hostinger is a straightforward process. But to make your subdomain truly shine, you need to delve into some advanced tips. These tips will enhance the functionality and security of your subdomain.
Ssl Certificates
Securing your subdomain with an SSL certificate is crucial. It helps to protect data and build trust with visitors. Here’s how you can add an SSL certificate to your subdomain:
- Log in to your Hostinger account.
- Navigate to the SSL section in your dashboard.
- Select the subdomain you want to secure.
- Click on Install SSL.
- Follow the prompts to complete the installation.
Once installed, your subdomain will show a padlock icon in the browser. This indicates a secure connection.
Custom Error Pages
Custom error pages improve user experience. They guide visitors when they encounter errors. Follow these steps to create custom error pages for your subdomain:
- Create an HTML file for each error (404, 500, etc.).
- Upload these files to the public_html directory of your subdomain.
- Access your .htaccess file.
- Add the following code to specify custom error pages:
ErrorDocument 404 /404.html
ErrorDocument 500 /500.html
This code tells the server to display your custom error pages. Custom error pages can be informative or fun, adding a personal touch to your site.
Frequently Asked Questions
How To Create A Subdomain Website In Hostinger?
Log in to Hostinger. Go to hPanel, then click on “Domains” and select “Subdomains. ” Enter the subdomain name and choose the domain. Click “Create. “
How Do I Create A Subdomain In Host?
Log into your hosting account. Go to the control panel. Click “Subdomains”. Enter your desired subdomain name. Save changes.
How Do I Create A Subdomain On Truehost?
Log in to your Truehost cPanel. Click on “Subdomains” under the “Domains” section. Enter the desired subdomain name. Choose the domain for the subdomain. Click “Create. “
How To Add Ssl To Subdomain In Hostinger?
To add SSL to a subdomain in Hostinger, log into your account. Go to the SSL section, select the subdomain, and click “Install”. Ensure DNS settings are correct.
Conclusion
Creating a subdomain in Hostinger is straightforward. Follow the steps outlined, and you’ll set it up quickly. This guide simplifies the process, ensuring even beginners succeed. Start creating your subdomain now to enhance your website’s functionality and organization. Happy hosting with Hostinger!