To set up Hostinger email on Outlook, open Outlook and navigate to File > Add Account. Enter your Hostinger email credentials and follow the prompts.
Setting up your Hostinger email on Outlook is straightforward and efficient. Outlook is a popular email client that offers various features for managing your emails. Integrating your Hostinger email with Outlook ensures you can access and manage your emails seamlessly.
This process not only enhances your productivity but also keeps your communications organized. By following simple steps, you can quickly sync your Hostinger email with Outlook. This guide helps you through the essential steps for a smooth setup. Enjoy the convenience of accessing your Hostinger emails directly from Outlook without hassle.
Credit: hostwizly.com
Prerequisites
Setting up your Hostinger email on Outlook requires some preparation. Ensure you have all the necessary information and access rights before starting.
Required Information
Before you begin, gather the following details:
- Hostinger Email Address: The complete email address you wish to set up.
- Password: The password associated with your Hostinger email account.
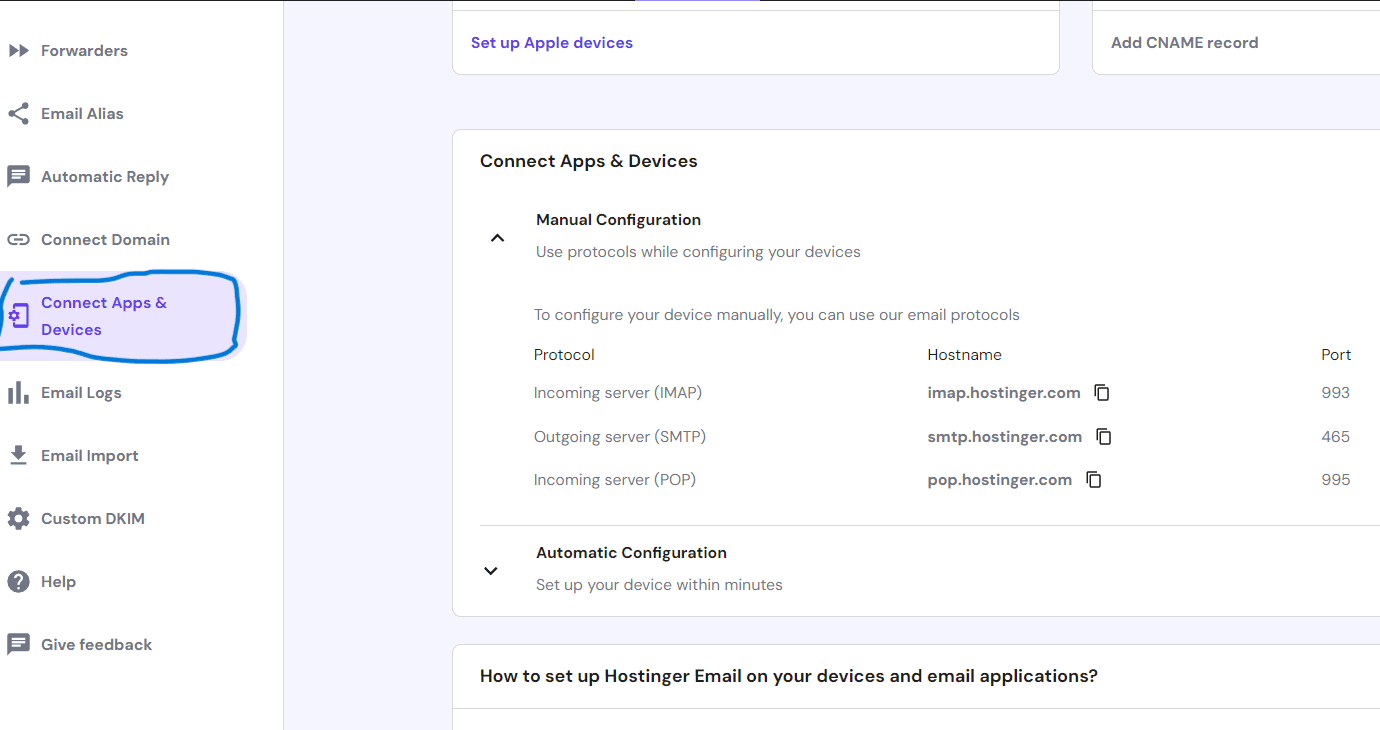
- Incoming Mail Server (IMAP/POP): Usually
imap.hostinger.comorpop.hostinger.com. - Outgoing Mail Server (SMTP): Typically
smtp.hostinger.com. - Port Numbers: IMAP (993) or POP (995), and SMTP (465 or 587).
Setting Up Hostinger Email Account
Follow these steps to set up your Hostinger email on Outlook:
- Open Outlook and go to File.
- Select Add Account.
- Enter your Hostinger email address and click Connect.
- Choose IMAP or POP as your account type.
- Fill in the Incoming and Outgoing mail server details:
- Enter your password and click Connect.
- Outlook will verify your settings and complete the setup.
| Server Type | Server Address | Port |
|---|---|---|
| Incoming (IMAP) | imap.hostinger.com | 993 |
| Incoming (POP) | pop.hostinger.com | 995 |
| Outgoing (SMTP) | smtp.hostinger.com | 465 or 587 |
Once setup is complete, your Hostinger email will sync with Outlook. You can now send and receive emails seamlessly.
Accessing Outlook
Setting up your Hostinger Email on Outlook is easy. Follow these steps to get started. First, you need to access Outlook on your device.
Installing Outlook
To begin, you must install Outlook on your computer or mobile device.
- Visit the Microsoft Office website.
- Download the Outlook application.
- Follow the installation instructions.
If you already have Outlook installed, you can skip this step.
Launching The Application
Once installed, you need to launch Outlook.
- Find the Outlook icon on your desktop or start menu.
- Double-click the icon to open Outlook.
- Wait for the application to load.
Now, you are ready to start setting up your Hostinger Email.
Adding A New Account
Setting up your Hostinger email on Outlook can enhance your email experience. Follow these simple steps to add a new account without any hassle.
Navigating To Account Settings
First, open Outlook on your computer. Click on the File tab in the top-left corner. This will open a new window with various options.
In the new window, select Account Settings from the drop-down menu. Click on Account Settings again in the list that appears.
A new window will pop up showing all your email accounts. Click on the New button to start the process of adding a new email account.
Choosing Email Account Type
After clicking the New button, you will see different types of email accounts. Select the Email Account option and click Next.
You will now need to enter your Hostinger email details. These include your name, email address, password, and password confirmation.
Click on the Next button after filling in the details. Outlook will now try to connect to the Hostinger mail server.
If everything is correct, you will see a success message. Click on the Finish button to complete the setup.
| Step | Description |
|---|---|
| 1 | Open Outlook and go to the File tab. |
| 2 | Click on Account Settings and then Account Settings again. |
| 3 | Click on the New button to add a new account. |
| 4 | Select Email Account and click Next. |
| 5 | Enter your Hostinger email details and click Next. |
| 6 | Click Finish to complete the setup. |
By following these steps, you can easily set up your Hostinger email on Outlook. This will help you manage your emails more efficiently.
Entering Account Details
Setting up your Hostinger email on Outlook requires a few key steps. One crucial step is Entering Account Details. This involves inputting your email credentials and configuring server settings. Below is a detailed guide to help you through the process.
Inputting Hostinger Email Credentials
First, open Outlook and select File in the top left corner. Click Add Account to start the setup wizard. Choose Manual setup or additional server types and click Next.
In the Choose Service window, select POP or IMAP and click Next. You will be prompted to enter your email account details.
Fill in the following fields:
- Your Name: Enter your full name.
- Email Address: Enter your Hostinger email address.
- Account Type: Choose either POP3 or IMAP. IMAP is recommended.
- Incoming mail server: Enter
imap.hostinger.comfor IMAP orpop.hostinger.comfor POP3. - Outgoing mail server (SMTP): Enter
smtp.hostinger.com. - Username: Enter your Hostinger email address again.
- Password: Enter your Hostinger email password.
Configuring Server Settings
Click on More Settings in the lower-right corner. Navigate to the Outgoing Server tab. Check the box labeled My outgoing server (SMTP) requires authentication. Select Use same settings as my incoming mail server.
Next, go to the Advanced tab. Configure the following settings:
| Field | IMAP | POP3 |
|---|---|---|
| Incoming server (IMAP/POP3) | 993 | 995 |
| Use the following type of encrypted connection | SSL | SSL |
| Outgoing server (SMTP) | 465 | 465 |
| Use the following type of encrypted connection | SSL | SSL |
After entering the server settings, click OK to close the window. Click Next to test the account settings. Outlook will confirm if the settings are correct. If everything is set up properly, click Finish to complete the setup.
Advanced Settings
Setting up Hostinger email on Outlook requires adjusting advanced settings. These settings ensure seamless synchronization and secure communication. Let’s explore the advanced settings to configure your Hostinger email properly.
Outgoing Server Settings
For the outgoing server settings, follow these steps:
- Open Outlook and go to File > Account Settings.
- Select your Hostinger email account and click Change.
- Click More Settings and navigate to the Outgoing Server tab.
- Check the option “My outgoing server (SMTP) requires authentication”.
- Select “Use same settings as my incoming mail server”.
Next, configure the SMTP details:
| Field | Value |
|---|---|
| Outgoing mail server (SMTP) | smtp.hostinger.com |
| Port | 587 (TLS) or 465 (SSL) |
| Encryption | TLS or SSL |
Incoming Server Settings
The incoming server settings are equally important:
- Go to the Advanced tab in More Settings.
- Under Incoming Server (IMAP), enter the following details:
| Field | Value |
|---|---|
| Incoming mail server (IMAP) | imap.hostinger.com |
| Port | 993 (SSL) or 143 (TLS) |
| Encryption | SSL or TLS |
Ensure that the settings match exactly. Incorrect details can lead to issues. Click OK to save the changes. Your Hostinger email should now be set up in Outlook.
Testing The Configuration
After setting up Hostinger Email on Outlook, it’s crucial to test the configuration. This ensures everything works smoothly. Follow these steps to verify your setup and fix any issues.
Sending A Test Email
To verify the email setup, send a test email. Follow these steps:
- Open Outlook.
- Click on New Email.
- Enter your email address in the To field.
- Type Test Email in the subject line.
- Write a short message in the body.
- Click Send.
Check your inbox. Ensure the test email arrives without delay. If it doesn’t, there might be a configuration issue.
Troubleshooting Common Issues
If the test email doesn’t arrive, consider these common issues:
| Issue | Solution |
|---|---|
| Incorrect Settings | Verify the server settings. Ensure you used the correct ports. |
| Authentication Errors | Check your username and password. Make sure they are correct. |
| Firewall or Antivirus | Disable the firewall or antivirus temporarily. Test sending the email again. |
Also, you can check the Outgoing Server settings:
- Click on File.
- Select Account Settings.
- Double-click your Hostinger account.
- Click More Settings.
- Navigate to the Outgoing Server tab.
- Ensure My outgoing server (SMTP) requires authentication is checked.
Make these adjustments and send another test email. Repeat the troubleshooting steps if necessary.
Final Adjustments
You’ve successfully set up your Hostinger email on Outlook. Now, it’s time to fine-tune your settings. These final adjustments will ensure optimal performance. Let’s dive into the specifics of syncing folders and customizing notification settings.
Syncing Folders
Syncing folders ensures all your email data stays up-to-date across devices. Follow these steps:
- Open Outlook and go to File.
- Select Account Settings and then Account Settings again.
- Choose your Hostinger email account and click Change.
- Click on More Settings and switch to the Advanced tab.
- Under Folders, ensure Root folder path is set to Inbox.
- Click OK and then Next.
- Finally, click Finish to save changes.
Customizing Notification Settings
Custom notifications help you stay informed without distractions. Adjust your settings as follows:
- Go to File and select Options.
- Click on Mail in the left sidebar.
- Scroll down to the Message arrival section.
- Check or uncheck the boxes based on your preference:
- Play a sound
- Briefly change the mouse pointer
- Show an envelope icon in the taskbar
- Display a Desktop Alert
- Click OK to save your settings.
With these final adjustments, your Hostinger email in Outlook is ready to use.

Credit: m.youtube.com

Credit: www.youtube.com
Frequently Asked Questions
How To Setup Hostinger Mail On Outlook?
Open Outlook. Go to File > Add Account. Enter your Hostinger email and password. Select manual setup. Use IMAP/POP settings from Hostinger. Save changes.
What Is The Smtp Setting For Hostinger?
Hostinger’s SMTP settings are: SMTP server: smtp. hostinger. com, Port: 587 (TLS) or 465 (SSL), Username: your email, Password: your email password.
How To Configure Email On Outlook?
Open Outlook. Go to File > Add Account. Enter your email address. Click Connect. Input your password. Click Next, then Finish.
What Is An Imap Hostinger?
IMAP Hostinger is a service that allows you to manage and access your email from multiple devices. It synchronizes emails in real-time, ensuring you see the same messages and folders regardless of the device used. Ideal for efficient and seamless email management.
Conclusion
Setting up Hostinger email on Outlook is straightforward and efficient. Follow the steps to enjoy seamless communication. Ensure your settings are correct for smooth operation. With this guide, you can now confidently configure your email. Enjoy the benefits of a well-organized inbox and enhanced productivity.
Happy emailing!