To use Hostinger CDN, activate it from your hosting control panel and configure the settings. Ensure the CDN is linked to your website.
Hostinger CDN improves website speed by distributing content across multiple global servers. Fast loading times enhance user experience and boost SEO rankings. With Hostinger CDN, your website loads quickly for visitors worldwide, reducing latency and server load. This results in less downtime and increased reliability.
The setup is straightforward, requiring just a few steps in your Hostinger control panel. Optimal configuration ensures your site runs efficiently. Using a CDN can significantly impact your website’s performance and user satisfaction. Leverage Hostinger CDN to deliver content swiftly and improve your site’s overall performance.
Setting Up Hostinger Cdn
Setting up Hostinger CDN is straightforward and enhances your website’s speed. It helps in faster content delivery and improves user experience. Follow this guide to set up Hostinger CDN easily.
Creating An Account
First, you need a Hostinger account. Visit the Hostinger website to sign up.
- Click on the “Sign Up” button.
- Enter your email address and create a password.
- Verify your email to activate your account.
Once verified, log in to your new Hostinger account.
Choosing A Plan
Next, choose a CDN plan that suits your needs. Hostinger offers different plans based on your website traffic and storage requirements.
| Plan | Monthly Visits | Storage | Price |
|---|---|---|---|
| Basic | Up to 50,000 | 10GB | $9.99/month |
| Pro | Up to 100,000 | 20GB | $19.99/month |
| Business | Unlimited | 50GB | $29.99/month |
Choose a plan and proceed to payment. After payment, your CDN service will be activated. Now, you can start configuring it for your website.
Configuring Your Website
Configuring your website for Hostinger CDN ensures fast load times. It also improves user experience. Follow these simple steps.
Adding Your Domain
First, log into your Hostinger account. Navigate to the CDN section. There, click on the Add Domain button.
Enter your domain name in the provided field. Ensure you type it correctly. Click Add Domain to proceed.
Configuring Dns Settings
After adding your domain, you need to configure the DNS settings. This step is crucial for your site’s performance.
In your Hostinger dashboard, find the DNS Zone Editor. Select your domain from the dropdown list.
Add a CNAME record pointing to the CDN URL provided by Hostinger. This redirects traffic through the CDN.
| Type | Name | Value |
|---|---|---|
| CNAME | www | your-cdn-url.com |
Save your changes. It may take some time for DNS changes to propagate.
Optimizing Performance
Performance optimization is crucial for any website. A well-optimized site loads faster and offers a better user experience. Hostinger CDN provides various features to help you achieve this. Let’s explore some key settings to optimize your site’s performance.
Caching Settings
Caching stores copies of files for quick access. This reduces server load and speeds up your site.
- Enable Static File Caching for CSS, JavaScript, and images.
- Set a TTL (Time To Live) for cached files. A typical setting is 24 hours.
- Utilize Browser Caching to store files in the user’s browser.
| File Type | TTL |
|---|---|
| Images | 24 hours |
| CSS/JS | 12 hours |
| HTML | 1 hour |
Image Optimization
Images can slow down your site if not optimized. Hostinger CDN offers tools to enhance image performance.
- Use Lazy Loading to delay loading off-screen images.
- Enable Image Compression to reduce file sizes without losing quality.
- Convert images to WebP format for better compression.
Optimized images load faster and use less bandwidth, enhancing user experience.
Security Features
Hostinger CDN offers robust security features to protect your website. These features keep your site safe from various online threats. Let’s dive into some key security features.
Ddos Protection
Hostinger CDN includes DDoS protection to guard against attacks. DDoS attacks flood your site with traffic, causing it to crash. Hostinger CDN detects and blocks such attacks, ensuring your site remains online.
This feature keeps your website running smoothly. Visitors won’t face downtime or slow speeds. Your online presence stays strong and dependable.
Ssl/tls Encryption
With Hostinger CDN, your website benefits from SSL/TLS encryption. This encryption protects data transfer between your site and users. It makes it difficult for hackers to steal information.
SSL/TLS encryption boosts your website’s credibility. Visitors see a padlock symbol in their browser, indicating a secure connection. This trust can improve your site’s reputation and user experience.
| Security Feature | Benefit |
|---|---|
| DDoS Protection | Prevents site crashes from malicious traffic |
| SSL/TLS Encryption | Secures data transfer, enhancing trust |
These security features are essential for maintaining a safe and reliable website. Hostinger CDN makes it easy to protect your online presence.
Monitoring And Analytics
Monitoring and Analytics in Hostinger CDN helps you track your website’s performance. You can check traffic, speed, and other key metrics. This data helps you improve your site’s efficiency and user experience.
Traffic Reports
Traffic Reports offer insights into your website’s visitors. You can see how many users visit your site daily. This helps you understand user behavior and peak times.
A typical traffic report includes:
- Daily visits
- Page views
- Unique visitors
Hostinger CDN provides easy-to-read charts and graphs. This visual data helps you quickly understand your traffic patterns.
Performance Metrics
Performance Metrics show how well your site performs. You can track load times, response rates, and more.
Key performance metrics include:
| Metric | Description |
|---|---|
| Load Time | Time taken for a page to load |
| Response Time | Server response time |
| Uptime | Percentage of time site is up |
These metrics help you identify areas needing improvement. You can then take steps to optimize your site’s performance.

Credit: www.hostinger.com
Troubleshooting Common Issues
Using Hostinger CDN can improve your website speed. But sometimes issues arise. This section will help you troubleshoot common problems. Follow these tips to ensure smooth operation.
Dns Propagation Delays
DNS propagation delays can slow down your site. This happens when DNS changes take time to update. Here are steps to handle this issue:
- Check DNS Settings: Ensure all DNS records are correct.
- Be Patient: DNS updates can take up to 48 hours.
- Use Online Tools: Check propagation status with tools like WhatsMyDNS.net.
If the problem persists, contact your DNS provider. They can provide further assistance.
Slow Loading Times
Slow loading times can frustrate users. Here are some tips to speed up your site:
- Optimize Images: Use compressed images to reduce load times.
- Minimize HTTP Requests: Limit the number of elements on your page.
- Enable Browser Caching: Save static files in users’ browsers.
For more persistent issues, check your server response times. If needed, upgrade to a better hosting plan.
Advanced Configurations
Advanced Configurations in Hostinger CDN offer a range of features. These features help you enhance your website’s performance. By tweaking these settings, you can achieve faster load times and better user experiences.
Custom Rules
Custom rules allow you to tailor your CDN settings. You can create rules based on your website’s needs. This ensures optimal performance and security.
- Cache Control: Set how long files stay in the cache.
- Security Rules: Block specific IPs or countries.
- URL Redirects: Redirect traffic to specific URLs.
To set custom rules, go to your Hostinger CDN dashboard. Click on the Custom Rules section. Add your desired rules and save them.
Api Integration
API integration allows you to automate tasks. This feature is essential for developers. You can manage your CDN settings through your application.
| Task | API Endpoint |
|---|---|
| Clear Cache | /api/v1/cache/clear |
| Set Custom Rules | /api/v1/custom-rules |
| View Analytics | /api/v1/analytics |
Use the API keys provided in your dashboard. Ensure you keep these keys secure. Integrate the API with your application to automate tasks.
const axios = require('axios');

const options = {
  method: 'POST',
  url: 'https://cdn.hostinger.com/api/v1/cache/clear',
  headers: {
    'Authorization': 'Bearer YOUR_API_KEY'
  }
};

axios(options)
  .then(response => console.log(response.data))
  .catch(error => console.error(error));
This is a simple example of clearing the cache. Modify the code for other tasks.

Credit: www.hostinger.com

Credit: m.youtube.com
Frequently Asked Questions
How Does Hostinger Cdn Work?
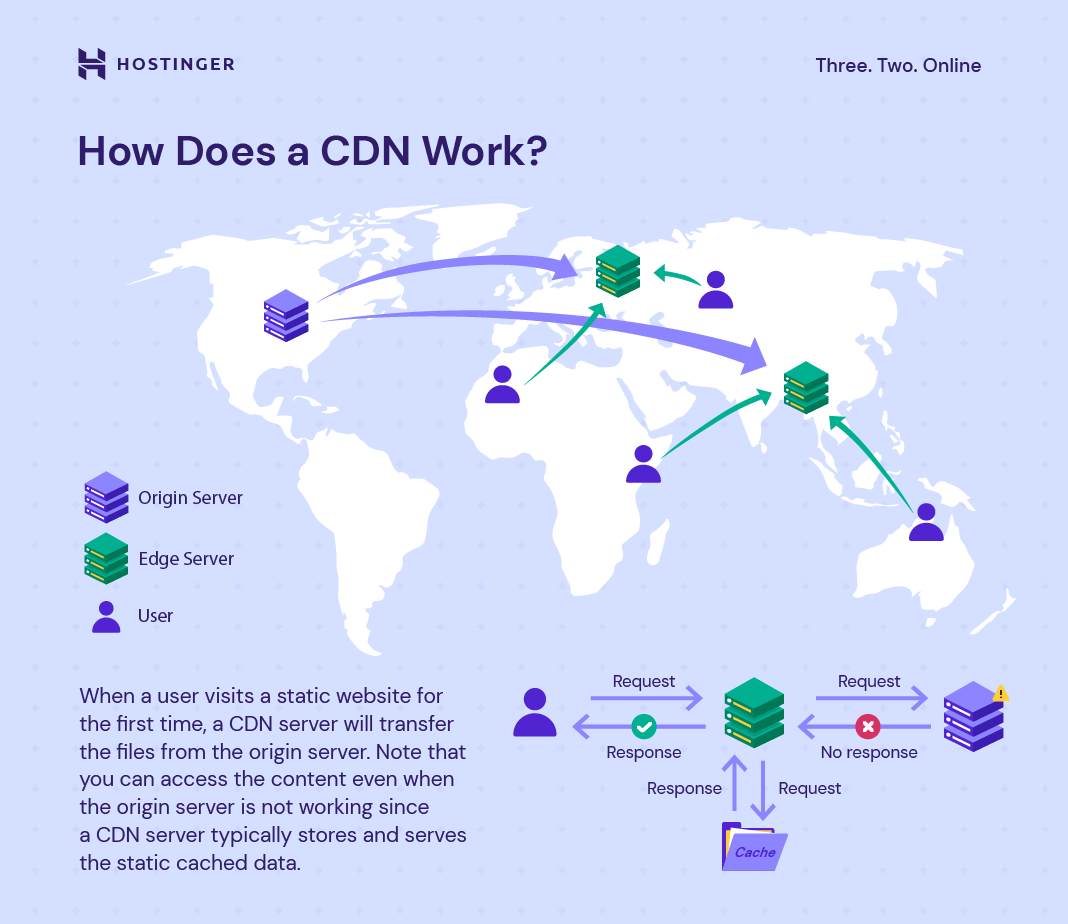
Hostinger CDN speeds up your website by caching content on multiple servers globally. It reduces load times and enhances user experience.
How Do I Access A Website Using Cdn?
Access a website using a CDN by entering its URL in your browser. The CDN automatically delivers content from the nearest server. This reduces load times and improves performance. Ensure the website uses a CDN by checking the network requests in the developer tools.
How To Use Cloudflare Cdn Hostinger?
Sign up for Cloudflare. Add your domain. Update DNS settings in Cloudflare. Change nameservers to Cloudflare’s provided ones. Verify setup.
How To Activate Cdn?
To activate CDN, log in to your hosting provider’s dashboard. Find the CDN settings. Enable the CDN option. Update your DNS settings if required. Save the changes.
Conclusion
Using Hostinger CDN is an effective way to boost your website’s speed and performance. It enhances user experience and improves SEO rankings. Follow our guide to easily set up and optimize your CDN. Enjoy faster load times and happier visitors.
Start enhancing your website’s performance with Hostinger CDN today.