To use Hostinger Email, log into your Hostinger account and access the Email section. Follow the setup instructions provided.
Hostinger Email provides a reliable and user-friendly platform for managing business and personal emails. With Hostinger, users can create professional email addresses that reflect their domain names. The service includes features like spam filtering, email forwarding, and autoresponders. Hostinger Email integrates seamlessly with various email clients, making it easy to access your emails from any device.
The intuitive interface ensures that even those new to email hosting can navigate the setup process effortlessly. Security features protect your communications, ensuring privacy and data integrity. Hostinger’s customer support is available to assist with any issues, making it a dependable choice for email hosting needs.
Introduction To Hostinger Email
Hostinger Email is a powerful tool for managing your business communications. It offers a range of features designed to make your email experience seamless and efficient. Whether you are a small business owner or running a large enterprise, Hostinger Email can meet your needs.
What Is Hostinger Email?
Hostinger Email is a professional email service provided by Hostinger. It allows you to create and manage email accounts with your domain name. This service ensures your emails are secure, reliable, and professional.
Benefits Of Using Hostinger Email
Using Hostinger Email offers numerous benefits:
- Professional Appearance: Use your domain name for emails.
- Security: Advanced spam and virus protection.
- Reliability: High uptime and dependable service.
- Easy Management: User-friendly control panel.
| Feature | Benefit |
|---|---|
| Domain-based Email | Enhances professional image |
| Spam Protection | Keeps your inbox clean |
| High Uptime | Ensures email availability |
| User-Friendly Interface | Simplifies email management |
Hostinger Email is a smart choice for your business communication needs. It combines ease of use with advanced features for a seamless experience.

Credit: www.youtube.com
Setting Up Your Hostinger Email
Setting up your Hostinger email is easy. This guide will help you. Follow these steps to start.
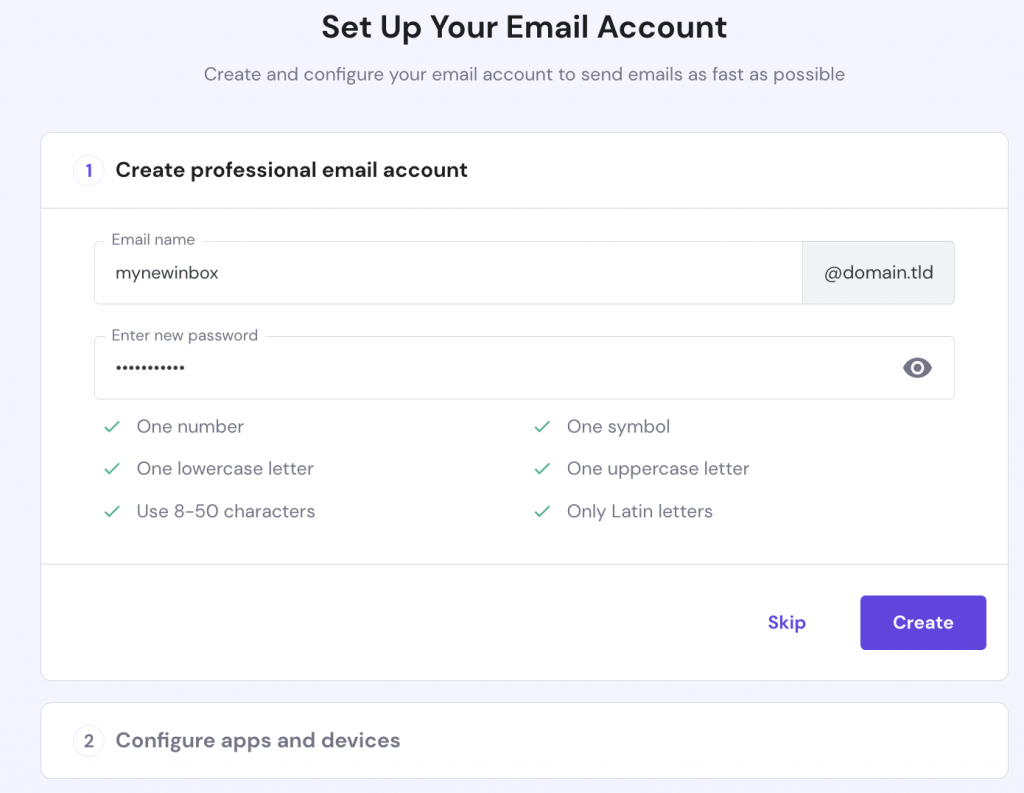
Creating An Email Account
First, log in to your Hostinger account. Go to the Email section in the dashboard.
- Click on Email Accounts.
- Choose the domain you want.
- Click on Create.
- Enter your desired email address.
- Set a strong password.
- Click on Create again.
Now, you have an email account ready to use.
Configuring Email Settings
Next, configure your email settings. This ensures smooth operation.
- Open the Email Accounts section.
- Find your new email account.
- Click on Manage.
- Adjust settings for spam filters and forwarding.
- Set auto-replies if needed.
Make sure your settings match your needs.
Table Of Common Settings
| Setting | Description |
|---|---|
| Spam Filter | Blocks unwanted emails. |
| Email Forwarding | Sends emails to another address. |
| Auto-Reply | Sends automatic replies. |
Accessing Hostinger Email
Accessing your Hostinger email is simple and convenient. Whether you prefer using webmail or an email client, Hostinger has you covered. Let’s dive into the steps for each method.
Using Webmail
Webmail is a quick and easy way to access your Hostinger email. Here are the steps:
- Open your web browser and go to the Hostinger Webmail login page.
- Enter your full email address and password.
- Click the Login button.
Once logged in, you can read and send emails, organize your inbox, and manage settings. Webmail offers a user-friendly interface, making it ideal for beginners.
Setting Up Email Clients
If you prefer using an email client, you can set it up with Hostinger email. Follow these steps:
| Step | Description |
|---|---|
| 1 | Open your email client application (e.g., Outlook, Thunderbird). |
| 2 | Go to the Account Settings or Add Account section. |
| 3 | Enter your full email address and password. |
| 4 | Select IMAP or POP3 as the account type. |
| 5 | Input the incoming and outgoing mail server details:
|
| 6 | Save the settings and test the connection. |
Now, your email client is ready to send and receive Hostinger emails. This method allows for offline access and more advanced features.
Credit: www.hostinger.com
Managing Your Inbox
Managing your inbox efficiently can save time and reduce stress. Hostinger Email offers powerful tools to help you stay organized. Learn how to manage your inbox effectively with these tips.
Organizing Emails
Keep your inbox clean by organizing emails into folders. Create folders for different categories such as work, personal, and newsletters. Drag and drop emails into the appropriate folders.
Use the search function to find specific emails quickly. You can search by sender, subject, or keywords.
Delete emails you no longer need. This will free up space and make it easier to find important messages.
Using Filters And Labels
Filters can automatically sort emails as they arrive. To create a filter, go to your email settings and select Filters. Set conditions for the filter, such as sender or subject. Choose actions like moving the email to a folder or labeling it.
| Condition | Action |
|---|---|
| Sender is boss@example.com | Move to Work Folder |
| Subject contains “Newsletter” | Move to Newsletters Folder |
Labels work like tags and can help you find emails faster. Apply multiple labels to a single email. For example, label an email as both work and urgent.
To create a new label, click on the Labels section in your settings. Name your label and choose a color for easy identification.
- Urgent: For emails that need immediate attention.
- Follow-up: For emails that require a response later.
Use labels and filters together for maximum efficiency. This will keep your inbox organized and clutter-free.
Advanced Email Features
Hostinger Email offers powerful tools beyond basic email functions. Explore advanced features like Email Forwarding and Autoresponders to enhance your email experience.
Email Forwarding
With Email Forwarding, you can redirect emails from one address to another. This helps you manage multiple email accounts efficiently.
- Log in to your Hostinger account.
- Navigate to the “Emails” section.
- Select the email account you want to forward.
- Click on “Email Forwarding.”
- Enter the destination email address.
- Save the changes.
Email Forwarding can help you centralize your emails. No need to check multiple inboxes. Get all emails in one place.
Autoresponders
Autoresponders send automatic replies to incoming emails. They are great for informing senders about your availability.
- Log in to your Hostinger account.
- Go to the “Emails” section.
- Select your email account.
- Click on “Autoresponders.”
- Set the subject and message for the auto-reply.
- Specify the time frame for the autoresponder.
- Save your settings.
Use Autoresponders to keep your contacts informed. Let them know when you are away. Provide them with alternative contact options if needed.
Both Email Forwarding and Autoresponders are easy to set up. They improve your email management and communication.
Security And Privacy
Protecting your email is essential. Hostinger Email offers robust security features. This ensures your data stays safe. Let’s explore key features like enabling two-factor authentication and spam protection.
Enabling Two-factor Authentication
Two-factor authentication (2FA) adds an extra layer of security. It requires two forms of identification. This makes it harder for unauthorized users to access your account.
- Log in to your Hostinger account.
- Navigate to the Security Settings section.
- Enable the Two-Factor Authentication option.
- Follow the on-screen instructions.
2FA protects your email from breaches. Always keep your authentication device secure.
Spam Protection
Spam emails can be annoying and harmful. Hostinger Email includes robust spam filters. These filters block unwanted emails from reaching your inbox.
| Spam Protection Feature | Description |
|---|---|
| SpamAssassin | Analyzes and filters spam emails. |
| Blacklist/Whitelist | Customize which emails get blocked or allowed. |
Regularly check your spam folder. Ensure no important emails are filtered out.
Using these features enhances your email security and privacy. Stay safe and keep your data protected with Hostinger Email.
Troubleshooting Common Issues
Using Hostinger Email is usually smooth. But sometimes, you may face issues. This section helps you solve common problems like emails not sending and password recovery.
Email Not Sending
Are your emails not sending? Follow these steps to fix it:
- Check your internet connection: Ensure you are connected to the internet.
- Verify recipient’s email address: Ensure the email address is correct.
- Check your email quota: Ensure you have not exceeded your quota.
- Review SMTP settings: Ensure your SMTP settings are correct. Hostinger’s SMTP settings are:
| SMTP Server | smtp.hostinger.com |
|---|---|
| Port | 587 (TLS), 465 (SSL) |
| Username | Your full email address |
| Password | Your email password |
If emails still don’t send, contact Hostinger support for further help.
Password Recovery
Forgot your email password? Don’t worry. Follow these steps:
- Go to Hostinger’s control panel: Log in to your Hostinger account.
- Navigate to Email Accounts: Click on the “Emails” tab.
- Select the email account: Choose the email account you need to recover.
- Click “Change Password”: Enter a new password and confirm it.
Use a strong password with letters, numbers, and symbols. This keeps your email secure.
If you face issues, reach out to Hostinger support. They will assist you.

Credit: www.youtube.com
Tips And Best Practices
Using Hostinger Email effectively can improve your communication. Learn essential tips and best practices to optimize your email performance and maintain proper email etiquette.
Email Etiquette
Email etiquette is crucial for clear and professional communication. Follow these simple rules:
- Use a clear subject line: Summarize your email in a few words.
- Greet properly: Start with a polite greeting like “Dear” or “Hello”.
- Keep it concise: Write short, focused emails. Avoid unnecessary details.
- Use proper grammar: Check for spelling and grammatical errors.
- Be respectful: Maintain a polite tone throughout your message.
- Sign off appropriately: End with phrases like “Best regards” or “Sincerely”.
Optimizing Email Performance
Optimize your email performance to ensure fast and reliable delivery. Here are some tips:
- Use filters: Organize your inbox with filters and labels.
- Regularly clean your inbox: Delete or archive old emails to keep your inbox tidy.
- Enable two-factor authentication: Enhance security by enabling two-factor authentication.
- Use professional signatures: Create a signature with your name, title, and contact info.
- Monitor email metrics: Track open rates and responses to measure effectiveness.
| Tip | Action |
|---|---|
| Clear subject lines | Summarize your email topic |
| Proper greetings | Start with “Dear” or “Hello” |
| Concise messages | Keep emails short and to the point |
| Grammar check | Proofread before sending |
| Respectful tone | Maintain politeness |
| Appropriate sign-off | End with “Best regards” or “Sincerely” |
| Inbox filters | Organize with filters and labels |
| Clean inbox | Delete or archive old emails |
| Two-factor authentication | Enable for added security |
| Professional signatures | Include name, title, and contact info |
| Email metrics | Track open rates and responses |
Frequently Asked Questions
How To Use Email From Hostinger?
Log in to Hostinger. Go to the Email Accounts section. Click “Create” and set up your new email. Access it via webmail or configure it in an email client.
Does Hostinger Give Free Email?
Yes, Hostinger provides free email with their web hosting plans. You get a professional email address.
How Do I Use Hostinger Mail In Outlook?
To use Hostinger mail in Outlook, open Outlook, go to “File” > “Add Account”, enter your email and password, select “IMAP” or “POP”, input Hostinger’s mail server settings, and complete the setup.
How To Transfer Hostinger Mail To Gmail?
Go to Gmail settings, select “Accounts and Import”. Click “Add a mail account”. Enter your Hostinger email and follow prompts.
Conclusion
Mastering Hostinger Email is simple with these steps. You’ll enjoy streamlined communication and professional email management. Start implementing these tips now for a more organized inbox. Remember, effective email use can enhance your online presence. Happy emailing with Hostinger!