Are you looking to make a powerful first impression with your SharePoint 2013 site? Creating a landing page is your key to engaging visitors right from the start.
Imagine a page that not only looks stunning but also serves as a gateway to your content, products, or services. A well-crafted landing page can turn casual browsers into committed users or customers. How do you achieve this in SharePoint 2013?
You’re in the right place! This guide will walk you through the steps, tips, and tricks to create a landing page that captures attention and drives action. Get ready to transform your SharePoint site into a dynamic hub of activity.

Credit: www.sharepointdiary.com
Getting Started With Sharepoint 2013
First, install SharePoint on your computer. Follow the instructions given. It’s important to have all the necessary software ready. This includes Windows Server and SQL Server.
Make sure you have enough storage space. SharePoint needs a lot of it. You also need a stable internet connection. This helps in downloading updates and features.
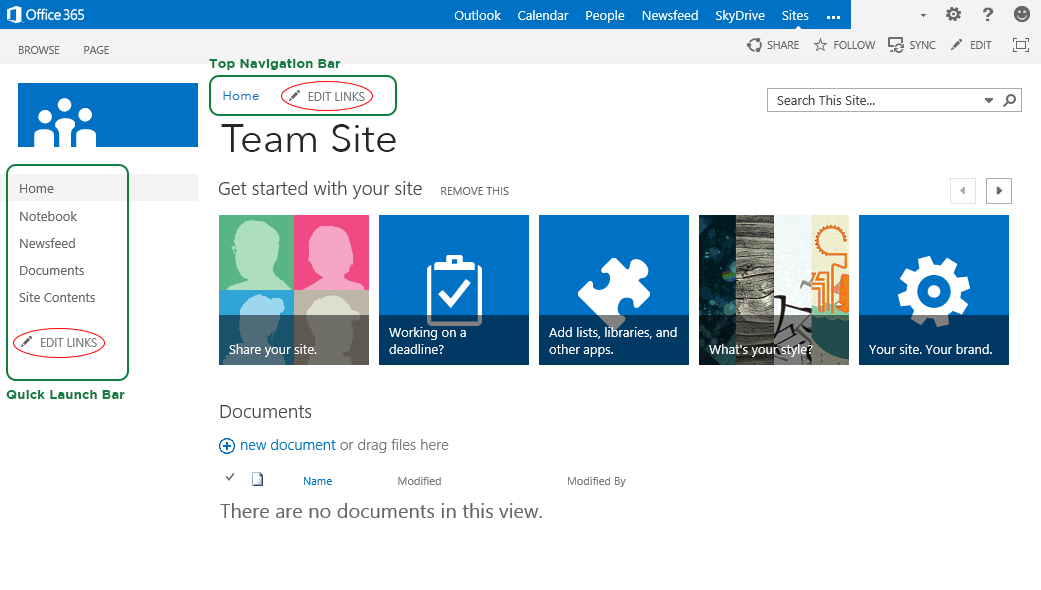
SharePoint has many parts. Learn about lists, libraries, and sites. Each part has a role. Lists store data. Libraries keep files. Sites help organize everything.
Get familiar with web parts. These are small pieces you add to pages. They show information in different ways. Also, know about workflows. They automate tasks and save time.

Credit: mydigitalworkplace.wordpress.com
Designing Your Landing Page
Know who will visit your page. Think about their needs. Are they kids or adults? Understanding this helps create a better page. Your audience can be students, workers, or customers. Each group wants something different. So, tailor your content to their desires.
Pick a simple layout. It should be easy to navigate. Use clear sections. Keep the design clean. A good layout makes information easy to find. Your layout helps guide the eyes. Choose colors that match your brand. Avoid clutter to keep the focus.
Use your logo and colors. These show your identity. Branding elements make your page unique. Use them consistently. Keep them simple and clear. Branding builds trust. Include company fonts and style. Make sure everything matches. Your branding tells your story.
Building The Landing Page Structure
Start by opening your SharePoint 2013 site. Navigate to the Site Contents area. Click on New Page. Name your page something simple. Make sure it describes your content. This is important. Choose a Page Layout that fits your needs. Basic layouts are easy to use. Save your new page to keep changes. Your page is ready for content.
Web Parts are like building blocks. They help organize your page. Click on Add a Web Part. You can choose from many options. Text, images, or lists can be added. Position them as needed. Rearrange for best layout. Web Parts make your page interactive. They help users engage with content.
Good navigation is key. It guides users through your site. Go to Site Settings. Click on Navigation. Add links to important pages. Use clear and simple names. Arrange links in a logical order. This helps users find what they need. Save changes to update your site.
Adding Content And Media
Creating a landing page in SharePoint 2013 involves adding content and media effectively. Use web parts to display images and videos. Ensure content is concise and engaging to capture visitor attention.
Embedding Text And Images
Text tells the story. Write clear and simple sentences. Use headings to organize. Use bullet points for lists. Images make pages pretty. Use high-quality pictures. Add them where they fit best. Use alt text for each image. This helps everyone understand.
Integrating Videos
Videos show things clearly. Pick short videos. They should be easy to understand. Use the embed code. Copy and paste it. Make sure the video player is visible. Use a video description. Explain what the video is about. This helps users know before watching.
Using Lists And Libraries
Lists organize information. Use them for tasks or steps. Libraries store files. Share documents easily. Create folders to sort items. Use clear names for each folder. This helps users find things quickly. Check permissions. Make sure users have access. This keeps files safe.
Enhancing User Experience
A responsive design makes your page look good on all devices. Use flexible layouts and images. This helps the page adjust to different screen sizes. Avoid using fixed-width elements. Test your design on various devices. Make sure everyone can view your page nicely.
Accessibility ensures everyone can use your page. Add alt text to images for people who can’t see them. Use clear headings and labels. This helps those using screen readers. Choose colors that are easy to see. Ensure text is big enough to read.
Interactive features keep users engaged. Add buttons and links that users can click. Use forms to gather information. Include videos or slideshows for more interest. These features make users want to stay longer. Always test them to ensure they work well.
Credit: www.proserveit.com
Testing And Publishing Your Page
Testing and publishing your SharePoint 2013 landing page ensures functionality and visibility. Check links, formatting, and user experience thoroughly. Once verified, publish the page to make it accessible to users.
Previewing And Testing Functionality
Before publishing, it’s vital to preview your landing page. Check if all buttons and links work. Ensure images load correctly. Look for spelling mistakes. Test on different devices. Make sure the page looks good on phones and computers. Verify all forms are working. Are animations smooth? Check if videos play well. Ensure everything is in place.
Gathering Feedback
Feedback is crucial. Share the page with friends. Ask them for opinions. Did they find any errors? Was the page clear? Collect their thoughts. Use their feedback to improve your page. Consider their suggestions. Make adjustments based on feedback. Ensure the page is user-friendly. Aim for a better experience.
Finalizing And Publishing
After adjustments, finalize your page. Review all changes. Double-check everything. Ensure it’s perfect. Ready to go live? Then, publish your page. Make it accessible to everyone. Ensure it’s visible online. Let others see your work. Celebrate your achievement. You’ve made a landing page!
Maintaining And Updating Your Landing Page
Monitoring performance is important. Use tools to check how your page does. Look at visitor numbers. See which parts they like. This helps you know what works.
Scheduling regular updates keeps your page fresh. Make a plan to update it. Add new information. Change pictures or text as needed. This keeps users interested.
Adapting to user feedback is smart. Listen to what users say. Use their ideas to make your page better. This makes them feel heard. It improves their experience.
Frequently Asked Questions
How To Create A Page In Sharepoint 2013?
To create a page in SharePoint 2013, navigate to your site. Click “Settings” and select “Add a Page. ” Enter a name for your page and click “Create. ” Use the “Edit” button to add content and web parts. Finally, save and publish your page.
What Is A Landing Page In Sharepoint?
A SharePoint landing page is a central hub that showcases important content and resources. It organizes information, enhances navigation, and engages users through visually appealing design and interactive elements. Optimizing a SharePoint landing page improves user experience, boosts productivity, and ensures quick access to essential tools and information.
How To Make A Page Home Page In Sharepoint?
To make a page the homepage in SharePoint, open the page, click “Make homepage” in the settings menu.
What Is The Difference Between A Sharepoint Site And A Sharepoint Page?
A SharePoint site is a collection of web pages, libraries, and lists, forming a workspace. A SharePoint page is a single web page within a site, displaying content like text, images, and apps. Sites organize multiple pages, while pages present specific information or functionality.
Conclusion
Creating a landing page in SharePoint 2013 is straightforward. Follow these steps to build a functional page. Start by planning your content and layout. Use SharePoint’s built-in tools for ease. Customize the design to match your brand. Ensure mobile compatibility for better user experience.
Test the page thoroughly to catch any issues. Keep the content clear and concise. Regular updates keep your page relevant. With practice, you can create effective landing pages. SharePoint 2013 offers flexibility to meet your needs. Explore its features to enhance your projects.
Happy designing!


