
To automate photo editing in Photoshop, use Actions and Batch Processing. Create an Action, then apply it to multiple photos.
Automating photo editing in Photoshop saves time and boosts productivity. Photoshop’s Actions feature lets you record a series of edits and apply them to any image with a single click. This is particularly useful for repetitive tasks, such as resizing, color correction, or applying specific filters.
Batch Processing takes this a step further by allowing you to apply an Action to an entire folder of images, streamlining your workflow. This combination of features is invaluable for photographers, graphic designers, and anyone who frequently edits large numbers of photos. By automating routine tasks, you can focus on more creative aspects of your projects.
Credit: www.adobe.com
Introduction To Automation In Photoshop
Editing photos can take a lot of time. But, Photoshop has tools that can help. Automation in Photoshop can make your work faster. In this section, we will learn about these tools.
The Need For Speed
Every photo editor wants to work quickly. Speed is very important. Sometimes, you need to edit many photos. Doing this by hand can take hours. Automation can save you time. It can do the same task on many photos.
Automation helps keep edits the same. Every photo will look the same. This is good for work with many photos.
Basic Concepts Of Automation
Let’s look at some basic concepts of automation in Photoshop.
- Actions: These are steps you record. Photoshop will repeat these steps for you.
- Batch Processing: This lets you run actions on many files.
- Droplets: These are small apps that run actions on files you drag to them.
These tools can make your work easy. You can do more in less time.
Here is a simple table to explain these concepts:
| Tool | Description |
|---|---|
| Actions | Record steps to repeat. |
| Batch Processing | Run actions on many files. |
| Droplets | Small apps to run actions. |
These tools can help you edit photos fast. You can focus on being creative. Let Photoshop do the hard work.
Getting Started With Actions
Automating photo editing in Photoshop can save you a lot of time. Actions are a powerful tool that allows you to record tasks and play them back. This makes repetitive tasks easy and quick. Below, learn how to create, edit, and manage actions in Photoshop.
Creating Your First Action
To create your first action, open Photoshop and follow these steps:
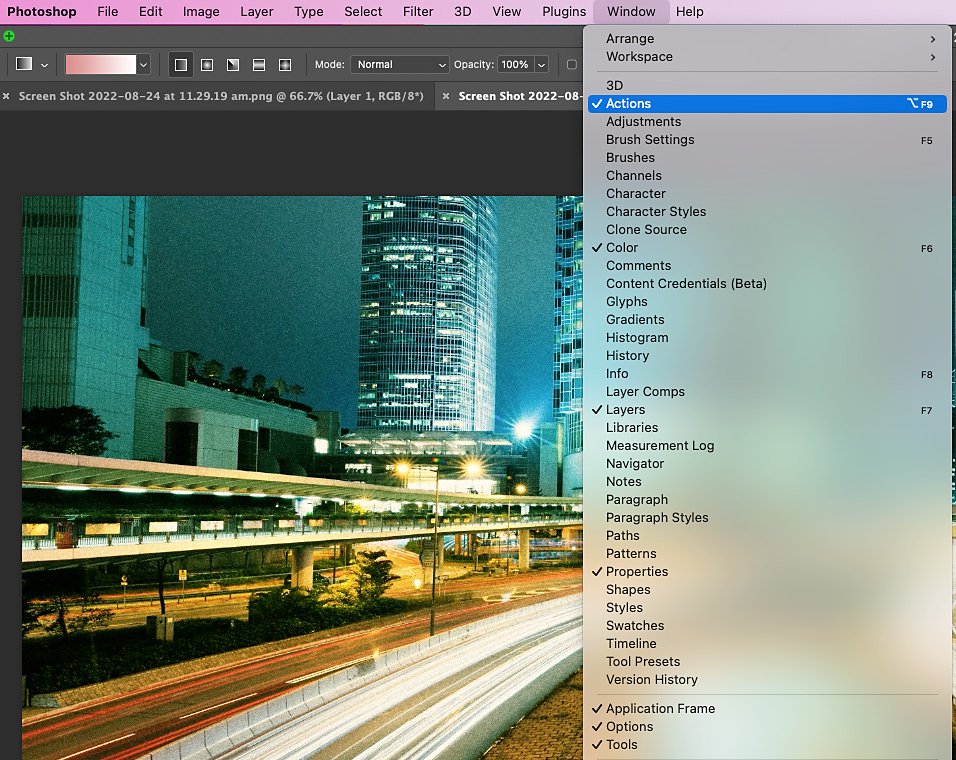
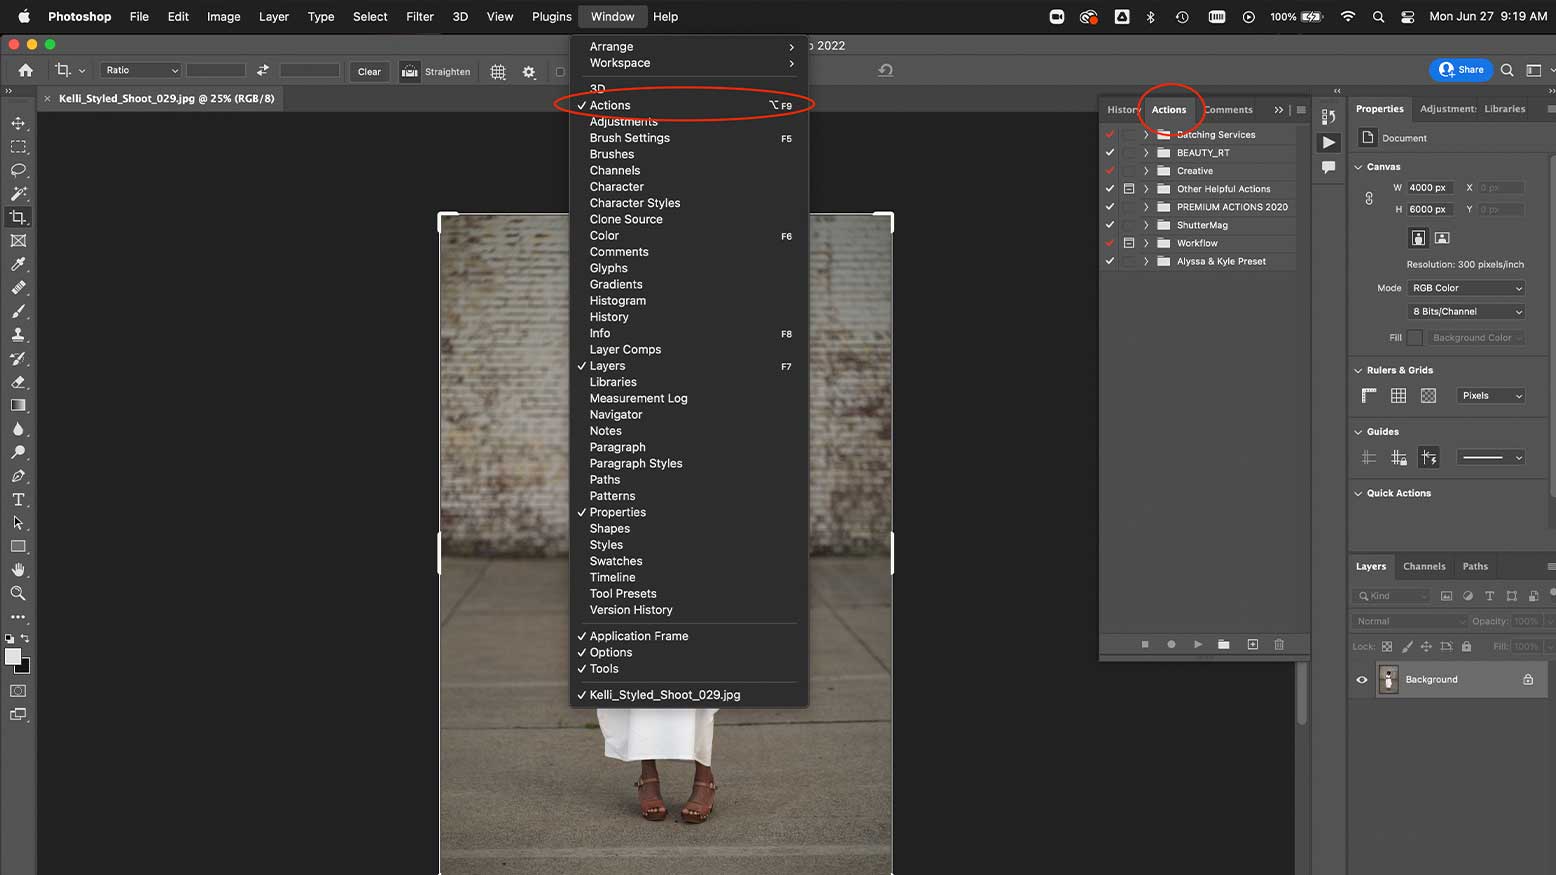
- Open the Actions panel by going to Window > Actions.
- Click the Create new action button at the bottom.
- Give your action a name, then click Record.
- Perform the tasks you want to automate.
- Click the Stop button when done.
Your first action is now created and ready to use.
Editing And Managing Actions
Editing and managing actions allows you to refine your workflow. Here’s how:
- To edit an action, select it in the Actions panel.
- Click the Record button to add more steps.
- To delete a step, select it and click the Trash icon.
- Organize actions by creating action sets. Click the Folder icon to create a set.
- Drag actions into sets to keep things organized.
Managing actions ensures your workflow stays smooth and efficient.
| Action | Description |
|---|---|
| Create new action | Start recording a new action. |
| Edit action | Add, modify, or delete steps in an action. |
| Action sets | Organize your actions for better management. |
Batch Processing Basics
Understanding batch processing in Photoshop can save you countless hours. This technique allows you to edit multiple photos simultaneously, making your workflow efficient and consistent. Let’s dive into the basics and learn how to set up and customize batch processing.
Setting Up Batch Processing
To start batch processing, open Photoshop and go to the File menu. Select Automate and then click on Batch. A new window will appear with various options. Choose the action you want to apply to your photos.
| Option | Description |
|---|---|
| Source | Folder or files to process |
| Destination | Where to save the edited files |
| File Naming | How to name the new files |
Once you’ve selected your options, click OK. Photoshop will then apply your chosen action to all selected photos.
Customizing Batch Settings
Customizing batch settings ensures each photo gets the right edits. In the Batch window, you can adjust various parameters. For instance, choose a different source folder if needed. Set a specific destination to save your edited photos.
- Check the
Override Action "Open" Commandsbox to skip opening commands. - Use
Override Action "Save As" Commandsto save photos as per your preferences. - Adjust
File Namingto keep your files organized.
- Go to the
Filemenu. - Select
Automate, thenBatch. - Choose your action and customize settings.
- Click
OKto start batch processing.
By customizing these settings, you ensure each photo receives the correct edits. This makes your workflow smoother and faster.
Utilizing Scripts For Complex Tasks
Automating photo editing in Photoshop can save you time. You can use scripts for complex tasks. These scripts can handle repetitive actions. They are perfect for non-coders too.
Finding And Installing Scripts
First, find the right script for your task. Many websites offer free Photoshop scripts. Download the script file. It will usually be in a .jsx format.
| Step | Action |
|---|---|
| 1 | Open Photoshop. |
| 2 | Go to File > Scripts > Browse. |
| 3 | Select the downloaded script file. |
| 4 | Click Open to install the script. |
Scripting Basics For Non-coders
Scripts may seem hard, but they are not. Let’s break it down. Scripts use a language called JavaScript. You don’t need to know JavaScript to use scripts.
- Open the script in a text editor.
- Look for variables and settings.
- Change settings to fit your needs.
- Save the changes.
Here is an example of a simple script:
    // This script resizes an image
    var doc = app.activeDocument;
    doc.resizeImage(UnitValue(500, "px"), null, null, ResampleMethod.BICUBIC);
Copy the script into a new file. Save it as “resize.jsx”. Run it in Photoshop. Your image will resize to 500 pixels wide.
Conditional Actions For Smart Automation
Conditional Actions for Smart Automation in Photoshop can save you time and effort. These actions allow Photoshop to make decisions based on certain conditions. This means you can automate complex tasks that would otherwise take hours.
Creating Conditional Actions
To start, you need to open the Actions panel. You can find it under the Window menu.
- Click on the Actions Panel.
- Choose New Action from the menu.
- Give your action a name and click Record.
Now, you are recording every step you take in Photoshop. Perform the tasks you want to automate. After you finish, click Stop in the Actions panel.
Next, you need to set conditions:
- Click the dropdown menu in the Actions panel.
- Select Insert Conditional.
- Choose the condition you need, like If Layer is Background.
Decide what the action should do if the condition is true or false. This step lets you automate complex workflows easily.
Real-world Applications
Conditional actions can be very useful. Here are some real-world applications:
- Batch Editing: Automate edits for hundreds of photos in minutes.
- Portrait Retouching: Apply different edits based on skin tone.
- Product Photography: Adjust lighting based on product color.
These applications can help photographers and designers save time. They can focus on creativity instead of repetitive tasks.
| Task | Action | Condition |
|---|---|---|
| Resize Images | Resize | If image width > 2000px |
| Apply Filter | Sharpen | If layer is not background |
| Color Correction | Adjust Hue/Saturation | If image is in RGB mode |
Using conditional actions can elevate your workflow. Automate the most repetitive tasks and focus on the creative aspects of your projects.
Credit: www.behindtheshutter.com
Data-driven Graphics For Mass Production
Automating photo editing in Photoshop saves time and effort. With data-driven graphics, you can create multiple images quickly. This method is great for large batches of images. You can ensure consistency and quality. Let’s dive into how to automate this process.
Preparing Your Data
To start, you need a data source. This could be a CSV file or a spreadsheet. Each row represents one image. Columns include details like text, colors, and images.
Ensure your data is clean and organized. Each column should have a clear label. Save your data file in a location you can access easily.
Generating Graphics From Data
Open Photoshop and go to File > Scripts > Load Files into Stack. Choose your data file. Photoshop will read each row and generate an image.
Use actions and scripts to automate repetitive tasks. Create an action for each editing step. Save the action and apply it to all images.
You can also use Variables and Data Sets. Go to Image > Variables > Define. Set up variables for text, images, and colors. Import your data file here.
Once set up, go to Image > Apply Data Set. Photoshop will create images based on your data. Check each image for quality.
Tips And Tricks For Efficient Workflow
Automating photo editing in Photoshop can save you a lot of time. In this section, we’ll dive into some tips and tricks for efficient workflow. These tips will make your photo editing faster and more organized. You’ll learn how to organize your actions and scripts and troubleshoot common issues.
Organizing Your Actions And Scripts
Actions and scripts can be your best friends in Photoshop. They help automate repetitive tasks. Here are some tips to keep them organized:
- Group related actions: Create action sets for similar tasks. This keeps your workspace tidy.
- Label clearly: Use descriptive names for your actions and scripts. This makes them easy to find.
- Use folders: Place your scripts in folders. This helps you find them quickly.
- Backup regularly: Save copies of your actions and scripts. This prevents loss if something goes wrong.
Troubleshooting Common Issues
Even with automation, you might face some issues. Here are some common problems and how to fix them:
| Issue | Solution |
|---|---|
| Action not working | Check if the layer names match. Rename layers if needed. |
| Script error | Ensure the script is compatible with your Photoshop version. |
| Photoshop crashes | Update Photoshop to the latest version. Clear your cache. |
| Missing actions | Reload your actions set. Check if the file path is correct. |
By following these tips and tricks, you can streamline your workflow in Photoshop. Automation saves time and reduces errors. Happy editing!
Advanced Techniques And Resources
Automating photo editing in Photoshop can save hours of work. Advanced techniques and resources take your skills to the next level. These tools help you achieve consistent results with less effort.
Exploring Third-party Plugins
Third-party plugins enhance Photoshop’s capabilities. These plugins automate complex tasks, making them easier to manage. Here are some popular plugins:
- Nik Collection: This plugin offers a suite of editing tools.
- Topaz Labs: Known for its powerful AI features.
- Portraiture: Perfect for smoothing skin and enhancing portraits.
Continuing Your Automation Journey
Once comfortable with basic automation, explore more advanced techniques. These methods include scripting and batch processing. Scripting allows for custom automation tailored to specific needs. Batch processing helps apply the same edits to multiple images.
| Technique | Benefits |
|---|---|
| Scripting | Custom automation, highly flexible |
| Batch Processing | Speeds up repetitive tasks |
To start scripting, learn the basics of Photoshop’s scripting language. Resources like Adobe’s scripting guide are invaluable. For batch processing, use Photoshop’s built-in tools. Create actions that apply edits to a folder of images.
These advanced techniques and resources will elevate your photo editing automation. They save time and ensure consistent, professional results.

Credit: www.youtube.com
Frequently Asked Questions
How Do I Automate Photoshop Editing?
Use Photoshop’s Actions panel to record and save repetitive tasks. Apply saved actions to automate your editing process efficiently.
Can Photoshop Automatically Edit Photos?
Yes, Photoshop can automatically edit photos using its tools like Auto Tone, Auto Contrast, and Auto Color.
Is There A Way To Batch Edit Photos In Photoshop?
Yes, you can batch edit photos in Photoshop using the “Image Processor” tool. This tool automates editing tasks.
Is There A Way To Edit Multiple Photos At Once?
Yes, you can edit multiple photos at once. Use software like Adobe Lightroom or batch editing tools to streamline the process.
Conclusion
Mastering automation in Photoshop saves time and boosts efficiency. Implement these techniques to streamline your photo editing workflow. Enhance your productivity and creativity by leveraging Photoshop’s powerful automation tools. Start automating today and transform your editing process. Happy editing!