To use Hostinger email in Gmail, configure Gmail to fetch emails from Hostinger via POP3/IMAP. Then, set up SMTP to send emails.
Integrating Hostinger email with Gmail streamlines email management by consolidating accounts into one interface. This setup allows you to handle all your emails from different domains effortlessly within Gmail. Simplifying your email processes reduces the hassle of logging into multiple accounts and ensures you never miss an important message.
Using Gmail’s robust features, such as filtering and labeling, enhances your email organization. This guide outlines the steps to seamlessly combine your Hostinger email with Gmail, optimizing your email experience. Follow the instructions carefully to ensure a smooth integration and enjoy the benefits of a unified email platform.
Setting Up Hostinger Email
Using Hostinger email with Gmail is simple. Follow these steps to create and configure your Hostinger email account for seamless integration.
Creating Hostinger Email Account
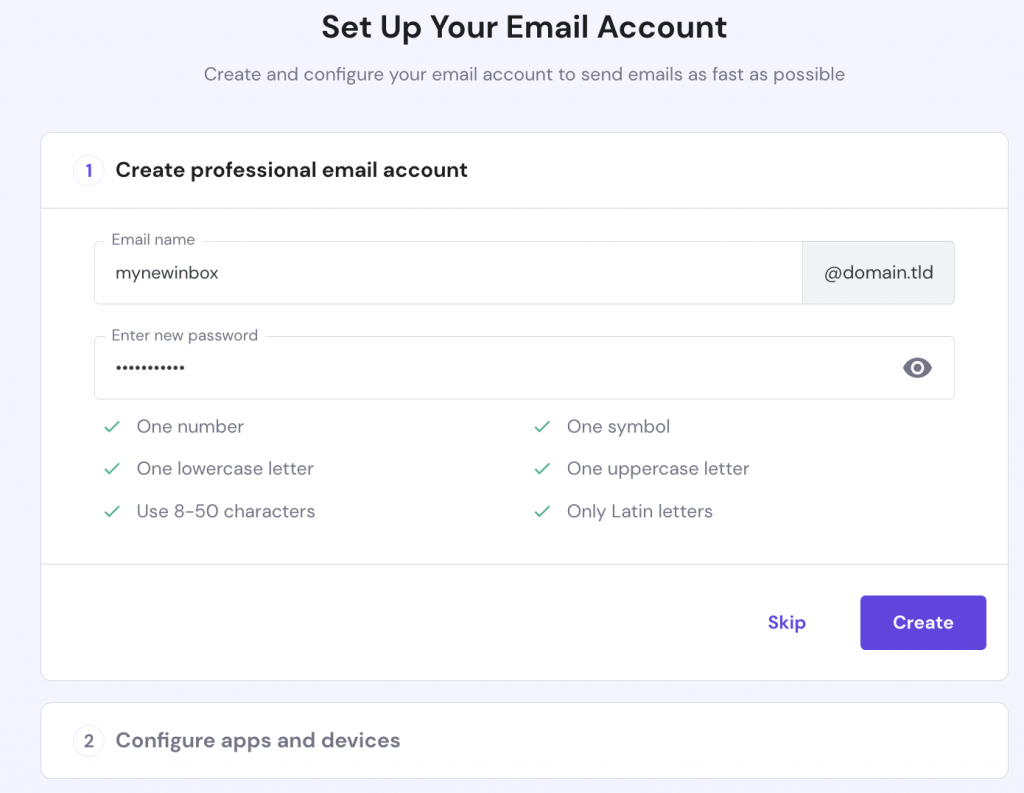
First, log in to your Hostinger account. Go to the Email Accounts section. Click on Create Account.
- Enter your desired email address.
- Set a secure password.
- Click Create to finalize.
Your Hostinger email account is now ready for configuration.
Configuring Email Settings
Next, configure your email settings to integrate with Gmail. Follow these steps:
- Open Gmail and go to Settings.
- Select the Accounts and Import tab.
- Click on Add a mail account.
A new window will pop up. Enter your Hostinger email address and click Next.
| Field | Value |
|---|---|
| Username | Your full Hostinger email address |
| Password | Your Hostinger email password |
| POP Server | pop.hostinger.com |
| Port | 995 |
Check the box for Always use a secure connection (SSL).
- Click Add Account.
- Choose Yes, I want to be able to send mail as.
Complete the setup by following the on-screen instructions. Your Hostinger email is now successfully configured in Gmail.
Credit: www.hostinger.com
Accessing Gmail Settings
Integrating your Hostinger email with Gmail helps manage your emails in one place. The first step is to access the Gmail settings. This section will guide you through the process.
Navigating To Gmail Settings
Start by opening your Gmail account. Look for the gear icon at the top right corner.
Click on the gear icon to open a dropdown menu. Select the option labeled “See all settings.”
Locating Accounts And Import
Once in the settings menu, click on the “Accounts and Import” tab. This tab includes options for adding email accounts.
You will find a section called “Check mail from other accounts.” This section is where you can add your Hostinger email.
| Step | Action |
|---|---|
| 1 | Open Gmail and click the gear icon. |
| 2 | Select “See all settings.” |
| 3 | Click on the “Accounts and Import” tab. |
| 4 | Locate “Check mail from other accounts.” |
- Gear icon – top right corner of Gmail.
- See all settings – opens the settings menu.
- Accounts and Import – tab for email settings.
- Check mail from other accounts – where you add Hostinger email.
Following these steps will help you integrate your Hostinger email. Accessing Gmail settings is the first step for a seamless email experience.
Adding Hostinger Email To Gmail
Want to manage your Hostinger emails from your Gmail account? Integrating Hostinger email with Gmail is simple. Follow these steps to streamline your email communications.
Entering Email Information
First, open your Gmail account. Click on the gear icon in the top-right corner. Select See all settings.
Navigate to the Accounts and Import tab. Under Check mail from other accounts, click on Add a mail account.
Enter your Hostinger email address. Click on Next.
Configuring Pop3 Settings
Choose Import emails from my other account (POP3). Click on Next.
Fill in the following details:
| Field | Information |
|---|---|
| Email Address | Your Hostinger email |
| Username | Your Hostinger email |
| Password | Your Hostinger email password |
| POP Server | pop.hostinger.com |
| Port | 995 |
Ensure the Always use a secure connection (SSL) when retrieving mail option is checked.
- Check Leave a copy of retrieved message on the server if needed.
- Optionally, label incoming messages for easy identification.
Click on Add Account. Your Hostinger email will now be accessible in Gmail.

Credit: www.hostinger.com
Configuring Smtp Settings
Configuring SMTP settings is crucial for using Hostinger email in Gmail. This setup ensures your emails are sent smoothly through Gmail’s interface. Follow the steps below to get started.
Outgoing Server Information
To configure SMTP settings, you need the right outgoing server information. This ensures your emails are sent using Hostinger’s servers.
| Field | Value |
|---|---|
| SMTP Server | smtp.hostinger.com |
| Port | 465 (SSL) or 587 (TLS) |
| Encryption | SSL/TLS |
Authentication Details
Authentication details are necessary to verify your identity. This prevents unauthorized access to your email account.
- Email Address: Use your full Hostinger email address.
- Password: Enter the password for your Hostinger email account.
Ensure you use the correct details for a successful connection. Incorrect details will cause errors.
By following these steps, you can successfully configure your SMTP settings. This will allow you to send emails from your Hostinger account using Gmail.
Testing The Configuration
Now that you’ve configured your Hostinger email in Gmail, it’s important to test the setup. This ensures everything works perfectly and your emails are sent and received without issues. Follow these steps to verify your configuration.
Sending A Test Email
First, compose a new email in Gmail. Use your Hostinger email as the sender. This verifies the outgoing server settings.
- Click on the “Compose” button in Gmail.
- In the “From” field, select your Hostinger email.
- Address the email to another account you own.
- Write a simple subject and body message like “Test Email”.
- Click “Send”.
Check the recipient inbox to confirm the email was received. If it appears, your outgoing settings are correct.
Troubleshooting Common Issues
If your test email didn’t work, there might be some common issues. Check these possible problems and solutions:
- Incorrect Settings: Double-check your SMTP and IMAP settings. Ensure they match Hostinger’s recommendations.
- Authentication Errors: Verify your username and password. They must be correct for the email account.
- Firewall or Security Software: These may block the connection. Temporarily disable them and try again.
- Server Issues: Hostinger’s servers might be down. Wait a few minutes and try again.
If you still face issues, contact Hostinger support. They can help resolve any configuration problems.
Managing Emails Efficiently
Managing your emails efficiently can save you a lot of time. By integrating Hostinger Email with Gmail, you can streamline your email management. This guide will help you organize your inbox and use labels and filters effectively.
Organizing Inbox
A cluttered inbox can be overwhelming. Organizing your inbox can make your life easier. Start by archiving old emails that you no longer need. Use the search function to find specific emails quickly.
You can also create a system for flagging important emails. Gmail lets you add stars to mark emails that need your attention. This way, you can quickly find important messages without scrolling through your entire inbox.
Using Labels And Filters
Labels and filters are powerful tools for email organization. They help you categorize emails and automate sorting. Here’s how you can make the most out of these features:
- Create Labels: Go to the left sidebar and click on “More” then “Create new label”. Name your label something meaningful.
- Apply Labels: Select the emails you want to categorize. Click on the label icon at the top and choose the appropriate label.
Filters can automatically sort incoming emails based on certain criteria. To create a filter:
- Click on the gear icon and select “See all settings”.
- Navigate to the “Filters and Blocked Addresses” tab.
- Click on “Create a new filter”.
- Enter criteria such as sender, subject, or keywords.
- Click on “Create filter” and choose actions like applying a label or deleting.
| Criteria | Action |
|---|---|
| Emails from boss@example.com | Apply “Important” label |
| Subject contains “Invoice” | Move to “Finance” folder |
By effectively using labels and filters, you can keep your inbox organized. This will help you focus on the emails that matter most.
Advanced Tips
Once you have set up your Hostinger email in Gmail, you can take it a step further with some advanced tips. These tips will help you streamline your email management and improve productivity. The following sections will guide you through setting up email forwarding and using Gmail add-ons.
Setting Up Email Forwarding
Email forwarding allows you to automatically send emails from one account to another. This can be useful if you want to manage all your emails from a single inbox.
- Log in to your Hostinger account.
- Go to the Email section.
- Select the email account you want to forward.
- Click on Forwarding and enter your Gmail address.
- Save the changes.
Now, all emails sent to your Hostinger email will appear in your Gmail inbox. This way, you won’t miss any important emails.
Using Gmail Add-ons
Gmail add-ons can enhance your email experience with additional features. These tools can help you manage tasks, schedule emails, and integrate other apps.
- Open Gmail on your computer.
- Click on the Settings gear icon.
- Select Get add-ons from the drop-down menu.
- Browse or search for the desired add-ons.
- Click Install to add them to your Gmail.
Some popular add-ons include Trello for task management, Boomerang for email scheduling, and Zoom for video conferencing. These tools can help you stay organized and efficient.

Credit: m.youtube.com
Frequently Asked Questions
How Do I Get Hostinger Email On Gmail?
Add your Hostinger email to Gmail by navigating to Gmail settings. Click “Accounts and Import,” then “Add a mail account. ” Follow the prompts to enter your Hostinger email credentials.
How To Transfer Hostinger Mail To Gmail?
To transfer Hostinger mail to Gmail, enable IMAP in Hostinger. Then, add your Hostinger email account in Gmail’s settings under “Accounts and Import. “
How Can I Use My Domain Email With Gmail?
Go to Gmail settings, click “Accounts and Import. ” Add your domain email under “Check mail from other accounts” and “Send mail as. “
How Do I Link My Hostinger Titan Email To Gmail?
To link Hostinger Titan email to Gmail, go to Gmail settings, click “Accounts and Import,” and add your Titan email under “Check mail from other accounts. ” Follow the prompts to complete the setup.
Conclusion
Integrating Hostinger email with Gmail is straightforward and efficient. This guide simplifies the process for seamless communication. Follow these steps to streamline your email management. Enhancing productivity has never been easier. Start using Hostinger email in Gmail today and experience the convenience firsthand.
Your inbox will thank you!