
To use an AI file in Photoshop, open Photoshop and import the AI file. Convert the AI file to a smart object for editing.
Adobe Illustrator files, or AI files, are vector graphics primarily used in Illustrator. Sometimes, you may need to edit or incorporate these graphics into Photoshop projects. This process is straightforward and allows for seamless integration between the two Adobe programs.
By converting the AI file to a smart object, you preserve its vector quality, making it scalable without losing resolution. This is particularly useful for designers who need to maintain high-quality graphics in their Photoshop compositions. Follow these steps to ensure your AI files are editable and retain their original quality in Photoshop.
Introduction To Ai Files And Photoshop
Adobe Illustrator (AI) files are vector graphics files created with Adobe Illustrator. Photoshop is a powerful tool for editing these files. Combining both tools can enhance your design workflow. Learn how to use AI files in Photoshop efficiently.
What Are Ai Files?
AI files are vector-based graphics created with Adobe Illustrator. They use mathematical equations to create shapes and lines. This makes AI files scalable without losing quality. These files are ideal for logos, icons, and illustrations.
The Role Of Photoshop In Editing Vector Graphics
Photoshop is primarily a raster graphics editor. It can edit and enhance pixel-based images. However, Photoshop also supports vector graphics to some extent. This allows you to open and edit AI files.
Here are some key steps to use AI files in Photoshop:
- Open the AI file: Go to File > Open and select the AI file.
- Choose import settings: Adjust the resolution and size settings as needed.
- Edit the file: Use Photoshop tools to modify the vector graphics.
- Save the file: Save the edited file in the desired format.
By following these steps, you can effectively use AI files in Photoshop. This makes your design process more versatile and efficient.
| Feature | AI Files | Photoshop |
|---|---|---|
| Scalability | High | Low |
| File Size | Small | Large |
| Editing Tools | Vector Tools | Raster Tools |
Understanding the strengths of both AI files and Photoshop can improve your design skills. You can create and edit more complex and visually appealing graphics.
Credit: www.psdvault.com
Preparing To Import Ai Files Into Photoshop
Importing AI files into Photoshop is a valuable skill. It enables you to work with vector graphics in a raster-based environment. This process requires understanding software requirements and file compatibility. Let’s dive into the steps for a smooth import.
Software Requirements
To import AI files, ensure you have the necessary software. You need both Adobe Illustrator and Adobe Photoshop installed on your computer.
- Adobe Illustrator: Create and save AI files.
- Adobe Photoshop: Import and edit AI files.
Make sure both programs are up-to-date. Older versions may not support newer file formats.
Understanding Ai File Compatibility
AI files are vector-based, while Photoshop works with raster graphics. This difference in formats is crucial for compatibility.
| File Type | Description |
|---|---|
| Vector Graphics (AI) | Scalable without losing quality. Best for logos and illustrations. |
| Raster Graphics (PSD) | Pixel-based. Best for photos and detailed artwork. |
Photoshop can open AI files, but they are rasterized. This means they will lose their vector properties. Follow these steps to ensure a smooth import:
- Open your AI file in Illustrator.
- Save the file as a PDF or EPS if needed. This preserves vector data.
- Open the saved file in Photoshop. Choose the resolution and color mode.
By following these steps, you ensure high-quality imports. This allows for effective editing within Photoshop.
Step-by-step Guide To Opening Ai Files In Photoshop
Want to open an AI file in Photoshop? Follow this easy guide. We’ll show you two methods to get started. This guide is perfect for beginners and pros alike.
Opening Directly From Photoshop
Photoshop can open AI files directly. Here’s how:
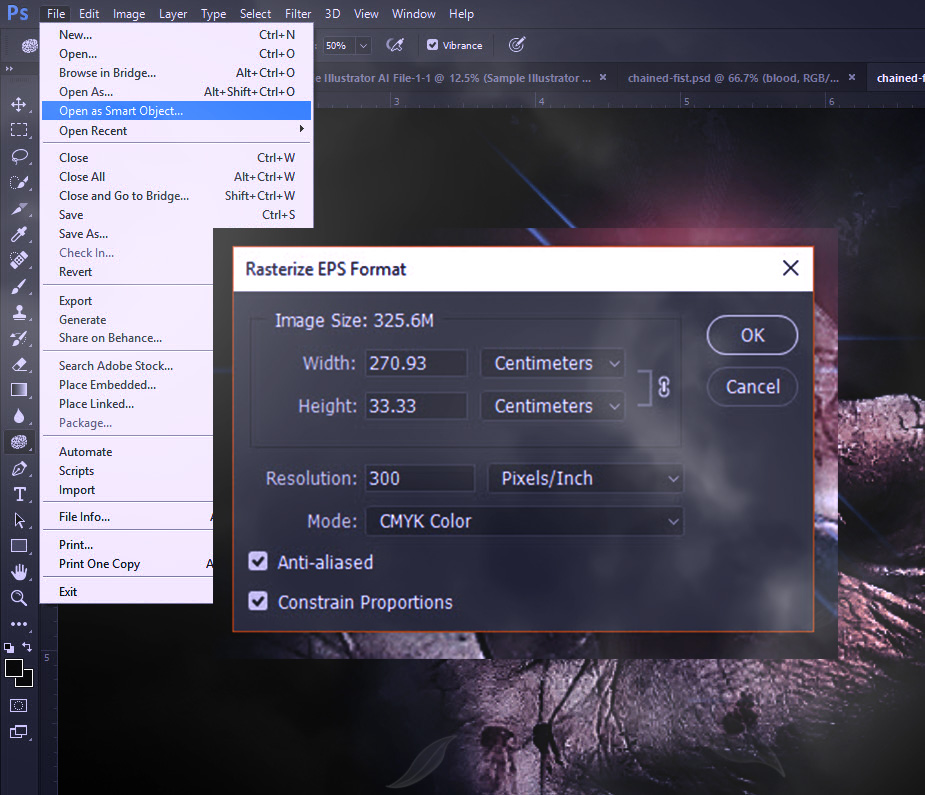
- Open Photoshop: Start by launching Photoshop on your computer.
- Select File: Click on File in the top menu.
- Open: Choose Open from the dropdown menu.
- Locate File: Navigate to your AI file.
- Open File: Select the AI file and click Open.
- Rasterize: A dialog box will appear. Adjust the settings and click OK.
Your AI file is now open in Photoshop. You can edit it as a raster image.
Using Adobe Illustrator For Conversion
Sometimes, you might need to convert the AI file first. Adobe Illustrator can help. Here’s how:
- Open Illustrator: Launch Adobe Illustrator on your computer.
- Select File: Click on File in the top menu.
- Open: Choose Open from the dropdown menu.
- Locate File: Find your AI file and select it.
- Save As: Click on File again and choose Save As.
- Select Format: In the format dropdown, choose PSD (Photoshop).
- Save File: Click Save and adjust any settings as needed.
Now, open the PSD file in Photoshop. All layers and vectors are preserved.
Credit: www.dynamicwebtraining.com.au
Editing Ai Files In Photoshop
Editing AI files in Photoshop opens a world of design possibilities. Photoshop allows you to manipulate vector files with precision. This guide will help you master the basics of editing AI files in Photoshop.
Working With Layers
Layers are essential in Photoshop for organized editing. When you open an AI file, Photoshop converts vector elements into layers.
- Ensure the Layers Panel is visible. Go to Window > Layers.
- Each layer represents different vector elements.
- You can hide or show layers by clicking the eye icon.
- Rename layers for better organization. Double-click the layer name to rename.
Layers offer a non-destructive editing workflow. You can easily revert changes by toggling layer visibility.
Adjusting Vector Shapes
Vector shapes in AI files retain their scalability in Photoshop. Adjusting these shapes can enhance your design.
- Select the Direct Selection Tool (A) from the toolbar.
- Click on the vector shape you want to adjust.
- Use anchor points to modify the shape. Drag these points for precise adjustments.
- Change the fill or stroke color in the Properties Panel.
You can also add new shapes using the Shape Tool from the toolbar. Hold Shift for proportional shapes.
Photoshop offers a range of tools for editing AI files. These tools help you achieve your design goals efficiently.
By understanding layers and vector shapes, you can create stunning designs. Take your time to explore these features in Photoshop.
Advanced Techniques For Ai Files In Photoshop
Photoshop is a powerful tool for editing AI files. You can use advanced techniques to enhance your images. This guide will help you master these skills.
Applying Filters And Effects
Filters and effects can change the look of your AI files. Open your AI file in Photoshop. Go to the Filter menu. Choose a filter or effect you like. Try different options to see what works best.
Here is a simple table of popular filters:
| Filter | Effect |
|---|---|
| Blur | Softens the image |
| Sharpen | Makes the image clearer |
| Distort | Changes the shape |
Experiment with these filters. Each one gives a different look to your image. Save your work after applying a filter or effect.
Rasterizing Vector Graphics
Rasterizing changes vector graphics to bitmap images. This allows you to edit them like regular images. To rasterize, select your vector layer. Right-click and choose ‘Rasterize Layer’.
Here is a step-by-step process:
- Open your AI file in Photoshop.
- Select the vector layer.
- Right-click on the layer.
- Choose ‘Rasterize Layer’.
Now you can edit the image with more tools. Use brushes, erasers, and other Photoshop tools.
Remember to save your work often. Rasterizing gives you more freedom to edit. But, you lose the ability to scale without losing quality.

Credit: www.psdvault.com
Tips For Maintaining Quality When Editing Ai Files
Editing AI files in Photoshop can be a powerful way to enhance your designs. Maintaining quality during this process is crucial. Here are some tips to ensure you achieve the best results.
Resolution Best Practices
High resolution is key to maintaining quality. Always check the resolution before editing. Set the resolution to at least 300 DPI for print projects. For web designs, 72 DPI is sufficient. This ensures your images stay sharp.
| Use Case | Recommended DPI |
|---|---|
| 300 DPI | |
| Web | 72 DPI |
Avoiding Common Pitfalls
Converting AI files can sometimes lead to issues. Always check the layers after importing. Ensure that your text remains editable. Rasterizing text can reduce quality. Use vector shapes to maintain clarity. Avoid excessive scaling of images. This can lead to pixelation. Always save a copy of your original AI file.
- Check layers after importing.
- Keep text editable.
- Use vector shapes.
- Avoid excessive scaling.
- Save a copy of the original file.
Exporting Edited Ai Files From Photoshop
Editing AI files in Photoshop is fun and creative. But exporting them correctly ensures their usability. This section explains how to export edited AI files from Photoshop.
File Format Options
Photoshop offers various file formats for exporting. Choosing the right one is vital.
- PSD: Keeps layers and edits intact.
- JPEG: Best for web images with high quality.
- PNG: Perfect for images with transparency.
- TIFF: Ideal for high-resolution prints.
- PDF: Great for sharing and printing.
Ensuring Compatibility
Ensure your exported file is compatible with other software. Follow these steps:
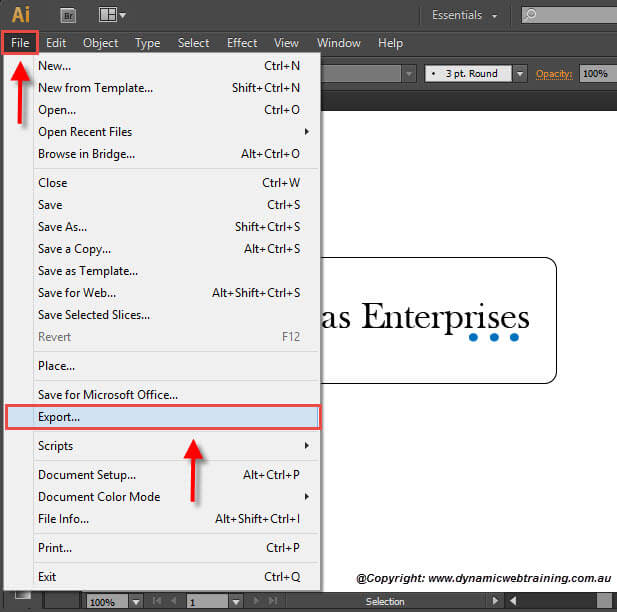
- Choose File from the top menu.
- Select Export and then Export As.
- Pick the desired file format from the list.
- Adjust the settings to match your needs.
- Click Export to save your file.
Compatibility with other programs is crucial. Some formats work better for specific applications. For instance:
| Software | Preferred Format |
|---|---|
| Adobe Illustrator | AI, PDF |
| Web Browsers | JPEG, PNG |
| Print Shops | TIFF, PDF |
Always test your exported file. Make sure it opens correctly in the target software. This ensures no loss in quality or features.
Case Studies: Creative Uses Of Ai Files In Photoshop Projects
Photoshop and AI files offer many creative opportunities. Explore how designers use AI files for projects. These case studies show the power of AI files in Photoshop.
Branding And Logo Design
AI files are perfect for branding and logo design. They maintain high quality when resized. See how designers use them to create stunning logos.
For example:
- Company X used AI files for a scalable logo.
- Brand Y created a detailed logo with AI files.
AI files allow for easy color changes. Adjustments are quick and efficient. This flexibility is key in branding projects.
Illustration And Art Creation
Illustrators use AI files in Photoshop for detailed artwork. These files keep the quality intact. Artists can add layers without losing detail.
Examples include:
- Artist A used AI files for a vibrant digital painting.
- Illustrator B crafted a complex illustration with AI files.
Artists can experiment with different styles. AI files make it easy to try new techniques. This leads to unique and creative art pieces.
Frequently Asked Questions
Can You Use An Ai File In Photoshop?
Yes, you can use an AI file in Photoshop. Import the AI file as a Smart Object for easy editing.
How Is Ai Used In Photoshop?
AI in Photoshop enhances image editing with tools like Content-Aware Fill, Neural Filters, and auto-selection. It speeds up tasks.
Can You Convert An Ai File To Psd?
Yes, you can convert an AI file to PSD. Use Adobe Illustrator to export the file as PSD format.
How Do I Select Ai In Photoshop?
To select AI in Photoshop, go to the “Window” menu, then choose “Neural Filters. ” Enable the desired AI filter.
Conclusion
Mastering how to use AI files in Photoshop opens up new creative possibilities. This skill enhances your design projects and workflow efficiency. Follow the steps outlined for seamless integration. Experiment with different features to fully utilize AI files. Happy designing!


