Java offers robust libraries for image processing, including OpenCV and Apache Commons Imaging. These tools simplify tasks like resizing, filtering, and format conversion.
Java’s image processing tools are essential for developers working on graphics-related projects. OpenCV, a powerful library, supports a wide range of image processing functions. Apache Commons Imaging, another valuable resource, provides easy-to-use methods for image manipulation. These libraries enable developers to perform tasks like resizing, filtering, and format conversion with ease.
They are particularly useful in applications requiring real-time image analysis, such as facial recognition and object detection. Utilizing these tools can significantly enhance the efficiency and functionality of your Java-based projects, making them indispensable in modern software development.

Credit: www.alibabacloud.com
Introduction To Image Processing With Java
Image processing is an exciting field in computer science. Java is a powerful tool for this purpose. It helps manipulate and enhance images easily. Many developers prefer Java for its versatility.
The Role Of Java In Modern Image Processing
Java plays a crucial role in modern image processing. It has many libraries and frameworks. These tools help in performing various image operations. Some common libraries include OpenCV, JavaCV, and BoofCV.
Java’s platform independence is a significant advantage. It allows the same code to run on different operating systems. This feature makes Java a popular choice for image processing projects.
Benefits Of Using Java For Photo Enhancement
- Cross-platform compatibility: Java runs on any operating system.
- Rich library support: Many libraries are available for image processing tasks.
- Robust performance: Java provides efficient performance for complex operations.
- Easy integration: Java integrates well with other technologies.
Java also offers excellent memory management. This feature is essential for handling large images efficiently. Developers can focus on enhancing photos without worrying about performance issues.
| Library | Purpose | Key Features |
|---|---|---|
| OpenCV | General image processing | Face detection, image transformation |
| JavaCV | Computer vision | Video capturing, machine learning integration |
| BoofCV | Real-time image processing | Feature tracking, 3D reconstruction |
Java is a great choice for photo enhancement projects. It offers many libraries, cross-platform support, and robust performance. Using Java can make image processing tasks easier and more efficient.
Setting Up Your Java Environment
Before diving into image processing, set up your Java environment. This ensures smooth coding and efficient execution. Below are the key steps to get started.
Choosing The Right Java Development Kit (jdk)
Selecting the right Java Development Kit (JDK) is crucial. The JDK is a software development kit used to develop Java applications. Oracle JDK and OpenJDK are the most popular choices.
| JDK Version | Key Features |
|---|---|
| Oracle JDK | Comprehensive support, frequent updates, robust performance |
| OpenJDK | Open-source, community-driven, fully compatible with Oracle JDK |
For image processing, JDK 11 or higher is recommended. It provides better performance and more features.
Essential Java Libraries For Image Processing
Several Java libraries facilitate image processing. These libraries simplify complex image manipulations.
- Java Advanced Imaging (JAI): Handles advanced image processing tasks.
- OpenCV: Popular for computer vision tasks.
- ImageJ: Ideal for scientific image processing.
- Apache Commons Imaging: Useful for basic image manipulations.
Here is a simple code snippet using OpenCV:
import org.opencv.core.Core;
import org.opencv.core.Mat;
import org.opencv.imgcodecs.Imgcodecs;

public class ImageProcessor {
  static { System.loadLibrary(Core.NATIVE_LIBRARY_NAME); }

  public static void main(String[] args) {
    Mat image = Imgcodecs.imread("path/to/image.jpg");
    // Process the image
    Imgcodecs.imwrite("path/to/output.jpg", image);
  }
}
Ensure you have the required libraries in your project’s classpath. This makes your development process smoother.
Basic Concepts In Image Processing
Image processing involves performing operations on images to enhance them. This can include transforming, filtering, and analyzing images. Java provides powerful tools and libraries for these tasks. Understanding the basic concepts is crucial for effective image processing.
Understanding Pixels And Color Models
Images are made of tiny units called pixels. Each pixel represents a single point in the image. The color of each pixel is defined by a color model. There are different color models such as RGB and CMYK.
In the RGB model, each color is a combination of red, green, and blue. The intensity of each color is represented by a value between 0 and 255. This model is widely used in digital images. Below is a simple representation:
| Color | Red | Green | Blue |
|---|---|---|---|
| Black | 0 | 0 | 0 |
| White | 255 | 255 | 255 |
| Red | 255 | 0 | 0 |
Manipulating Images With Java’s Bufferedimage Class
Java provides the BufferedImage class for handling images. This class allows reading, writing, and manipulating images. You can load an image from a file and perform various operations on it.
Here is a simple example to load and display an image:
import java.awt.image.BufferedImage;
import java.io.File;
import javax.imageio.ImageIO;

public class ImageProcessor {
    public static void main(String[] args) {
        try {
            File file = new File("path/to/image.jpg");
            BufferedImage image = ImageIO.read(file);
            // Display or process the image
        } catch (Exception e) {
            e.printStackTrace();
        }
    }
}
You can also manipulate the image by accessing its pixels. For example, you can change the color of a pixel:
int x = 0; // X coordinate
int y = 0; // Y coordinate
int rgb = image.getRGB(x, y); // Get the pixel color
int newRgb = (rgb & 0xFF00FF00) | 0x000000FF; // Change color
image.setRGB(x, y, newRgb); // Set the new color
With these basic concepts, you can start exploring more complex image processing tasks using Java.
Common Image Processing Operations
Understanding common image processing operations is essential for any developer working with images. Java offers robust tools for performing various image manipulations. These include resizing, cropping, and color adjustments. Let’s delve into some of these fundamental operations.
Resizing And Cropping Techniques
Resizing and cropping images are basic yet powerful techniques. They help in optimizing image dimensions without losing quality. Here are some common methods:
- Resizing: Use the
getScaledInstancemethod to resize images. This method maintains aspect ratio. - Cropping: Use the
getSubimagemethod to crop images. This method allows you to specify the region to keep.
Below is a simple code example:
BufferedImage originalImage = ImageIO.read(new File("path/to/image.jpg"));
Image resizedImage = originalImage.getScaledInstance(100, 100, Image.SCALE_SMOOTH);
BufferedImage croppedImage = originalImage.getSubimage(50, 50, 100, 100);
Color Adjustments And Filters
Color adjustments and filters enhance images. They can change the mood and focus. Java provides several classes for this purpose:
- Color Adjustment: Use the
RescaleOpclass to adjust brightness and contrast. - Filters: Apply different filters using the
BufferedImageOpinterface.
The following table summarizes some common filters:
| Filter | Description |
|---|---|
| Grayscale | Converts the image to shades of gray. |
| Sepia | Gives the image a warm, brownish tone. |
| Invert | Inverts the colors of the image. |
Here is an example code snippet for color adjustment:
BufferedImage img = ImageIO.read(new File("path/to/image.jpg"));
RescaleOp rescaleOp = new RescaleOp(1.2f, 15, null);
img = rescaleOp.filter(img, img);
Advanced Photo Enhancement Techniques
Java offers many powerful tools for image processing. These tools enhance photos using advanced techniques. Enhancing photos makes them look more professional and appealing.
Edge Detection And Sharpening
Edge detection finds the borders in an image. It highlights the boundaries of objects. This makes images look clear and defined.
Sharpening increases the contrast at edges. It makes images appear crisper. The combination of edge detection and sharpening enhances photo quality.
Here is an example of edge detection code in Java:
    // Edge detection code in Java
    BufferedImage edgeDetectedImage = new BufferedImage(width, height, BufferedImage.TYPE_INT_ARGB);
    for (int y = 1; y < height - 1; y++) {
        for (int x = 1; x < width - 1; x++) {
            int pixelColor = image.getRGB(x, y);
            int edgeColor = detectEdge(pixelColor);
            edgeDetectedImage.setRGB(x, y, edgeColor);
        }
    }
Noise Reduction Algorithms
Noise reduction removes unwanted pixels from photos. This process smooths the image. It makes photos look cleaner and more polished.
Several algorithms reduce noise in Java. Common algorithms include Median Filter and Gaussian Blur. These algorithms filter out noise while preserving image details.
Below is a table comparing two noise reduction algorithms:
| Algorithm | Description | Use Case |
|---|---|---|
| Median Filter | Replaces each pixel with the median of neighboring pixels. | Effective for salt-and-pepper noise. |
| Gaussian Blur | Applies a Gaussian function to blur the image. | Reduces Gaussian noise. |
Here is a sample code for noise reduction using Gaussian Blur:
    // Gaussian Blur code in Java
    BufferedImage blurredImage = new BufferedImage(width, height, BufferedImage.TYPE_INT_ARGB);
    float[] matrix = {
        1/16f, 1/8f, 1/16f,
        1/8f, 1/4f, 1/8f,
        1/16f, 1/8f, 1/16f
    };
    Kernel kernel = new Kernel(3, 3, matrix);
    ConvolveOp op = new ConvolveOp(kernel, ConvolveOp.EDGE_NO_OP, null);
    op.filter(image, blurredImage);
Credit: tgebarowski.github.io
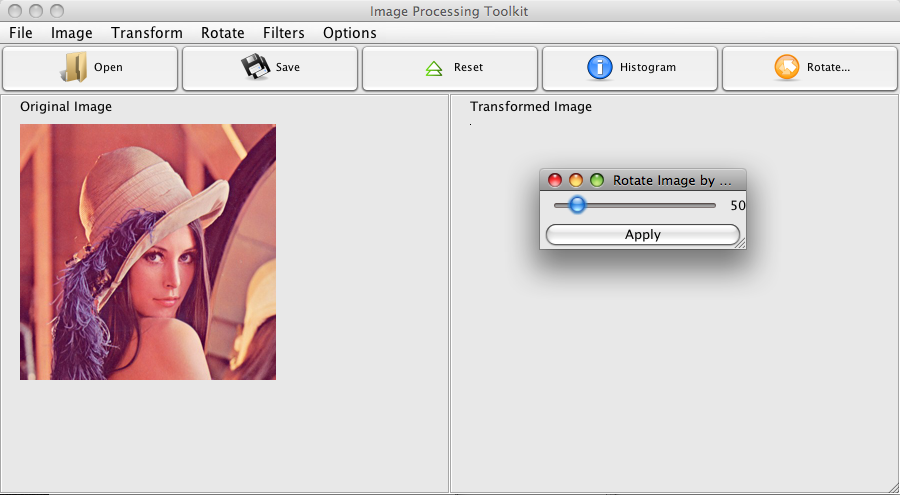
Building A User Interface For Your Tool
Creating a user-friendly interface is crucial for any image processing tool. Users need an easy way to interact with the software. Java offers robust libraries for building graphical user interfaces (GUIs). In this section, we will explore how to design an intuitive GUI using Java Swing and how to incorporate user input for image adjustments.
Designing An Intuitive Gui With Java Swing
Java Swing is a powerful toolkit for building GUIs. It provides a variety of components to create interactive applications. Let’s start by setting up the main window for our image processing tool.
Use the JFrame class to create the main window:
JFrame frame = new JFrame("Image Processing Tool");
frame.setSize(800, 600);
frame.setDefaultCloseOperation(JFrame.EXIT_ON_CLOSE);
frame.setVisible(true);
Next, add a menu bar for basic operations like file open and save. Use the JMenuBar and JMenu classes:
JMenuBar menuBar = new JMenuBar();
JMenu fileMenu = new JMenu("File");
JMenuItem openItem = new JMenuItem("Open");
JMenuItem saveItem = new JMenuItem("Save");
fileMenu.add(openItem);
fileMenu.add(saveItem);
menuBar.add(fileMenu);
frame.setJMenuBar(menuBar);
Incorporating User Input For Image Adjustments
Allow users to adjust image settings like brightness and contrast. Use sliders for input. The JSlider class is ideal for this purpose:
JSlider brightnessSlider = new JSlider(JSlider.HORIZONTAL, 0, 100, 50);
brightnessSlider.setMajorTickSpacing(10);
brightnessSlider.setPaintTicks(true);
brightnessSlider.setPaintLabels(true);

JSlider contrastSlider = new JSlider(JSlider.HORIZONTAL, 0, 100, 50);
contrastSlider.setMajorTickSpacing(10);
contrastSlider.setPaintTicks(true);
contrastSlider.setPaintLabels(true);
Arrange the sliders in a panel and add them to the frame:
JPanel panel = new JPanel();
panel.add(new JLabel("Brightness:"));
panel.add(brightnessSlider);
panel.add(new JLabel("Contrast:"));
panel.add(contrastSlider);
frame.add(panel, BorderLayout.SOUTH);
To process user input, add event listeners to the sliders:
brightnessSlider.addChangeListener(e -> adjustBrightness(brightnessSlider.getValue()));
contrastSlider.addChangeListener(e -> adjustContrast(contrastSlider.getValue()));
Define the methods to adjust brightness and contrast:
private void adjustBrightness(int value) {
    // Code to adjust brightness
}

private void adjustContrast(int value) {
    // Code to adjust contrast
}
With these elements, your image processing tool will be more interactive and user-friendly. Users can easily tweak image settings and see instant results.
Optimizing Image Processing Performance
Optimizing image processing performance is crucial for faster results. In Java, various methods help enhance performance. Let’s explore some key techniques.
Multi-threading For Efficient Processing
Multi-threading allows multiple tasks to run at the same time. This speeds up image processing. Java provides built-in support for multi-threading.
Here are some steps to implement multi-threading:
- Create a thread pool using
ExecutorService. - Divide the image into smaller sections.
- Assign each section to a separate thread.
- Merge the processed sections into a final image.
Below is a simple code example:
import java.util.concurrent.;

public class ImageProcessor {
    private static final int THREAD_COUNT = 4;

    public static void main(String[] args) {
        ExecutorService executor = Executors.newFixedThreadPool(THREAD_COUNT);
        // Divide and process image sections here
        executor.shutdown();
    }
}
Memory Management Best Practices
Efficient memory management is key to performance. It prevents memory leaks and excessive usage.
Follow these best practices:
- Use BufferedImage for efficient image handling.
- Release unused resources with
System.gc(). - Avoid creating unnecessary objects.
- Use memory profiling tools to monitor usage.
Here’s a simple example to manage memory efficiently:
import java.awt.image.BufferedImage;

public class MemoryManager {
    public static void main(String[] args) {
        BufferedImage image = new BufferedImage(100, 100, BufferedImage.TYPE_INT_ARGB);
        // Process the image
        image.flush(); // Release resources
        System.gc(); // Suggest garbage collection
    }
}
Case Studies: Real-world Applications
Java-based image processing tools have transformed various industries. This section highlights their impact in real-world scenarios.
Photo Editing Software Successes
Java has powered many successful photo editing tools. These tools offer a range of features:
- Advanced filters for enhancing image quality.
- Noise reduction for clearer photos.
- Cropping and resizing options for better composition.
One popular software, PhotoEditorX, uses Java for efficient image processing. It supports batch editing, saving users valuable time. Another example is ImageMaster. This software offers real-time previews and advanced layering options.
Impacting Industries With Java-based Image Processing
Java-based image processing has a wide-reaching impact on various industries:
| Industry | Application |
|---|---|
| Healthcare | Medical imaging for accurate diagnosis. |
| Retail | Product image enhancement for better online displays. |
| Automotive | Quality control through image analysis. |
In the healthcare sector, Java tools improve medical imaging. They help doctors diagnose diseases more accurately. Retailers use these tools to enhance product images. This improves the online shopping experience. The automotive industry benefits through quality control. Java-based image analysis ensures product consistency.
Java-based image processing tools are versatile. They offer robust solutions for varied needs. Their impact is seen across multiple sectors. These tools enhance efficiency and improve outcomes.
Integrating With Other Technologies
Integrating an Image Processing Tool in Java with other technologies brings immense benefits. It enhances the tool’s capabilities, making it more powerful and versatile. Leveraging machine learning and connecting with cloud services can significantly improve performance and scalability.
Leveraging Machine Learning For Automated Enhancements
By integrating machine learning, you can automate image enhancements. This allows the tool to learn from data and improve its processing techniques over time.
- Automatically adjust brightness and contrast
- Identify and remove noise from images
- Enhance image resolution and clarity
Machine learning models can classify images, detect objects, and even recognize patterns. This makes the image processing tool smarter and more efficient.
Connecting With Cloud Services For Scalability
Connecting the image processing tool with cloud services ensures it can handle large-scale tasks. Cloud platforms like AWS, Google Cloud, and Azure offer powerful resources for processing images.
| Cloud Service | Feature |
|---|---|
| AWS | Elastic Load Balancing |
| Google Cloud | Auto-scaling |
| Azure | Virtual Machines |
Cloud services provide storage solutions, making it easy to manage large image datasets. They also offer APIs for integrating advanced features like facial recognition and object detection.
Scalability ensures the tool remains responsive and efficient, even with increasing workloads. This integration makes the image processing tool more robust and capable of handling complex tasks.
Future Trends In Image Processing
Image processing is continuously evolving. The future promises more advanced tools and techniques. Java will play a crucial role in this evolution. Let’s explore some of these trends.
The Evolution Of Image Processing Algorithms
Image processing algorithms are getting smarter. They are now using machine learning and deep learning. These algorithms can now recognize and enhance images better.
Traditional methods relied on simple filters and edge detection. Modern algorithms can identify objects, faces, and even emotions. This allows for more precise image enhancement.
Here is a comparison of traditional vs modern algorithms:
| Traditional Algorithms | Modern Algorithms |
|---|---|
| Simple filters | Machine learning |
| Edge detection | Deep learning |
| Basic color correction | Object recognition |
Algorithms will continue to improve. They will become more efficient and accurate.
Java’s Role In The Future Of Image Enhancement
Java is a powerful programming language. It is widely used in image processing. Java libraries like OpenCV and BoofCV offer robust tools for image enhancement.
These libraries provide pre-built functions. They make image processing tasks easier. Developers can focus on creating innovative solutions. Java’s versatility ensures it remains relevant in the future.
Here are some key advantages of using Java for image processing:
- Platform independence
- Strong community support
- Extensive libraries
- Scalability
Java’s role in image processing is significant. Its adaptability ensures it will continue to be a preferred choice. Future trends in image processing will heavily rely on Java’s capabilities.

Credit: www.visma.com
Frequently Asked Questions
Can Java Do Image Processing?
Yes, Java can do image processing. Java libraries like OpenCV, BoofCV, and MarvinFramework provide powerful tools for this purpose.
What Is The Java Library For Image Recognition?
The Java library for image recognition is OpenCV. It offers tools for real-time computer vision applications.
How To Import Image In Java Code?
To import an image in Java, use `ImageIO. read(new File(“path/to/image. jpg”))`. Ensure the file path is correct.
What Is Image Processing Tool?
An image processing tool manipulates and enhances digital images. It helps in improving image quality and extracting useful information.
Conclusion
Mastering an image processing tool in Java can greatly enhance your projects. This tool offers powerful features for developers. Start exploring its capabilities today. You’ll find it invaluable for various applications. Enhance your skills and streamline your workflow with this versatile tool.
Don’t miss out on the benefits it provides.