Have you ever crafted the perfect email campaign in Marketing Cloud, only to find yourself stumped when it comes to attaching crucial documents? You’re not alone.
Understanding how to attach documents to your Marketing Cloud emails can elevate your campaigns, making them more informative and engaging for your audience. Imagine the impact of supplementing your message with detailed reports, eye-catching brochures, or personalized proposals directly in the inbox of your recipients.
This not only adds value but also enhances the overall recipient experience, potentially driving higher engagement and conversion rates. Ready to unlock this powerful tool and streamline your communication strategy? Stick around as we dive into the step-by-step process to seamlessly integrate attachments into your Marketing Cloud emails.
Credit: pyrus.com
Setting Up Your Marketing Cloud Account
Attach documents to Marketing Cloud emails effortlessly. Navigate to the email editor, choose ‘Attach File,’ and upload your document. Ensure files are compatible with the email format for smooth delivery.
Setting up your Marketing Cloud account is the first step towards sending out emails that resonate with your audience. Whether you’re a seasoned marketer or a beginner, the process can be straightforward if approached systematically. Let’s walk through the essentials, making sure your experience is both smooth and enlightening.Logging Into Marketing Cloud
To start, you’ll need to access your Marketing Cloud account. This is your gateway to a world of marketing opportunities. Make sure you have your login credentials handy.Go to the Marketing Cloud login page and enter your username and password. If you’re like me, you might have experienced the frustration of forgetting your password at the worst possible moment. If that happens, utilize the “Forgot Password” feature to reset it quickly.Once logged in, take a moment to familiarize yourself with the dashboard. This is where all the magic happens.Navigating To Email Studio
After logging in, your next step is to find Email Studio. It’s the hub for crafting and managing your email campaigns. Look for the “Email Studio” option in the top navigation menu. It’s typically straightforward but can be intimidating if you’re new.Click on “Email Studio,” and you’ll be directed to a new interface. Here, you can create, edit, and send emails. Imagine it as your creative canvas for building engaging content.While exploring Email Studio, consider how you can structure your emails to include documents. This is where your strategic thinking comes into play.Have you thought about what kind of documents will add value to your emails? Consider attaching user guides, product catalogs, or personalized offers. The goal is to enhance the reader’s experience, not overwhelm them.Setting up your account efficiently sets the stage for successful email marketing. What’s one thing you’re excited to explore in Email Studio today?
Credit: it.umn.edu
Preparing Your Document
Preparing your document is a crucial step when attaching files to your Marketing Cloud emails. It’s more than just dragging and dropping a file. You need to ensure the document enhances your message without overwhelming your audience. Let’s dive into how to choose the right file format and optimize the file size for seamless integration and maximum impact.
Choosing The Right File Format
Choosing the correct file format can make or break your email attachment strategy. Are you sending a PDF, an image, or perhaps a Word document? Each format serves different purposes.
PDFs are ideal for maintaining formatting across devices. They ensure your content looks the same, no matter where it’s opened. On the other hand, images are great for visual appeal but may not convey detailed information as effectively as text-based files.
Consider what your audience needs. If clarity and professionalism are paramount, PDFs are a safe bet. However, if your goal is to capture attention quickly, images might be your best option. What’s your aim with this attachment?
Optimizing File Size
File size matters more than you might think. Large files can slow down email loading times and deter recipients from engaging with your content. You want your email to open swiftly and smoothly.
Compressing files can significantly reduce their size without sacrificing quality. Tools like Adobe Acrobat or TinyPNG can help shrink PDFs and images respectively. Smaller files mean faster load times and happier recipients.
Test the attachment before sending. If it takes too long to open or appears pixelated, adjust the size or format. You want to strike a balance between quality and convenience. Have you tried opening your attachment on multiple devices?
By thoughtfully preparing your document, you ensure your audience receives your message as intended. Each choice, from format to file size, can impact the effectiveness of your email. How will your document enhance your marketing efforts today?
Uploading Documents
Uploading documents to your Marketing Cloud email can enhance communication. It allows recipients to access vital information directly. This adds value to your email campaign. The process is straightforward if you follow some simple steps.
Accessing Content Builder
Start by logging into Marketing Cloud. Navigate to the Content Builder section. It’s the hub for managing all your email content. Here, you can create, edit, and organize your materials.
Once inside Content Builder, locate the ‘My Contents’ tab. This is where you upload documents. It’s user-friendly and intuitive. Find the ‘Upload’ option in this section.
Importing Files
After accessing the upload feature, select your files. You can import documents from your device easily. Ensure your documents are in compatible formats. Common formats include PDFs and Word documents.
Drag and drop your files into the designated area. Alternatively, click the ‘Select Files’ button. This allows you to browse your computer. Choose the files you need for your email campaign.
Once uploaded, files appear in your Content Builder library. You can now attach them to your emails. Ensure each document is correctly named for easy identification.

Credit: www.getmailbird.com
Attaching Documents To Emails
Attaching documents to your Marketing Cloud emails is crucial. It helps in sharing essential information with your recipients. This feature enhances engagement and provides value. Let’s explore the steps for attaching documents effectively.
Selecting Email Template
First, choose an email template that suits your campaign. Templates provide a consistent layout for your message. They ensure a professional appearance. You can find templates in the Email Studio of Marketing Cloud. Select a template that aligns with your brand’s style. A well-chosen template boosts the email’s visual appeal.
Inserting Document Links
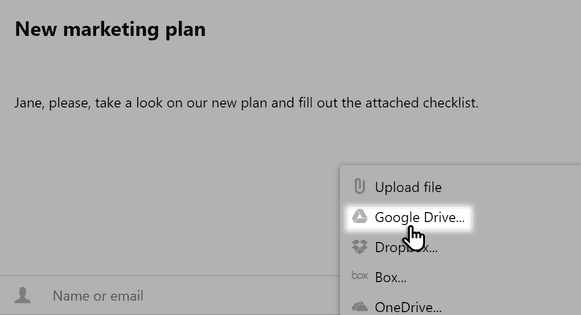
Instead of direct attachments, use document links. Upload your documents to a cloud service. Copy the link to the document. Go back to your email template. Locate the section where you want to insert the link. Paste the document link in the desired location. Ensure the link is accessible to your recipients. This method keeps your email size manageable. It also ensures proper delivery to your audience.
Testing Your Email
Attach documents to Marketing Cloud emails easily by navigating to the email editor. Click on ‘Attachments’ and select the desired files. Save the changes to ensure the documents are included in your email.
Testing your email before sending it out to thousands of recipients is crucial. This step ensures that all elements, including attachments, function as expected. By testing, you can catch potential issues that might otherwise affect your campaign’s success.Previewing Email With Attachments
Previewing your email with attachments gives you a glimpse of what your recipients will see. Use the preview function to check the layout and ensure that your attachments are correctly linked.Have you ever sent an email only to find that the attachment didn’t work? Don’t let that happen with your marketing emails. The preview tool is your ally in spotting these mishaps before they reach your audience.Test different devices and email clients to see how attachments appear. This step is crucial because what looks great on your desktop might look different on a mobile device.Sending Test Emails
After previewing, send test emails to yourself or a small group. This practice helps verify that the email, along with its attachments, lands perfectly in the inbox.Ever had an email land in spam because of an attachment? Sending test emails can help prevent this issue. It lets you confirm that everything is received as intended.Pay attention to loading times and attachment accessibility. If the file takes too long to open, your audience might lose interest. Aim for a seamless experience that keeps your readers engaged.Testing might sound tedious, but it’s a vital part of a successful email campaign. What would you do differently if you knew exactly how your audience experiences your emails?Sending Your Email Campaign
Sending your email campaign in Marketing Cloud is a crucial step. It involves ensuring your message reaches the right audience. You must attach documents correctly for maximum impact. Proper execution can enhance your campaign’s effectiveness.
Scheduling Email Sends
Plan your email sends to fit your marketing strategy. Choose the best time for your audience. Consider time zones to maximize engagement. Use Marketing Cloud’s scheduling tools. They simplify the process. Create a schedule that aligns with your goals. Consistency helps build trust with your subscribers.
Monitoring Delivery Success
Track your email delivery success to improve future campaigns. Use Marketing Cloud’s analytics to monitor key metrics. Check open rates and click-through rates. They show your campaign’s effectiveness. Identify areas that need improvement. Adjust strategies based on data insights. This ensures your emails reach and engage your audience.
Frequently Asked Questions
How Do I Attach A Pdf To An Email In Salesforce?
Open Salesforce and compose a new email. Click “Attach File” and select your PDF. Click “Attach” to include it in the email.
How Can I Send An Attachment In Email?
Open your email client and click “Compose. ” Find the paperclip icon, click it, and select your file. Press “Send. “
How Do I Attach A File To Hubspot Marketing Email?
To attach a file in HubSpot marketing email, upload the file to the file manager. Insert the link into your email content. HubSpot doesn’t support direct file attachments. This method ensures better deliverability and user experience.
Conclusion
Attaching documents to your Marketing Cloud emails can streamline communication. This process enhances the email’s value and provides essential information directly to recipients. By following the steps outlined, you can easily include attachments in your campaigns. This improves recipient engagement and makes your communication more efficient.
Remember to keep file sizes manageable for smooth delivery. With these tips, your email marketing becomes more effective. Simplifying document inclusion helps your audience receive and understand content better. Always check attachment compatibility before sending. Your efforts in refining email strategies will pay off.
Happy emailing!


