To create a free server on Teamspeak 3, download the server software from the official website and follow the installation guide. Next, configure your router to forward the appropriate port to allow external connections.
Embarking on the journey of setting up your Teamspeak 3 server doesn’t have to be daunting. This communication platform is a favorite among gamers and professionals alike for its robust features and customizability. Ensuring you have the server software is your first step toward creating a virtual meeting space for your community or team.
The process involves a simple download, basic configuration, and a quick setup to get you up and running. Embrace the power of real-time voice chat by hosting your own Teamspeak 3 server, fostering a more connected and collaborative environment. Whether for coordinating in-game strategies or facilitating project discussions, your server will be the cornerstone of seamless communication.
Credit: www.ionos.com
Introduction To Teamspeak 3
Teamspeak 3 stands out as a leader in voice communication. Users worldwide rely on its stable, clear, and secure voice channels for team interactions. Setting up a personal server on Teamspeak 3 can enhance your online collaboration experience.
Benefits Of Personal Servers
- Control: You manage who joins or leaves.
- Privacy: Your conversations stay private and secure.
- Customization: Set rules and features to suit your needs.
- No Costs: Creating a server on Teamspeak 3 can be free.
Teamspeak 3 Vs Other Communication Platforms
| Feature | Teamspeak 3 | Others |
|---|---|---|
| Latency | Low | Varies |
| Customization | High | Low to Moderate |
| Privacy | Strong | Depends |
| Cost | Free options | Subscription fees |
Prerequisites For Server Setup
Setting up a Teamspeak 3 server is an excellent way to communicate with friends or team members online. Before diving into the server creation process, it’s important to understand the prerequisites for server setup. This includes knowing the minimum system requirements and essential software downloads.
Minimum System Requirements
To ensure a smooth Teamspeak 3 server setup, your system should meet certain criteria. Here are the basic requirements:
- CPU: 1 GHz processor
- RAM: 1 GB or more
- Storage: At least 500 MB of free space
- Internet: Broadband connection with low latency
- Operating System: Windows, macOS, or Linux
Essential Software Downloads
Before creating your server, you need to download the following:
- Teamspeak 3 Server Software: Get the version compatible with your operating system.
- IP Address: You may need a static IP or a dynamic DNS service.
Once you have these prerequisites in place, you’re ready to set up your Teamspeak 3 server for free!
Setting Up Your Teamspeak 3 Server
Are you ready to chat with friends on your own Teamspeak 3 server? It’s simpler than you think! Follow these steps and you’ll be up and running in no time. Let’s dive into the setup process.
Installing Teamspeak 3 Server
The first step is to download the server software. Go to the Teamspeak website. Choose the version that matches your operating system. Download the package.
- After the download, extract the files to a folder.
- Find the
ts3server.exefile for Windows orts3server_startscript.shfor Linux. - Run the file as administrator on Windows or use terminal on Linux.
- Keep the Server Admin Token and Server Query Admin Account info safe.
Basic Configuration Steps
With the server installed, let’s configure it. You need to set up the basics to start inviting friends.
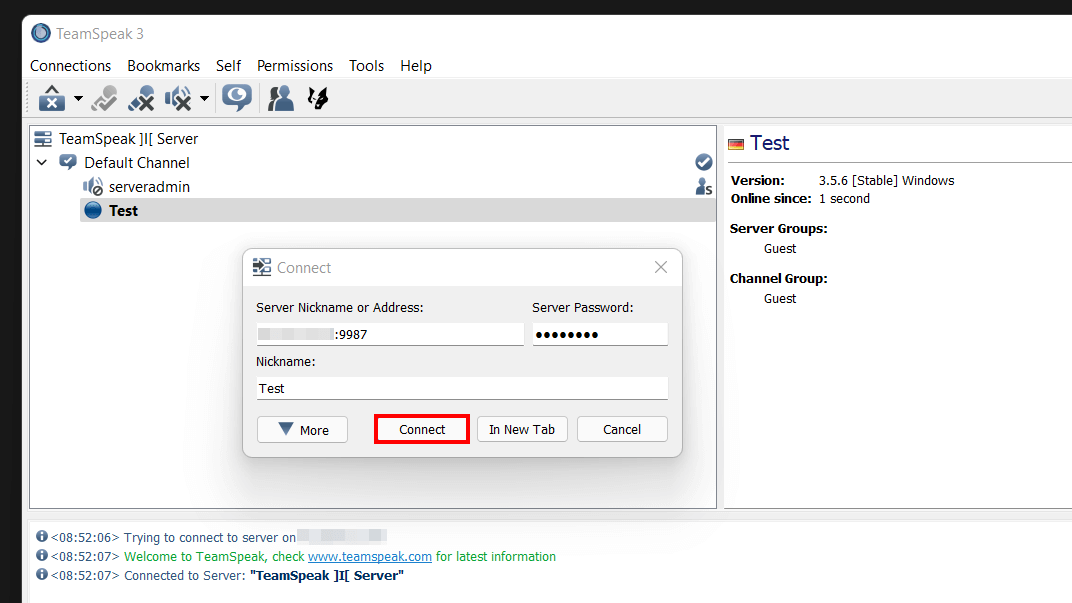
- Launch the Teamspeak 3 client.
- Connect to your server using the IP address and port displayed after installation.
- Enter the Server Admin Token to gain admin rights.
Now, create channels for different topics or games. Right-click in the main window to add channels. Customize your server by setting permissions. Do this by right-clicking on your server name and selecting “Edit Virtual Server”. Here you can set rules for users and manage the server.
| Task | Action |
|---|---|
| Create Channels | Right-click, ‘Create Channel’ |
| Set Permissions | Right-click server name, ‘Edit Virtual Server’ |
Remember to save all changes before exiting the server settings. Enjoy your custom Teamspeak 3 server and start inviting your friends!
Server Configuration
Creating your Teamspeak 3 server is exciting. Let’s dive into configuring it. Configuration is key for a smooth, tailored experience. You’ll learn to customize server properties and set up permissions.
Customizing Server Properties
Personalize your server for the best user experience. Follow these steps:
- Open the Teamspeak 3 client.
- Connect to your server using the admin credentials.
- Right-click on the server name and select Edit Virtual Server.
- Modify the server name, welcome message, and other settings.
- Click Apply to save changes.
These changes make your server unique. They reflect your community’s style.
Setting Up Permissions
Permissions control what users can do. Set them up with care:
- Navigate to the Permissions menu.
- Select Server Groups to define roles.
- Adjust settings for each role under Permissions.
- Use Channel Groups for channel-specific roles.
- Apply changes with the Apply button.
Correct permissions keep your server organized and secure.
Enhancing Server Security
Keeping your Teamspeak 3 server safe is a must. Let’s make it a fortress! We’ll talk about two big steps: password protection and managing user access.
Implementing Password Protection
First up, let’s lock the door. A strong password keeps unwanted guests out. Here’s how:
- Open Teamspeak 3 and go to your server settings.
- Look for the
Securitytab. - Find the
Passwordsection and create a tough password. - Hit Save.
Remember, a good password is like a good lock. It’s hard to break. Use letters, numbers, and symbols to make it strong.
Managing User Access
Not everyone should go everywhere. Let’s control who goes where. Do this by setting permissions.
- Create Groups: Set up different groups for users. Like ‘Admins’, ‘Members’, and ‘Guests’.
- Set Permissions: Decide what each group can do. Maybe ‘Admins’ can change settings, but ‘Guests’ cannot.
- Apply Changes: Save your settings. Now, each group has its own rules.
Think of your server like a house. Some rooms are for everyone. Some are private. You decide who goes where.

Credit: m.youtube.com
Tips For Effective Server Management
Managing your Teamspeak 3 server well is key to a smooth experience. Let’s dive into some top tips for keeping your server at its best.
Regular Maintenance Practices
Keeping your server updated is crucial. Regular updates ensure security and efficiency. Break down maintenance tasks into simple, manageable steps:
- Check for Teamspeak updates weekly.
- Restart your server monthly to clear bugs.
- Backup server data frequently to avoid data loss.
Setting a schedule for these tasks will help you stay on top of maintenance without feeling overwhelmed.
Monitoring Server Performance
Keeping an eye on how your server performs is essential. Use tools to monitor:
- Server load: Ensures the server is not overworked.
- Active users: Helps in managing bandwidth and resources.
- Error logs: Identifies issues early, preventing major problems.
Act quickly on the information these tools provide. This keeps your server running smoothly.
| Task | Frequency |
|---|---|
| Update Check | Weekly |
| Server Restart | Monthly |
| Data Backup | As needed |
Remember, communication with your server users is also part of effective management. Let them know about planned maintenance or updates. This builds trust and ensures a better experience for everyone.
Troubleshooting Common Issues
Setting up a Teamspeak 3 server offers a customizable space for gaming or chatting. But sometimes, you might hit a bump. Let’s troubleshoot common issues to keep your server running smoothly.
Connection Problems
Server not found or can’t connect messages can be frustrating. Follow these steps to solve them:
- Check your internet connection. Make sure it’s stable.
- Review your server IP and port. They must be correct.
- Update Teamspeak 3. Older versions might not work well.
- Check firewall settings. Your firewall must allow Teamspeak 3.
If these steps don’t work, restart your router. This might fix the issue.
Audio Quality Issues
Bad audio can ruin the experience. Try these fixes:
| Issue | Solution |
|---|---|
| Echo | Use headphones. They prevent sound from looping. |
| Noise | Enable noise reduction. It’s in the settings menu. |
| Low volume | Check your mic settings. Increase the volume there. |
Also, ensure your microphone is in good condition. A damaged mic can cause quality issues.
Expanding Your Server Capabilities
Expanding Your Server Capabilities on TeamSpeak 3 transforms your communication experience. More slots mean more users. Bots and plugins add cool features. Let’s grow your server!
Adding More Slots
More slots allow more users to join your server. A larger community thrives with more members. Follow these steps:
- Access your TeamSpeak 3 server settings.
- Look for the ‘Slots’ option.
- Increase the number based on your needs.
Remember, more slots may require a license upgrade. Check TeamSpeak’s licensing options.
Integrating Bots And Plugins
Bots and plugins enhance your server. They automate tasks and add new features. Here’s how to integrate them:
- Choose bots and plugins that suit your server.
- Download them from trusted sources.
- Follow the installation guides provided.
Plugins can offer music streaming or improved security. Bots can manage channels or welcome users. Explore the possibilities!
Community Building On Your Server
Building a strong community is key to a vibrant Teamspeak 3 server. Engaged members make for a lively, interactive environment. Let’s dive into how you can shape your server into a hub for community spirit.
Creating Channels
Channels are the rooms where your community gathers. Think of them as dedicated spaces for different topics or groups.
- Public Channels for open discussions.
- Private Channels for specific teams or VIPs.
- Themed Channels based on interests or games.
Create channels that reflect your community’s needs. Use clear, descriptive names so members can find their place easily.
Organizing Events And Activities
Events bring people together. They give your members something to look forward to and participate in.
Regular Events help members know what’s happening and when. This could be weekly game nights or monthly meetings.
Special Activities like tournaments or contests create excitement. They can help attract new members too.
| Event Type | Description | Frequency |
|---|---|---|
| Game Nights | Play together and have fun. | Weekly |
| Meetings | Discuss server topics. | Monthly |
| Tournaments | Compete and win prizes. | Quarterly |
Plan and announce events early. Use your channels to remind members as the date approaches.
Conclusion And Next Steps
Setting up your Teamspeak 3 server marks the beginning of a personalized voice communication experience. The steps outlined provide a solid foundation for your virtual meeting space. Now, let’s reflect on the setup and explore further possibilities.
Reflecting On The Setup Process
The journey to creating your own Teamspeak server should now feel rewarding. You’ve achieved a private space for chats and calls without spending a dime. Let’s recap the key steps:
- Downloading and installing the Teamspeak 3 Client.
- Setting up the Teamspeak 3 Server on your computer.
- Configuring basic server settings to welcome users.
- Sharing your server details with friends or teammates.
Take a moment to ensure all configurations are correct. A well-set server provides a seamless user experience.
Exploring Advanced Features
With your server running, it’s time to delve into advanced settings. These features will enhance your server’s functionality:
| Feature | Description |
|---|---|
| Permissions | Customize user access and privileges. |
| Channels | Create specific areas for different topics. |
| File Transfer | Share files securely within the server. |
| Server Backup | Keep your settings safe with regular backups. |
Experiment with these settings to tailor your Teamspeak server to your group’s needs. Remember, a great server is one that evolves with its users. Start exploring today!

Credit: www.ionos.com
Frequently Asked Questions
Can I Create A Teamspeak Server For Free?
Yes, you can create a TeamSpeak server for free using the limited personal use license or by hosting it on your own hardware.
How To Create A Server In Teamspeak 3?
Download and install the TeamSpeak 3 client. Open the program and click “Connections” at the top. Select “Create a Server” and set your preferences. Click “Start” to launch your new server.
How Much Does It Cost To Make A Teamspeak Server?
Creating a TeamSpeak server can be free if you host it yourself, but costs vary for renting one, typically starting from $2. 50 per month. Prices depend on the provider and server capacity.
Is Teamspeak Free Or Paid?
TeamSpeak offers both free and paid options. The free version caters to individual users, while the paid licenses are designed for larger teams and organizations seeking advanced features.
Conclusion
Setting up your own Teamspeak 3 server doesn’t have to be a challenge or a strain on your wallet. By following the steps outlined in this post, you’ll have a functional, cost-free server up and running in no time. Embrace the power of seamless communication with your gaming buddies or colleagues.
Get started today and elevate your team’s collaboration experience!