
To use Hostinger VPS, log in to your account and access the VPS management dashboard. Configure your server settings and install necessary software.
Hostinger VPS provides a robust platform for managing your online projects. With full root access and dedicated resources, you can customize your server environment to meet specific needs. Whether you are hosting websites, running applications, or setting up a development environment, Hostinger VPS offers flexibility and control.
Its user-friendly interface simplifies server management, making it accessible even for beginners. With scalable resources, you can easily upgrade your plan as your project grows. Hostinger also ensures reliable performance and security, providing a stable foundation for your digital endeavors. Explore the potential of VPS hosting with Hostinger for a seamless and powerful web management experience.
Introduction To Hostinger Vps
Hostinger VPS is a powerful tool for website hosting. It provides flexibility, speed, and control. This guide will help you understand how to use it effectively.
What Is Hostinger Vps?
Hostinger VPS stands for Virtual Private Server. It’s a type of web hosting where one physical server is divided into multiple virtual servers. Each virtual server operates independently.
Hostinger VPS offers more control and better performance than shared hosting. It’s ideal for websites with high traffic. Businesses use it to ensure their sites run smoothly.
Key Features
Hostinger VPS comes with several key features that make it powerful:
- Dedicated Resources: Each VPS has its own dedicated resources like CPU, RAM, and storage.
- Full Root Access: You get complete control over your server. Install any software and manage settings.
- Scalability: Easily upgrade your resources as your website grows.
- SSD Storage: Fast SSD storage ensures quick loading times for your website.
- 24/7 Support: Hostinger offers round-the-clock support for any issues you might face.

Credit: www.youtube.com
Setting Up Your Vps
Setting up your VPS with Hostinger is a straightforward process. Follow these steps to get your VPS up and running. This guide will help you through each step.
Choosing A Plan
First, choose a plan that fits your needs. Hostinger offers several VPS plans. Each plan varies in features and price.
| Plan | CPU | RAM | Storage | Price |
|---|---|---|---|---|
| VPS 1 | 1 Core | 1 GB | 20 GB | $3.95/month |
| VPS 2 | 2 Cores | 2 GB | 40 GB | $8.95/month |
| VPS 3 | 3 Cores | 3 GB | 60 GB | $12.95/month |
Creating An Account
Next, create an account on Hostinger. This is a simple process.
- Go to the Hostinger website.
- Click on the Sign Up button.
- Enter your email and password.
- Click Create Account.
After creating your account, you can purchase your chosen VPS plan. Log in to your account. Navigate to the VPS section. Choose your plan and complete the payment.
Once the payment is confirmed, you can start setting up your VPS. Hostinger provides easy-to-follow instructions. Follow them to complete your setup.
Accessing Your Vps
Accessing your VPS with Hostinger is straightforward and user-friendly. You can do this using SSH or the control panel. Both methods are efficient and secure.
Using Ssh
SSH (Secure Shell) provides a secure way to access your VPS. SSH uses encryption to keep your data safe.
To begin, open your terminal. On Windows, use PuTTY. Enter your VPS IP address and click “Open.” A window will prompt you for your username and password. Enter these details to access your VPS.
For example, use the following command:
ssh username@your_vps_ip
Replace username with your actual username. Replace your_vps_ip with your VPS IP address.
Connecting Via Control Panel
You can also access your VPS through the Hostinger control panel. This method is suitable for beginners.
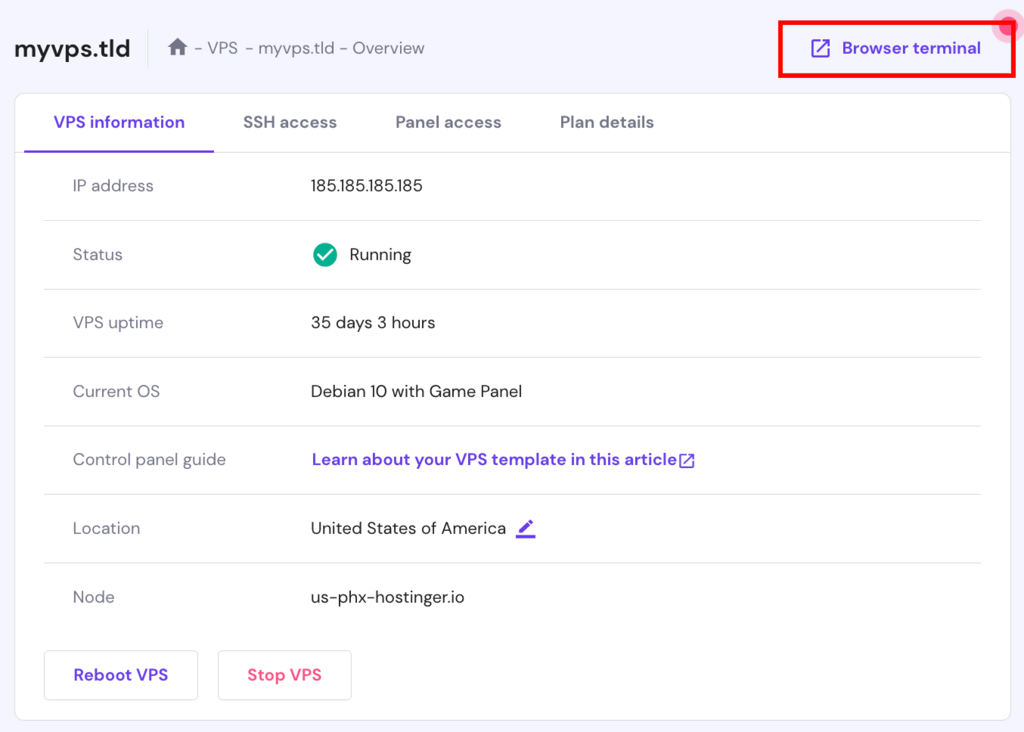
First, log in to your Hostinger account. Navigate to the VPS section. Click on your VPS to open its details.
Here, you will find the option to Open VPS Console. Click on it to access your VPS directly from the browser. No need to use additional software.
The control panel provides a user-friendly interface. You can perform various tasks with ease. This includes restarting your VPS or accessing the terminal.

Credit: www.websiteplanet.com
Basic Configuration
Configuring your Hostinger VPS is crucial for optimal performance. This guide helps you with the Basic Configuration steps. Follow the steps for a smoother setup experience.
Setting Up The Environment
First, access your VPS through SSH. Use a terminal or SSH client. Connect using your VPS IP address, username, and password.
ssh username@your_vps_ipAfter logging in, update your system. Run the following commands:
sudo apt-get update
sudo apt-get upgrade
These commands ensure your system has the latest security patches and updates.
Installing Essential Software
Next, install essential software for your VPS. Common choices include:
- Apache or Nginx for web server
- MySQL for database management
- PHP for server-side scripting
To install Apache, use:
sudo apt-get install apache2To install Nginx, use:
sudo apt-get install nginxFor MySQL, run:
sudo apt-get install mysql-serverFinally, install PHP:
sudo apt-get install php php-mysqlMake sure to restart your web server after installing each software. Use:
sudo systemctl restart apache2sudo systemctl restart nginxThese steps complete your basic configuration. Your VPS is now ready to host applications.
Managing Your Vps
Managing your VPS is crucial for optimal performance and security. Whether you are a beginner or an experienced user, Hostinger’s tools make it easy. This guide will walk you through using the Hostinger panel and monitoring performance.
Using The Hostinger Panel
The Hostinger panel is user-friendly and powerful. It gives you control over your VPS with a few clicks. Here’s how you can use it:
- Dashboard: View your server’s status and quick stats.
- Server Management: Reboot, shutdown, or reinstall your server.
- Backups: Schedule and manage backups easily.
In the dashboard, you can see your VPS’s CPU and RAM usage. It allows you to keep an eye on your server’s health.
Under Server Management, you can restart your server if needed. This is useful if your server becomes unresponsive.
Using the Backups section, ensure your data is safe. Regular backups prevent data loss.
Monitoring Performance
Monitoring your VPS performance is essential. Hostinger provides various tools for this purpose:
- Resource Usage: Monitor CPU, RAM, and disk usage.
- Logs: Check logs for any errors or issues.
- Alerts: Set up alerts for resource limits.
In the Resource Usage section, you can see real-time data. This helps you understand your server’s resource consumption.
The Logs section is vital for troubleshooting. It shows you what’s happening behind the scenes.
Set Alerts to notify you when resources are low. This helps you take action before any issues arise.
Credit: www.hostinger.com
Security Best Practices
Ensuring your Hostinger VPS is secure is vital. Following security best practices can help protect your data and resources from cyber threats. Here are some essential tips to enhance your VPS security.
Setting Up A Firewall
Firewalls act as a barrier between your server and potential threats. Configuring a firewall can help block unwanted traffic.
- Login to your Hostinger VPS control panel.
- Navigate to the Network section.
- Select Firewall settings.
- Add rules to block unnecessary ports.
- Allow only trusted IP addresses.
Using a firewall is crucial for maintaining server security.
Regular Backups
Backing up your data regularly ensures you can restore your system in case of data loss.
- Access your Hostinger VPS control panel.
- Go to the Backup section.
- Set up automated backups.
- Store backups in a secure location.
Keeping regular backups can save you from unexpected data loss.
Optimizing Performance
Optimizing the performance of your Hostinger VPS is crucial for a smooth experience. Proper optimization can ensure faster load times and better resource management.
Resource Allocation
Efficient resource allocation is key to VPS performance. Use Hostinger’s control panel to monitor and adjust resources.
- CPU: Assign adequate CPU cores based on your workload.
- RAM: Allocate enough RAM to prevent sluggish performance.
- Disk Space: Ensure you have enough storage for your data and backups.
Regularly review your usage statistics. Adjust allocations as needed to maintain optimal performance.
Speed Optimization Tips
Speed is vital for user satisfaction and SEO. Here are some tips to speed up your Hostinger VPS:
- Use a CDN: Content Delivery Networks can drastically improve load times.
- Optimize Images: Compress images to reduce load times.
- Minimize Plugins: Too many plugins can slow down your site. Use only essential ones.
- Enable Caching: Use caching to store static versions of your site.
Implementing these tips can make your site faster and more efficient.
Troubleshooting Common Issues
Running a VPS can sometimes present challenges. Knowing how to troubleshoot these common issues can save time. Below are some common problems and solutions.
Connection Problems
Connection problems can disrupt your VPS experience. Check these factors to resolve them:
- Network Configuration: Ensure the network settings are correct.
- Firewall Settings: Verify that the firewall is not blocking connections.
- Server Status: Check the server status on the Hostinger dashboard.
If the problem persists, try restarting your VPS. Use the following command:
sudo rebootAfter restarting, check your connection again. If issues continue, contact Hostinger support.
Software Conflicts
Software conflicts can affect VPS performance. Follow these steps to address them:
- Update Software: Ensure all software is up-to-date.
- Check Logs: Review error logs to identify conflicts.
- Disable Unnecessary Services: Turn off services not in use.
If conflicts arise after installing new software, try rolling back the changes. Use this command:
sudo apt-get remove [package-name]Replace [package-name] with the software causing issues. This should resolve most conflicts.
Advanced Tips And Tricks
Unlock the full potential of your Hostinger VPS with these advanced tips and tricks. Mastering these techniques will enhance your server’s performance and efficiency. Let’s dive into some expert advice on utilizing your Hostinger VPS to its fullest.
Custom Scripts
Custom scripts can automate repetitive tasks, saving you time and effort. You can create scripts for backups, updates, and monitoring.
- Automate Backups: Write a script to back up your data daily.
- Update Packages: Script automatic updates for your software packages.
- Monitor Performance: Use scripts to check server health and performance.
Here’s an example of a simple backup script:
#!/bin/bash
tar -czvf /backup/$(date +%F).tar.gz /var/www/html
Save this script and set a cron job to run it daily. This ensures your data is always backed up.
Scaling Your Vps
Scaling your VPS ensures it handles increased traffic and workload. Hostinger makes scaling easy and efficient.
- Upgrade Resources: Increase CPU, RAM, or disk space as needed.
- Load Balancers: Distribute traffic across multiple servers.
- Cloning: Create server clones for redundancy and load distribution.
Use the Hostinger control panel to adjust resources quickly. This helps maintain optimal performance during high-traffic periods.
Here’s a table to compare scaling options:
| Scaling Option | Benefit |
|---|---|
| Upgrade Resources | Improves server capacity and performance |
| Load Balancers | Distributes traffic to prevent overload |
| Cloning | Ensures redundancy and load sharing |
Regularly monitor your server’s performance. Adjust resources as necessary to keep your VPS running smoothly.
Frequently Asked Questions
How To Use Vps On Hostinger?
To use VPS on Hostinger, log in to your account. Choose a VPS plan, configure settings, and complete the purchase. Access the VPS dashboard, install the desired OS, and manage your server. Utilize SSH for advanced configuration. Host websites or applications efficiently.
Is Hostinger Good For Vps?
Yes, Hostinger is good for VPS hosting. It offers affordable plans, high performance, and reliable customer support.
How Can I Use My Vps?
Use your VPS to host websites, run applications, manage databases, or create a private server. Install necessary software, configure settings, and ensure security.
How Do I Host My Website On A Vps?
To host your website on a VPS, follow these steps:1. Choose and purchase a VPS plan. 2. Install a web server (Apache, Nginx). 3. Upload your website files. 4. Configure DNS settings. 5. Ensure your server is secure.
Conclusion
Mastering Hostinger VPS opens up countless possibilities for your website. Follow these steps to manage it effectively. Properly configuring your VPS enhances performance and security. With practice, you’ll find managing a VPS straightforward and rewarding. Embrace the learning curve and elevate your online presence with Hostinger VPS.


