
To cancel a Hostinger subscription, log in to your account and navigate to the “Billing” section. Select the service and click “Cancel.”
Canceling your Hostinger subscription is straightforward and user-friendly. Hostinger provides an easy-to-navigate platform, ensuring customers can manage their services effortlessly. Knowing how to cancel a subscription can be crucial for those who need to make changes to their hosting plans or switch providers.
Hostinger’s transparent cancellation process is designed to minimize any inconvenience. By following a few simple steps, users can cancel their subscriptions without hassle. This guide aims to provide a clear and concise method to help you manage your Hostinger services effectively. Understanding this process can save you time and ensure a smooth transition if you decide to move on.
Credit: www.youtube.com
Accessing Your Hostinger Account
Canceling a Hostinger subscription starts with accessing your account. This section covers the steps needed to log in and navigate the dashboard. Follow these steps to ensure a smooth process.
Login Steps
To access your Hostinger account, follow these simple steps:
- Open your web browser.
- Go to the Hostinger website.
- Click on the Login button at the top right corner.
- Enter your email address and password.
- Click on Login to access your account.
Make sure your login details are correct. Incorrect details will prevent access.
Navigating The Dashboard
Once logged in, you will land on the dashboard. The dashboard is your control center for managing your Hostinger account. Here’s how to navigate it:
- Look for the Hosting tab on the left menu.
- Click on the Hosting tab to view your active services.
- Find the subscription you want to cancel.
- Click on the Manage button next to the subscription.
This will take you to a detailed management page. Here, you can make changes or proceed with canceling your subscription.
Understanding these steps ensures you can easily access and navigate your Hostinger account. This is essential for managing your subscription effectively.

Credit: intelligenceinn.quora.com
Understanding Subscription Details
Canceling your Hostinger subscription is simple if you understand your subscription details. Knowing the specifics of your plan and billing cycle is crucial.
Plan Information
Your Hostinger subscription plan includes various features and services. Each plan offers different benefits tailored to user needs. You might have a shared hosting, VPS, or cloud hosting plan. Knowing your plan type helps in managing your cancellation effectively.
Check your plan details by logging into your Hostinger account. Navigate to the ‘Hosting’ section. Here, you will find all the information about your active plan. This section shows your plan type, resources, and additional services.
Billing Cycle
The billing cycle determines how often you are billed for your Hostinger services. Understanding your billing cycle is important for cancellation timing. Hostinger offers monthly, yearly, and multi-year billing cycles.
View your billing cycle in the ‘Billing’ section of your account. This section displays your payment history and next billing date. Knowing this helps you avoid unwanted charges post-cancellation.
Canceling before your billing cycle renews can save you money. Always check your next billing date before proceeding with the cancellation.
Initiating The Cancellation Process
Cancelling your Hostinger subscription can be straightforward. Follow these steps to ensure a seamless process. This section will guide you through initiating the cancellation process.
Locating Subscription Settings
To begin, log into your Hostinger account. Once logged in, navigate to the dashboard. You will see various options on the left sidebar.
Find and click on the Billing section. This will open a new page. Look for Subscription Settings. Click to access your subscription details.
Selecting Cancel Option
Within the Subscription Settings, scroll down to find the Cancel Subscription option. This is usually at the bottom of the page.
Click on the Cancel Subscription button. A confirmation dialog box will appear. It will ask if you are sure you want to cancel.
Confirm your decision to proceed with the cancellation. You may be asked to provide a reason for cancelling.
Follow the prompts to complete the process. Your subscription will be cancelled, and you will receive a confirmation email.
Choosing Cancellation Reasons
Canceling a Hostinger subscription is simple. However, selecting the appropriate cancellation reason can optimize the process. By understanding common reasons and providing valuable feedback, users can ensure a seamless experience.
Common Reasons
Users cancel Hostinger subscriptions for various reasons. Here are some common reasons:
- Service Quality: Issues with uptime or speed.
- Pricing: Finding more affordable options.
- Support: Dissatisfaction with customer service.
- Features: Needing advanced features not offered.
- Business Closure: No longer needing hosting services.
Providing Feedback
When canceling, providing feedback is crucial. This helps Hostinger improve their services. Here’s how to provide effective feedback:
- Be Specific: Detail the issues you faced.
- Be Honest: Provide truthful reasons for your dissatisfaction.
- Suggest Improvements: Offer constructive suggestions for service enhancement.
Your feedback can lead to better services for all users. It also helps Hostinger address specific concerns and improve.
Confirming Cancellation
Cancelling your Hostinger subscription involves several steps. Confirming the cancellation is crucial. This ensures you won’t be charged further. Follow these steps to confirm your cancellation:
Reviewing Terms
Before finalizing, review Hostinger’s cancellation terms. Check if there are any cancellation fees or refund policies applicable. This helps you understand any financial implications.
| Policy Aspect | Details |
|---|---|
| Refund Eligibility | Full refund within 30 days of purchase. |
| Cancellation Fees | No fees for basic plans; check for premium plans. |
| Service Downtime | Service ends immediately upon cancellation. |
Finalizing The Process
Once terms are reviewed, proceed to finalize the cancellation. Follow these steps:
- Log in to your Hostinger account.
- Navigate to the Billing section.
- Select the subscription you want to cancel.
- Click on Cancel Subscription.
- Confirm your decision when prompted.
After confirming, you will receive a confirmation email. Check your email for this confirmation. This email serves as proof of cancellation.
Handling Refunds
Canceling a Hostinger subscription is simple. But handling refunds can be confusing. This section will help you understand the process.
Eligibility Criteria
Not all subscriptions are eligible for a refund. To be eligible, you must meet specific criteria.
- You must request a refund within 30 days of the subscription.
- Only first-time purchases are eligible for refunds.
- Domain names and SSL certificates are non-refundable.
Processing Time
Once you request a refund, the processing time varies.
| Payment Method | Processing Time |
|---|---|
| Credit/Debit Card | 5-7 business days |
| PayPal | 1-2 business days |
| Cryptocurrency | Not eligible for refunds |
Keep these times in mind. Plan your cancellation accordingly. It ensures a smooth refund process.
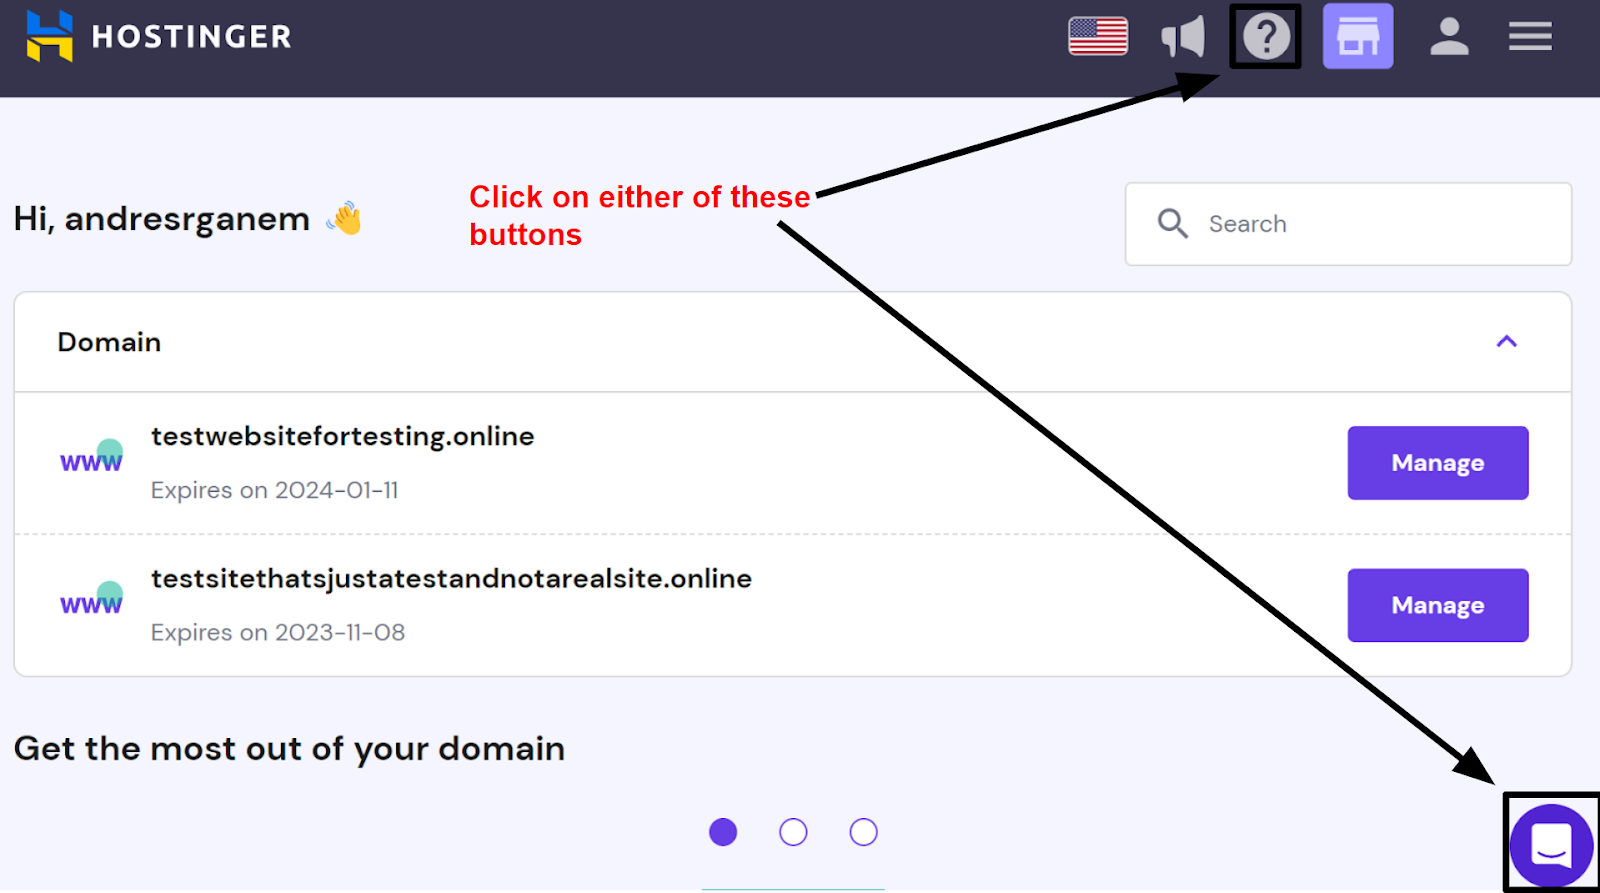
Contacting Customer Support
Canceling your Hostinger subscription may seem daunting. But the customer support team is ready to assist. This section provides information on how to reach them. Find the best way to get your issues resolved quickly.
Available Channels
Hostinger offers multiple channels for support:
- Live Chat: Available 24/7 for instant help.
- Email: Send detailed queries to support@hostinger.com.
- Support Ticket: Log in to your account and submit a ticket.
Each channel has its benefits. Choose the one that fits your needs.
Escalating Issues
If your issue remains unresolved, you can escalate the matter:
- Reopen the support ticket or start a new one.
- Request to speak with a supervisor.
- Provide all relevant details to speed up the process.
Escalation ensures that your concerns get the attention they deserve. The support team aims to resolve all issues promptly.
| Support Channel | Availability | Response Time |
|---|---|---|
| Live Chat | 24/7 | Instant |
| 24/7 | 24 Hours | |
| Support Ticket | 24/7 | 24-48 Hours |
Choose the best method for your situation. The goal is to cancel your Hostinger subscription smoothly.
Post-cancellation Steps
After canceling your Hostinger subscription, follow a few essential steps. These steps ensure a smooth transition and safeguard your data. This guide will help you through the post-cancellation process.
Data Backup
It’s crucial to back up your website data before canceling your subscription. You don’t want to lose important files and databases. Follow these steps to secure your data:
- Log into your Hostinger account.
- Navigate to the File Manager in the control panel.
- Select all necessary files and databases.
- Download them to your local storage or cloud storage.
Alternatively, you can use FTP clients like FileZilla. These clients allow you to transfer files directly to your computer. Ensure all vital data is backed up securely.
Alternative Services
After cancellation, you need a new hosting service. Consider these alternatives:
| Service | Features | Pricing |
|---|---|---|
| Bluehost | 24/7 support, free SSL, 1-click WordPress install | Starts at $3.95/month |
| SiteGround | Daily backups, managed WordPress, free CDN | Starts at $6.99/month |
| A2 Hosting | Turbo servers, free site migration, anytime money-back | Starts at $2.99/month |
Each service offers unique features and pricing. Choose one that fits your needs and budget. Always compare features and read reviews before deciding.
Credit: www.websiteplanet.com
Frequently Asked Questions
How Do I Cancel My Subscription From Hostinger?
To cancel your Hostinger subscription, log in to your account, go to the “Billing” section, and select “Cancel Subscription. ” Confirm the cancellation to complete the process.
How Do I Close My Hostinger Account?
To close your Hostinger account, log in, go to the ‘Account’ section, and select ‘Delete Account’. Follow the prompts.
How Do I Cancel My Domain And Get A Refund From Hostinger?
To cancel your domain and get a refund from Hostinger, log in to your account. Navigate to the ‘Billing’ section. Select ‘Services’, then choose your domain. Click ‘Cancel’ and request a refund. Ensure you comply with their refund policy.
How Do I Stop Hosting A Website On Hostinger?
Log in to your Hostinger account. Navigate to the “Hosting” section. Select your website. Click “Deactivate” or “Delete” from the options. Confirm the action.
Conclusion
Canceling your Hostinger subscription is straightforward with the steps outlined in this guide. Follow the instructions carefully to avoid any issues. Always double-check your account settings to ensure everything is in order. If you encounter problems, Hostinger’s support team is readily available to assist.


