To use Hostinger email in Outlook, configure the email account using the IMAP/SMTP server settings provided by Hostinger. Ensure you input accurate credentials.
Hostinger provides reliable email services that seamlessly integrate with Outlook. This integration allows users to manage their emails efficiently in a familiar environment. Setting up Hostinger email in Outlook is straightforward, requiring only the correct server settings and login details.
By following simple steps, you can access your Hostinger email directly through Outlook, ensuring streamlined communication. This setup enhances productivity, allowing you to handle emails, contacts, and calendar events in one place. Whether for personal or business use, Hostinger email in Outlook offers a user-friendly experience. Enjoy the convenience of managing all your correspondence from one central hub.

Credit: m.youtube.com
Setting Up Hostinger Email
Setting up your Hostinger email in Outlook is easy. Follow these steps to get started. First, you need to access Hostinger and create an email account. Then, you can configure your Outlook to send and receive emails. Let’s dive in!
Accessing Hostinger
To begin, log in to your Hostinger account. You can access the dashboard from the Hostinger website. Follow these steps:
- Go to the Hostinger website.
- Click on the “Login” button at the top right.
- Enter your login credentials and click “Sign In”.
Once logged in, you will see the Hostinger control panel. This is where you manage all your services.
Creating An Email Account
Next, you need to create an email account. Follow these steps:
- In the control panel, go to the “Emails” section.
- Click on “Email Accounts”.
- Click on the “Create” button.
Fill in the following details:
- Email: Choose a unique email address.
- Password: Create a strong password.
Click on the “Create” button to finish. Your new email account is now ready to use.

Credit: www.hostinger.com
Configuring Outlook
Configuring Outlook to use your Hostinger email is simple. Follow these steps to ensure your email works seamlessly.
Opening Outlook
First, open Outlook on your computer. You can do this by clicking the Outlook icon on your desktop or searching for Outlook in your start menu. Make sure you have your Hostinger email credentials handy.
Navigating Settings
Once Outlook is open, you’ll need to navigate to the settings to add your Hostinger email. Follow these easy steps:
- Click on File in the top-left corner.
- Select Account Settings and then Manage Profiles.
- In the new window, click on Email Accounts.
Now, it’s time to add your Hostinger email account. Follow these instructions:
- Click on New.
- Select Email Account and click Next.
- Enter your Hostinger email address and click Connect.
Manual Setup
If automatic setup fails, use manual setup:
- Select IMAP or POP.
- Enter your incoming and outgoing server details:
| Field | Details |
|---|---|
| Incoming Mail Server | imap.hostinger.com (or pop.hostinger.com) |
| Outgoing Mail Server | smtp.hostinger.com |
| Port (IMAP/POP) | 993/995 |
| Port (SMTP) | 465 |
Finalizing Setup
Once you’ve entered all necessary information, click Next and then Finish. Outlook will now test your account settings. If everything is correct, you will see a success message.
Adding A New Email Account
Setting up your Hostinger email in Outlook is simple. You can choose between a manual setup or an automatic setup. Follow the steps below to get started.
Manual Setup
To manually add a new email account in Outlook, follow these steps:
- Open Outlook and go to File.
- Click on Add Account.
- Select Manual setup or additional server types, then click Next.
- Choose POP or IMAP and click Next.
- Fill in your name and email address in the User Information section.
- In the Server Information section, choose your account type (POP3 or IMAP). Enter your incoming and outgoing mail server details from Hostinger.
- Enter your login information, including your full email address and password.
- Click on More Settings, go to the Outgoing Server tab, and check the box for My outgoing server (SMTP) requires authentication.
- Click on the Advanced tab and enter the correct port numbers for your incoming and outgoing servers.
- Click OK, then Next, and finally Finish.
Automatic Setup
To automatically set up your Hostinger email in Outlook, follow these steps:
- Open Outlook and go to File.
- Click on Add Account.
- Enter your email address and click Connect.
- Outlook will automatically find your email settings. Enter your password when prompted.
- Click Connect to finish the setup.
With these steps, you can easily connect your Hostinger email to Outlook. Whether you prefer a manual setup or an automatic one, you are covered.
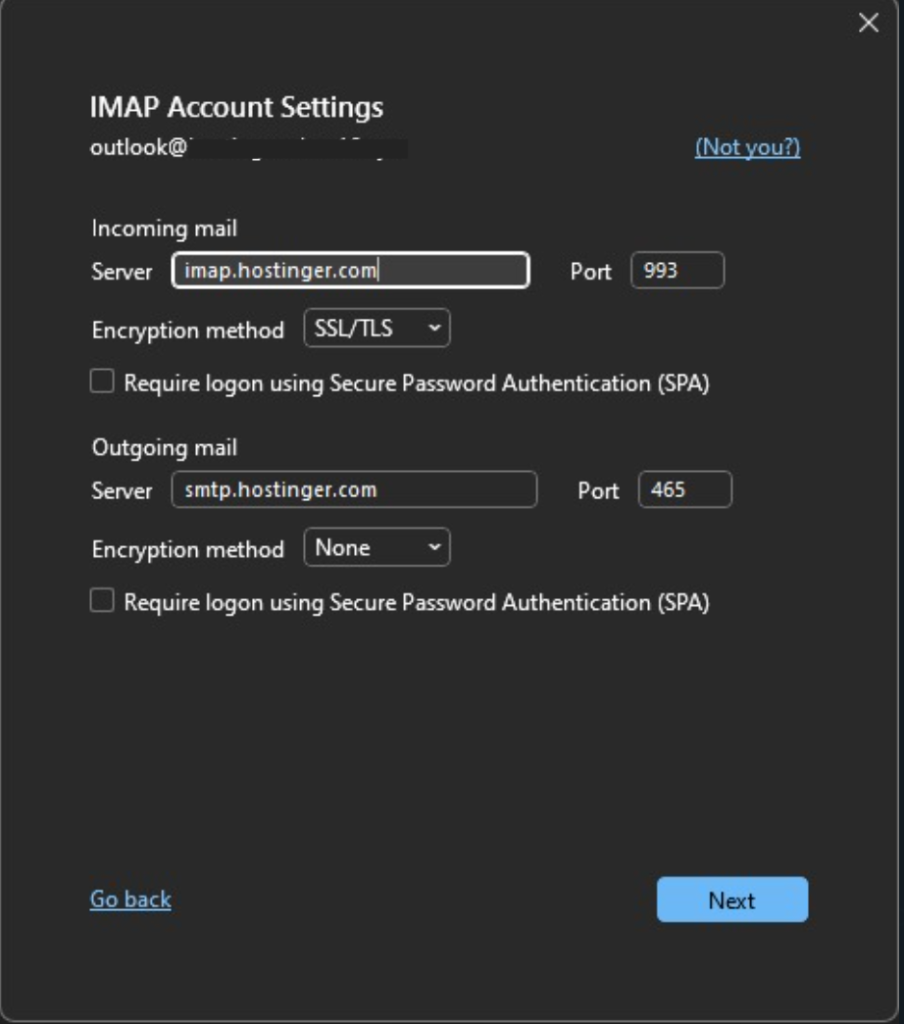
Entering Hostinger Email Details
Entering Hostinger email details into Outlook is a straightforward process. This process ensures seamless integration for managing your Hostinger email via Outlook. Let’s walk through the steps to configure your email settings efficiently.
Incoming Mail Server
The incoming mail server settings help you receive emails. Ensure you enter the correct settings.
- Server: imap.hostinger.com (for IMAP) or pop.hostinger.com (for POP3)
- Port: 993 (IMAP) or 995 (POP3)
- Encryption: SSL/TLS
- Username: Your full email address
- Password: Your email account password
Outgoing Mail Server
The outgoing mail server settings help you send emails. Ensure these settings are accurate.
- Server: smtp.hostinger.com
- Port: 465 (SSL) or 587 (TLS)
- Encryption: SSL/TLS
- Username: Your full email address
- Password: Your email account password
These settings will let you use Hostinger email in Outlook. Follow each step to ensure your email works perfectly.
Testing Email Configuration
Once you have set up your Hostinger email in Outlook, it’s crucial to test the configuration. This ensures that your email account is working correctly. Testing involves sending a test email and resolving any issues that may arise.
Sending A Test Email
Follow these steps to send a test email:
- Open Outlook.
- Click on New Email.
- Enter your own email address in the To field.
- Type Test Email in the subject line.
- Click Send.
Wait a few seconds and check your inbox. You should receive the test email you sent. If the email appears, your configuration is correct.
Troubleshooting Common Issues
If you don’t receive the test email, try these troubleshooting tips:
- Check your Internet connection: Ensure you are connected to the internet.
- Verify email settings: Double-check your incoming and outgoing server settings in Outlook.
- Review your spam folder: Sometimes emails get redirected to the spam folder.
- Restart Outlook: Close and reopen Outlook to refresh the settings.
If the issue persists, consider contacting Hostinger support for further assistance.

Credit: www.youtube.com
Advanced Settings
To make the most out of your Hostinger email in Outlook, you need to delve into the Advanced Settings. These settings help you manage your email efficiently, ensuring security and proper synchronization. Let’s break down the advanced settings into easy-to-follow steps.
Sync Settings
Proper synchronization is key to staying on top of your emails. Follow these steps to set up sync settings:
- Open Outlook and go to File.
- Select Account Settings and then Account Settings again.
- Choose your Hostinger email account and click Change.
- Under Offline Settings, move the slider to your preferred sync period.
- Click Next and then Finish.
Adjusting these settings ensures that your emails sync efficiently, allowing you to access them offline.
Security Options
Securing your email is crucial. Hostinger offers several security options to keep your data safe. Here’s how to set them up:
- Navigate to File and select Account Settings.
- Choose your Hostinger email account and click Change.
- Click on More Settings and go to the Advanced tab.
- Under the Encryption section, select SSL/TLS for both Incoming and Outgoing servers.
- Click OK and then Next.
- Finally, click Finish to save the changes.
These steps will enhance the security of your email, protecting it from unauthorized access.
Tips And Best Practices
Using Hostinger Email in Outlook can elevate your email management. Below are tips and best practices to enhance your experience.
Managing Storage
Efficient storage management ensures optimal email performance. Implement these strategies:
- Regular Cleanup: Delete unnecessary emails and old attachments.
- Archiving: Move old emails to an archive folder.
- Attachment Management: Save large attachments to cloud storage.
- Folder Organization: Use folders to categorize emails.
Organizing your inbox reduces clutter and improves search efficiency. Keep your storage usage under control to avoid slow performance.
Improving Email Efficiency
Boost productivity with these email efficiency tips:
- Use Filters: Automatically sort incoming emails into folders.
- Set Up Rules: Create rules for repetitive tasks.
- Keyboard Shortcuts: Learn shortcuts for quick navigation.
- Flag Important Emails: Use flags to highlight crucial emails.
Filters and rules automate tasks, saving time. Keyboard shortcuts speed up email management.
Flagging important emails ensures critical messages stand out.
Frequently Asked Questions
How To Integrate Hostinger Email With Outlook?
To integrate Hostinger email with Outlook, open Outlook, navigate to “File” > “Add Account,” and enter your Hostinger email credentials. Use the IMAP/SMTP server settings from Hostinger’s email configuration page. Ensure all settings are correct, then click “Next” and “Finish” to complete the setup.
How To Connect Company Email To Outlook?
Open Outlook. Go to File > Add Account. Enter your company email address. Select Manual setup. Choose the account type and enter server settings. Click Finish.
What Is The Imap Server For Hostingers?
The IMAP server for Hostinger is `imap. hostinger. com`. Use port 993 for a secure SSL/TLS connection.
What Email Platform Does Hostinger Use?
Hostinger uses Titan Email for its professional email services. Titan Email offers reliable and feature-rich email solutions.
Conclusion
Setting up Hostinger email in Outlook is straightforward and efficient. Follow the steps outlined, and you’ll streamline your communication effortlessly. Enjoy seamless email management with this powerful combination. By integrating Hostinger email with Outlook, you enhance productivity and stay organized.
Take advantage of this simple yet effective setup today.