To access Bluehost email, log in to your Bluehost account and navigate to the Email & Office tab. Click on the “Check Email” button.
Bluehost provides a reliable and user-friendly email service for businesses and individuals. Their platform offers various features, including secure email hosting and easy integration with other email clients. This makes managing your professional and personal communications seamless. By using Bluehost email, you can benefit from their robust security measures and excellent customer support.
This ensures that your emails are not only easy to access but also safe from potential threats. Whether you’re running a small business or managing personal emails, Bluehost’s email service can cater to your needs efficiently.
Creating A Bluehost Account
Creating a Bluehost account is the first step to accessing Bluehost email. This guide will show you how to sign up and choose a plan.
Signing Up
To get started, visit the Bluehost website. Click on the “Get Started” button.
Enter your domain name if you have one. You can also choose to create a new domain.
Fill in your personal details like name, address, and email.
Next, you will need to set up your account password. Ensure it’s strong and unique.
Choosing A Plan
Bluehost offers multiple plans. Choose the one that suits your needs.
Here is a quick overview of the plans:
| Plan | Features |
|---|---|
| Basic | 1 Website, Free Domain, 50 GB SSD Storage |
| Plus | Unlimited Websites, Free Domain, Unlimited SSD Storage |
| Choice Plus | Unlimited Websites, Free Domain, Unlimited SSD Storage, Domain Privacy |
Select the plan that fits your budget and needs.
After choosing a plan, you will see the payment section. Fill in your payment information to complete the sign-up process.
Now you have a Bluehost account. You can access your email by logging in to your Bluehost dashboard.
Setting Up Your Email
Setting up your email on Bluehost is easy and quick. Follow these steps to get started. You’ll have your email running in no time.
Navigating To Email Settings
First, log in to your Bluehost account. You’ll see the dashboard. Look for the “Advanced” tab on the left side. Click on it. Then find “Email Accounts” under the Email section.
Clicking on “Email Accounts” will take you to the email settings page. Here you can manage your email addresses. This is where you can create new email addresses or manage existing ones.
Creating Email Addresses
On the Email Accounts page, click the “Create” button. This button lets you set up a new email address. A form will appear.
Fill in the details in the form. Enter the email address you want to create. Choose a strong password for security. You can also set a storage limit for the email account.
| Field | Description |
|---|---|
| Enter the desired email address. | |
| Password | Choose a strong password. |
| Storage Limit | Set the mailbox storage size. |
Once you have filled in the details, click “Create”. Your new email address is now set up. You can access it via webmail or configure it on your email client.
That’s it! You have successfully set up your email on Bluehost.
Accessing Your Email
Bluehost provides a simple way to access your email. Whether you prefer webmail or an email client, this guide will help you. Follow the steps to access your Bluehost email easily.
Using Webmail
To access your email via webmail, follow these steps:
- Log in to your Bluehost account.
- Go to the Advanced tab in the left-hand menu.
- Select Email Accounts under the Email section.
- Find the email account you want to access and click Check Email.
- Choose the webmail application you prefer, such as Roundcube or Horde.
Webmail lets you access your email from any browser. It’s quick and easy.
Configuring Email Clients
To configure your email client, use these settings:
| Setting | Value |
|---|---|
| Incoming Server | mail.yourdomain.com |
| Outgoing Server | mail.yourdomain.com |
| IMAP Port | 993 |
| POP3 Port | 995 |
| SMTP Port | 465 |
| SSL | Enabled |
| Username | Your full email address |
| Password | Your email password |
Popular email clients include:
- Microsoft Outlook
- Apple Mail
- Mozilla Thunderbird
Follow the specific instructions for your email client. This ensures a smooth setup.
Mobile Access
Accessing your Bluehost email on a mobile device is simple. This guide helps you set up your email on both iOS and Android devices.
Ios Setup
Follow these steps to set up your Bluehost email on your iPhone or iPad:
- Open the Settings app.
- Scroll down and tap Mail.
- Select Accounts.
- Tap Add Account.
- Choose Other.
- Tap Add Mail Account.
Fill in the following details:
| Field | Information |
|---|---|
| Name | Your Name |
| yourname@yourdomain.com | |
| Password | Your Email Password |
| Description | Bluehost Email |
Tap Next and ensure IMAP is selected. Fill in the server settings:
| Field | Information |
|---|---|
| Incoming Mail Server |
|
| Outgoing Mail Server |
|
Tap Save. Your Bluehost email is now set up on iOS.
Android Setup
Follow these steps to set up your Bluehost email on an Android device:
- Open the Email app.
- Tap Add Account.
- Enter your email address: yourname@yourdomain.com.
- Enter your password: Your Email Password.
- Tap Manual Setup.
Select IMAP and fill in the server settings:
| Field | Information |
|---|---|
| Incoming Server |
|
| Outgoing Server |
|
Tap Next. Your Bluehost email is now set up on Android.
Troubleshooting
Accessing your Bluehost email should be simple. Sometimes, you might face issues. Here are some common problems and solutions. This section will help you fix them.
Common Issues
Several issues can arise when accessing your Bluehost email. Here are the most common ones:
- Incorrect Login Details: Double-check your username and password.
- Server Issues: The email server might be down.
- Browser Problems: Clear your browser cache or try a different browser.
- Email Client Settings: Ensure your email client settings are correct.
Contacting Support
If you still can’t access your email, contact Bluehost support. They can help you quickly. Here are the steps:
- Visit the Bluehost Support page.
- Click on Live Chat or Call Support.
- Provide your account details and explain the issue.
Bluehost support is available 24/7. They can solve most problems promptly. Don’t hesitate to reach out for help.

Credit: m.youtube.com
Advanced Settings
Accessing Bluehost email offers several advanced settings for a tailored experience. These settings enhance email functionality and security. Below, we’ll explore key advanced features.
Email Forwarding
Email forwarding lets you automatically send emails from one address to another. This feature is useful for managing multiple email accounts.
- Log in to your Bluehost account.
- Navigate to the Email & Office tab.
- Select the desired email account.
- Click on Manage and choose Email Forwarding.
- Enter the email address where messages should be forwarded.
- Click Save to apply the settings.
Spam Filters
Spam filters help keep your inbox clean from unwanted emails. Setting up these filters is easy and effective.
| Step | Action |
|---|---|
| 1 | Log in to your Bluehost account. |
| 2 | Go to the Email & Office section. |
| 3 | Select your email account and click Manage. |
| 4 | Navigate to the Spam Filters option. |
| 5 | Choose the desired spam filter settings. |
| 6 | Click Save to activate the filters. |
By using these advanced settings, you can streamline your email management. Make your Bluehost email experience more efficient and secure.
Security Tips
Keeping your Bluehost email secure is crucial. This section covers key security tips to protect your account. Follow these practices to ensure your email remains safe from threats.
Setting Strong Passwords
Creating a strong password is the first step to securing your email. Use a combination of letters, numbers, and symbols. Avoid common words or easily guessable information like your name or birthdate.
- Use at least 12 characters.
- Include uppercase and lowercase letters.
- Add numbers and special characters.
- Avoid using the same password for multiple accounts.
Consider using a password manager to store and generate strong passwords.
Two-factor Authentication
Enable two-factor authentication (2FA) for an extra layer of security. With 2FA, you’ll need your password and a second form of verification.
- Log in to your Bluehost account.
- Go to the security settings.
- Select “Enable Two-Factor Authentication.”
- Follow the instructions to set up 2FA.
2FA can use SMS, an authentication app, or a physical security key.
This makes it harder for unauthorized users to access your email.

Credit: www.bluehost.com
Credit: www.bluehost.com
Frequently Asked Questions
How Do I Access My Bluehost Email Account?
Log in to your Bluehost account. Go to the Email tab and select your email account. Click on “Webmail Login. “
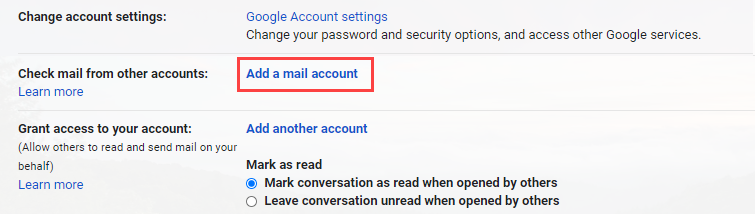
How Do I Open A Bluehost Email In Gmail?
To open a Bluehost email in Gmail, first, log into your Gmail account. Go to Settings, then Accounts and Import. Click “Add a mail account” and enter your Bluehost email address. Follow the prompts to complete the setup.
What Is The Url For Bluehost Email?
The URL for Bluehost email is https://login. bluehost. com. Access your Bluehost email through this link.
How Do I Access My Domain Email Account?
Log in to your domain email via your webmail URL. Use your email address and password.
Conclusion
Accessing your Bluehost email is straightforward with these steps. Follow the guide to manage your emails efficiently. Stay organized and enjoy seamless communication with Bluehost’s user-friendly platform. For more tips on optimizing your email experience, explore our other blog posts.
Happy emailing!